Repair
52
332144E
Drive Housing
Removal
1.
See Before Beginning Repair, page 40.
2.
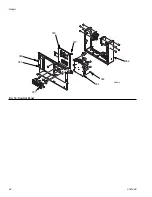
Remove screws (207) and end covers (229), see
F
IG
. 18.
NOTE: Examine connecting rod (216). If rod needs
replacing, first remove the pump (219), page 42.
3.
Disconnect pump inlet and outlet lines. Remove
screws (220) and pull drive housing (215) off motor
(201) Connecting rod (216) will disengage from
crankshaft (210).
4.
Examine crankshaft (210), gear reducer (214),
thrust washers (208, 212), and bearings (209, 211,
213).
Installation
1.
Apply grease liberally to washers (208, 212), bear-
ings (209, 211, 213), gear reducer (214), crankshaft
(210), and inside drive housing (215). Grease is
supplied with replacement parts kits.
NOTE: RES side crankshaft (210) includes the cycle
counter magnet (224). When reassembling, be sure to
install crankshaft with magnet on RES side.
If replacing crankshaft, remove magnet (224). Reinstall
magnet in center of offset shaft on new crankshaft. Posi-
tion shaft in Park position.
2.
Install bronze bearings (211, 213) in drive housing
(215), as shown.
3.
Install bronze bearings (209, 211) and steel washer
(208) on crankshaft (210). Install bronze bearing
(213) and steel washer (212) on gear reducer (214).
4.
Install gear reducer (214) and crankshaft (210) into
motor end bell (MB).
NOTE: Crankshaft (210) must be in line with crankshaft
at other end of motor. Pumps will move up and down
together.
NOTE: If connecting rod (216) or pump (219) were
removed, reassemble rod in housing and install pump,
page Displacement Pump, page 42.
5.
Push drive housing (215) onto motor (201). Install
screws (220).
6.
Install drive housing covers (229) and screws (207).
Pumps must be in phase (both at same position in
stroke).
NOTICE
To prevent equipment damage, do not drop gear
reducer (214) and crankshaft (210) when removing
drive housing (215). These parts may stay engaged in
motor end bell (MB) or may pull away with drive hous-
ing.

