Operation
3A8108A
23
Operation
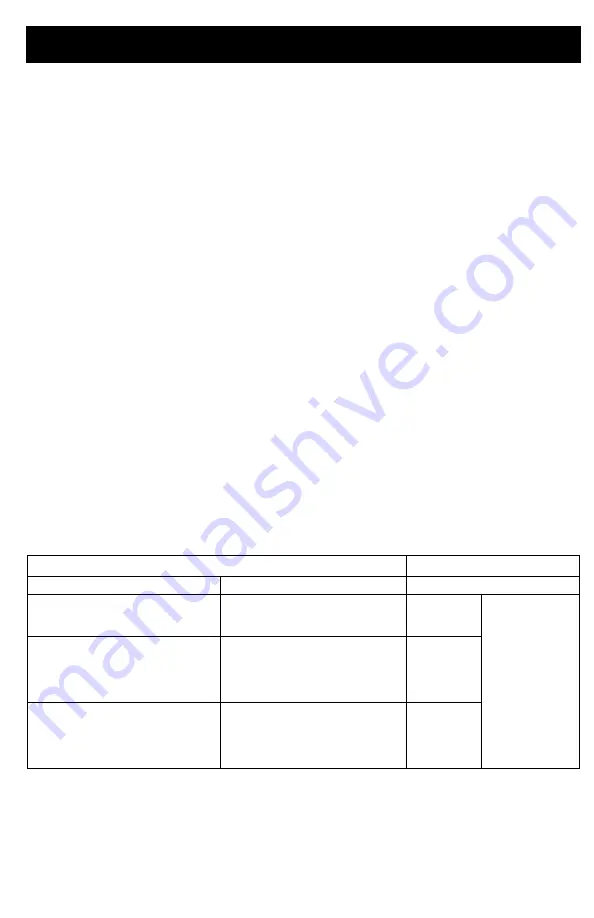
Modes of Operation
The method used to apply tape is set by the
combination of the
TAPE LINE TYPE
setting
and the
MODE
setting. Once both are set via
the display, tape application is started and
stopped with the tape application button
mounted on the handlebar.
Notes:
•
If the carriage is in the UP position, the
control will not allow taping to start.
•
The lengths of skips and spaces are set
on the Tape Skip and Space Lengths
striping screen. Preset lengths can be
selected by pressing the 'A', 'B', or 'C'
button. New presets can be saved by
pressing and holding the preset buttons.
•
Semi-Auto and Skip is the most
commonly used mode of operation and
is recommended for majority of
applications.
•
Unit can begin laying with a space
instead of a line, if desired. This can be
accessed in the Settings Menu.
•
CUT DELAY – the end of each skip can
be adjusted if necessary to correct for
mechanical variations that cause a
discrepancy between the programmed
skip length and the actual length of tape
placed on the road. To adjust Cut Delay,
see,
, page 33. Note that in
AUTO mode, the corresponding space
distance is also adjusted to maintain the
set cycle length (sum of the skip and
space lengths).
•
Discrepancies with line length accuracy,
especially in AUTO MODE, can be
improved by adding weight in the
on-board payload compartment
between the rear axle.
DO NOT
add
weight to the front of the TapeLazer, as
this will cause the rear tire to lose
connection to the pavement causing loss
of wheel sensor accuracy.
•
Refer to LazerGuide manual (3A5294)
for installation and operating instructions
if using the LazerGuide instead of the
mechanical pointer.
Tape Line Type (Press for solid and hold for skip)
Solid
Skip
Press the tape application button
once to start applying a continuous
line of tape, press again to cut.
Press the tape application button
once to lay a single skip of a
designated length.
Semi-Auto
Mode
(Press “D”
button to cycle
through
modes)
Press the tape application button
once to start applying a continuous
line of tape, press again to cut.
Press the tape application button
once to start applying the set
skip-space cycle. Press tape
application button again to end
cycle.
Automatic
Press and hold the tape
application button to lay a
continuous line of tape. Release
tape application button to cut.
Press and hold the tape
application button to start
applying the set skip-space
cycle. Release tape application
button to end cycle.
Manual
Summary of Contents for TapeLazer HP Automatic
Page 15: ...Setup Startup 3A8108A 15 7 Using a 1 4 in Allen wrench tighten bolts ...
Page 25: ...Operation 3A8108A 25 TapeLazer LiveLook Display ...
Page 51: ...Troubleshooting 3A8108A 51 Solenoid Ports Reference ...
Page 52: ...Parts 52 3A8108A Parts TapeLazer Parts ...
Page 54: ...Parts 54 3A8108A Front End Parts ...
Page 56: ...Parts 56 3A8108A Carriage Applicator Parts ...
Page 58: ...Parts 58 3A8108A Display Unit Parts ...
Page 60: ...Parts 60 3A8108A Additional Parts ...
Page 62: ...Air Line Schematic 62 3A8108A Air Line Schematic ...
Page 64: ...Wiring Diagram 64 3A8108A Wiring Diagram ...
Page 65: ...Universal Symbols Key 3A8108A 65 Universal Symbols Key ...