


Operation
3A8108A
27
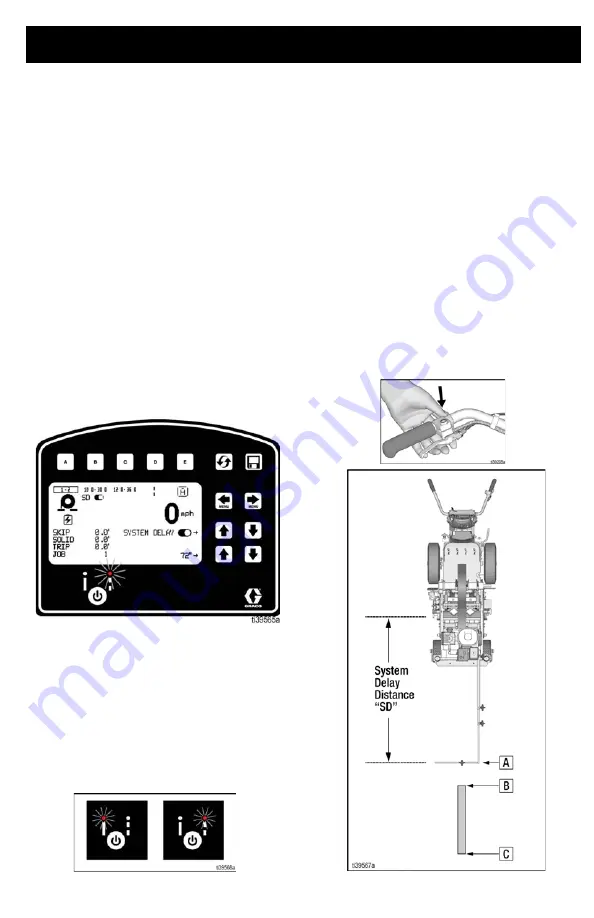
System Delay
System Delay (SD)
improves tape
placement accuracy by allowing the operator
to look forward at the line guide mechanism,
important for maintaining straight lines. With
System Delay
turned on, the line guide
mechanism becomes the activation point for
turning ON and OFF the placement of tape.
Setup System Delay
1.
Turn System Delay ON.
2.
Extend pointer to preferred distance
necessary to achieve long straight lines.
3.
Measure the System Delay Distance
from the blade to the pointer [A] as
shown in the example on the right. Due
to the viewing angle from the operator
position some amount of adjustment
may be necessary to properly view the
pointer.
Operating System Delay
1.
Turn System Delay ON.
2.
With System Delay, the pointer [A]
becomes the initiation point for all starts
and stops activated by the tape
application button.
3.
Choose Line Type, SOLID or SKIP. Line
Type is indicated by LED after selection.
4.
Choose Mode: Manual [M], Semi-Auto
[S], or Auto [A].
5.
Example below, when the pointer [A]
reaches start point [B] press (or hold in
manual mode) the tape application
button. When the pointer reaches the
end point [C] press tape application
button a second time (or release in
manual mode) to end the marking
process.
NOTE:
After the first button press a progress
bar will appear on the display screen showing
the delay travel distance. No tape is applied
during this travel. In most situations, tape will
begin to dispense at the end of this travel (the
exception is with the START with SPACE
setting). The progress bar will also display after
the last button push. At the end of that travel, all
taping will stop
Tape Application Button
Summary of Contents for TapeLazer HP Automatic
Page 15: ...Setup Startup 3A8108A 15 7 Using a 1 4 in Allen wrench tighten bolts ...
Page 25: ...Operation 3A8108A 25 TapeLazer LiveLook Display ...
Page 51: ...Troubleshooting 3A8108A 51 Solenoid Ports Reference ...
Page 52: ...Parts 52 3A8108A Parts TapeLazer Parts ...
Page 54: ...Parts 54 3A8108A Front End Parts ...
Page 56: ...Parts 56 3A8108A Carriage Applicator Parts ...
Page 58: ...Parts 58 3A8108A Display Unit Parts ...
Page 60: ...Parts 60 3A8108A Additional Parts ...
Page 62: ...Air Line Schematic 62 3A8108A Air Line Schematic ...
Page 64: ...Wiring Diagram 64 3A8108A Wiring Diagram ...
Page 65: ...Universal Symbols Key 3A8108A 65 Universal Symbols Key ...


