background image

309303

25

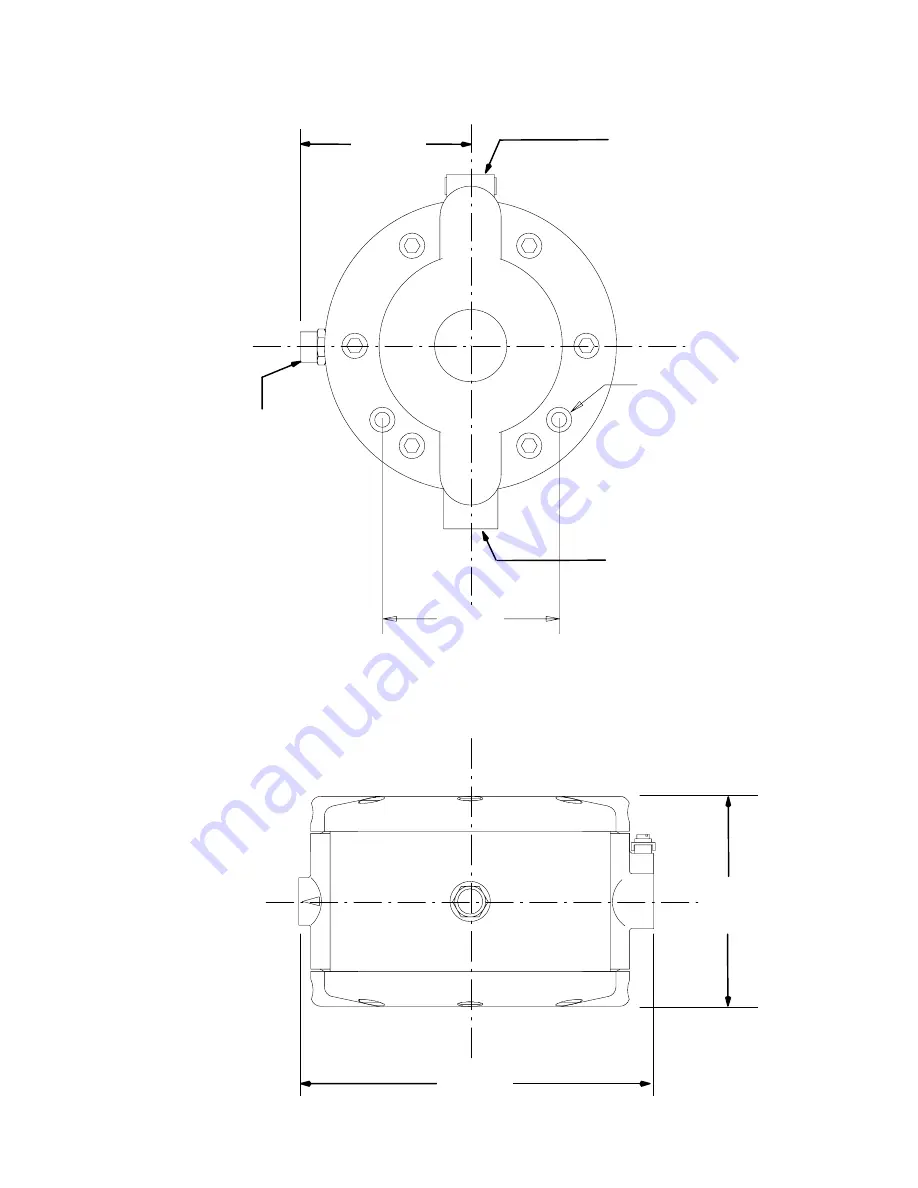
Dimensions

BOTTOM VIEW

SIDE VIEW

Two 0.35 in. (9 mm) diameter

holes, for mounting pump

4.1 in.

(104 mm)

4.53 in.

(115 mm)

3/8 npt Fluid Outlet

3/4 npt Fluid Inlet

1/4 npt Air Inlet

4.88 in.

(124 mm)

8.58 in.

(218 mm)

ti1037a

Summary of Contents for Triton 308

Page 1: ...R REFERENCE 1 1 RATIO TRITONt 308 Diaphragm Pump 115 psi 0 8 MPa 8 bar Maximum Fluid Working Pressure 115 psi 0 8 MPa 8 bar Maximum Air Input Pressure Part No 233500 Aluminum Pump Series A Part No 233501 Stainless Steel Pump Series A US and Foreign Patents Pending GRACO INC P O BOX 1441 MINNEAPOLIS MN 55440 1441 ECOPYRIGHT 2001 GRACO INC Graco Inc is registered to I S EN ISO 9001 Parts ...

Page 2: ...pair 18 Shaft Repair 20 Parts 22 Technical Data 24 Dimensions 25 Graco Standard Warranty 26 Graco Toll Free Phone Numbers 26 Symbols Warning Symbol WARNING This symbol alerts you to the possibility of serious injury or death if you do not follow the instructions Caution Symbol CAUTION This symbol alerts you to the possibility of damage to or destruction of equipment if you do not follow the instru...

Page 3: ... 8 bar maximum working pressure at 115 psi 0 8 MPa 8 bar maximum incoming air pressure D Use fluids and solvents which are compatible with the equipment wetted parts Refer to the Tech nical Data section of all equipment manuals Read the fluid and solvent manufacturer s warnings D Aluminum pumps only Never use 1 1 1 trichloroethane methylene chloride other halogenated hydrocarbon solvents or fluids...

Page 4: ...ly Do not use the equipment until you identify and correct the problem D Provide fresh air ventilation to avoid the buildup of flammable fumes from solvents or the fluid being pumped D Keep the work area free of debris including solvent rags and gasoline D Electrically disconnect all equipment in the work area D Extinguish all open flames or pilot lights in the work area D Do not smoke in the work...

Page 5: ...ngs daily Replace parts immediately if worn damaged or loose Permanently coupled hoses cannot be repaired TOXIC FLUID HAZARD Hazardous fluids or toxic fumes can cause a serious injury or death if splashed in the eyes or on the skin swallowed or inhaled D Know the specific hazards of the fluid you are using Read the fluid manufacturer s warnings D Store hazardous fluid in an approved container Disp...

Page 6: ...unless ventilation fans are operating Check and follow all of the national state and local codes regarding air exhaust velocity requirements WARNING TOXIC FLUID HAZARD Hazardous fluid or toxic fumes can cause serious injury or death if splashed in the eyes or on the skin inhaled or swallowed 1 Read TOXIC FLUID HAZARD on page 5 2 Use fluids and solvents which are compatible with the equipment wette...

Page 7: ... all of this equipment D Pump Attach a ground wire Y to the pump s grounding clamp 35 and secure with the screw as shown in Fig 1 Connect the clamp end of the ground wire to a true earth ground Order Part No 238909 Ground Wire and Clamp Fig 1 Y 35 ti1030a D Air and fluid hoses Use only electrically conductive hoses D Air compressor Follow the manufacturer s recom mendations D Solvent pails used wh...

Page 8: ... the pump air regula tor F On the fluid side install a fluid regula tor H near the pump fluid outlet b Locate a bleed type master air valve B close to the pump to relieve trapped air See the WARNING at left Locate another air valve E upstream from all air line accessories to isolate them during cleaning and repair c Install an air line filter D to remove harmful contaminants such as dirt moisture ...

Page 9: ...only J Drain circulation valve K Drain tube L Suction tube M Pump fluid inlet 3 4 npt f N Pump fluid outlet 3 8 npt f P Fluid hose shown connected to gun in spray system R Gun air hose used in spray system only S Spray gun used in spray system only T Pump air inlet 1 4 npt f U Agitator used in spray system only V Air line quick disconnect Y Ground wire ti1007a Fig 2 A P Wall Mount HVLP Spray Insta...

Page 10: ... relief valve at the pump outlet to prevent overpres surization and rupture of the pump or hose Thermal expansion of fluid in the outlet line can cause overpressurization This can occur when using long fluid lines exposed to sunlight or ambient heat or when pumping from a cool to a warm area for example from an underground tank Overpressurization can also occur if the pump is being used to feed fl...

Page 11: ...ion Hazard on page 4 4 Check all fittings to be sure they are tight Use a compatible liquid thread sealant on all male threads Tighten the fluid inlet and outlet fittings snugly Do not overtighten the fittings 5 Place the suction tube L if used in the fluid to be pumped 6 Place the fluid hose P in a container 7 Close the drain circulation valve J 8 Close the pump air regulator F Open all bleed typ...

Page 12: ...re Troubleshooting WARNING To reduce the risk of serious injury whenever you are instructed to relieve pressure always follow the Pressure Relief Procedure on page 11 1 Relieve the pressure before checking or servicing the equipment 2 Check all possible problems and causes before disassembling the pump PROBLEM CAUSE SOLUTION Pump will not run Closed air line valve Open valve Inadequate air supply ...

Page 13: ...vice air valve See page 18 Air exhausting from the mounting holes Fluid covers are installed incorrectly Align mounting holes in fluid covers with holes in center housing See page 14 Fluid in the exhaust air Ruptured diaphragm Replace diaphragms See page 17 Air bubbles in fluid Loose suction line Tighten Use a compatible liquid thread sealant on connections Ruptured diaphragm Replace diaphragms Se...

Page 14: ...ire 3 Remove the pump from its mounting CAUTION Be careful that the ball checks do not fall out when you remove the fluid covers 32 4 Remove the six screws 38 and top cover 32 from the center housing 1 Remove the ball check seals 24 Remove the bottom cover and seals NOTE Always replace the ball check seals 24 when ever the fluid covers 32 are removed These seals are included in the four repair kit...

Page 15: ...ce the ball check seals 24 4 Place the fluid covers 32 on the housing 1 Align the mounting holes H in the fluid covers with the holes in the housing Install the screws 38 loosely then torque oppositely and evenly to 70 in lb 8 NSm 5 Reinstall the pump on its mounting 6 Reconnect the ground wire and hoses ti1031a Fig 3 38 32 1 31 29 39 H H H 32 38 24 24 1 3 2 70 in lb 8 NSm Align 28 in lb 3 1 NSm 3...

Page 16: ...ove drive them out from the opposite side using a brass rod and hammer 3 Clean all parts and inspect for wear or damage Replace parts as needed Reassembly 1 Reinstall the inlet and outlet ball checks on one side of the pump The inlet and outlet checks are assembled differently Install the parts exactly as shown in Fig 4 2 Install one cover 32 loosely to prevent the ball checks from falling out See...

Page 17: ...3 Thread an M8 hexnut A onto an M8 bolt Screw the bolt into the shaft 5 until it bottoms out Thread the nut down to the shaft to lock it 4 Hold the nut with a wrench or vise to keep the shaft from turning Unscrew the other diaphragm 6 by hand NOTE If you cannot remove the second diaphragm refer to Shaft Repair Disassembly on page 20 Reassembly 1 Screw the new diaphragms 6 into the shaft 5 handtigh...

Page 18: ...our screws 36 air valve cover 17 and gasket 16 See Fig 7 3 See Fig 6 Note the orientation of the air valve plate 13 Pull the plate out of the center housing 1 Remove the three o rings 14 15 from the plate See Fig 7 4 Remove the air valve cup 12 from the center housing 1 5 Remove the retaining ring 11 and plug 9 and slide the carriage 7 from the center housing 1 Remove the o rings 8 10 from the car...

Page 19: ...so the open side faces out 4 Lubricate the large o ring 15 and the two small o rings 14 and install them on the air valve plate 13 Align the point on the plate with the arrow on the center housing 1 as shown in Fig 6 Install the plate in the housing 5 Install the gasket 16 Note the orientation 6 Reinstall the air valve cover 17 and screws 36 Torque the screws to 28 in lb 3 1 NSm 7 Replace the ball...

Page 20: ... that can scratch or damage the shaft such as wrenches or pliers 7 If you could not remove one diaphragm from the shaft place the shaft in a vise with soft jaws Unscrew the remaining diaphragm 6 from the shaft 5 by hand 8 Clean all parts and inspect for wear or damage Replace parts as needed Reassembly 1 Screw one diaphragm 6 into the shaft 5l handtight 2 Grease the o rings 2l and install them on ...

Page 21: ...air continued ti1035a Fig 8 38 1 3 2 70 in lb 8 NSm Lubricate Align 4 1 3 4 1 2 2 2 2 3 3 28 in lb 3 1 NSm 4 l8 10l 12l 13 14l 15l 16l l24 24l l24 24l 32 38 11 9 1 32 17 29 31 39 7 2 l8 36 3 4l 2 5 6 2 6 2 2 2 5 Align See Fig 6 5 ...

Page 22: ... BALL acetal 4 22 197664 SEAL valve outlet acetal 2 23 197665 SEAT valve outlet 2 stainless steel 24 l 197666 SEAL ball check nylon 4 25 197667 O RING valve inlet Vitonr 2 26 197668 SEAT valve inlet 2 stainless steel 27 197669 GUIDE ball acetal 4 28 197670 DAMPENER felt air inlet side 2 29 197671 DAMPENER felt side 1 30 197672 COVER air inlet side 1 31 197673 COVER side 1 32 197674 COVER housing 2...

Page 23: ...p Series A Part No 233501 Stainless Steel Pump Series A Shown ti1036a 1 2l 2l 3 4l 5l 6 6 7 8 l l8 9 l10 11 12 13 14 l 15 l 16 l 17 18 19 20 21 21 22 23 l24 24 l 25 26 27 27 28 29 30 31 32 32 38 36 37 35 Detail of Grounding Clamp 33 39 38 34 40Y ...

Page 24: ...41 165 188 3 8 15 2 19 0 26 6 D To find Fluid Outlet Pressure psi MPa bar at a specific fluid flow lpm gpm and operating air pressure psi MPa bar 1 Locate desired flow along bottom of chart 2 Follow vertical line up to intersection with selected fluid outlet pressure curve black Follow left to scale to read fluid outlet pressure To find Pump Air Consumption l min or scfm at a specific fluid flow l...

Page 25: ...5 Dimensions BOTTOM VIEW SIDE VIEW Two 0 35 in 9 mm diameter holes for mounting pump 4 1 in 104 mm 4 53 in 115 mm 3 8 npt Fluid Outlet 3 4 npt Fluid Inlet 1 4 npt Air Inlet 4 88 in 124 mm 8 58 in 218 mm ti1037a ...

Page 26: ...as set forth above The buyer agrees that no other remedy including but not limited to incidental or consequential damages for lost profits lost sales injury to person or property or any other incidental or consequential loss shall be available Any action for breach of warranty must be brought within two 2 years of the date of sale Graco makes no warranty and disclaims all implied warranties of mer...

Reviews: