Cleanup
18
334179B
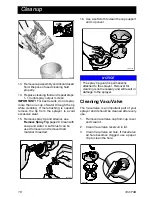
13. Remove cup assembly and discard used
fluid. Dispose of used cleaning fluid
properly.
14. Replace cleaning fluid and repeat steps
1- 13 until spray output is clean.
IMPORTANT!
For best results, do not spray
more than one cup of water through the tip
while cleaning. If more flushing is needed,
remove the tip from the sprayer to avoid
excessive wear.
15. Remove spray tip and strainer, see
Remove Spray Tip
, page 20. Clean with
soap and water. A soft brush can be
used to loosen and remove dried
material if needed.
16. Use a soft cloth to clean the cup support
and cup cover.
Cleaning VacuValve
The VacuValve is an important part of your
sprayer and it should be cleaned after every
use.
1.
Remove VacuValve cap from cup cover
and clean it.
2.
Clean VacuValve reservoir in lid.
3.
Clean VacuValve air hole. If VacuValve
air hole becomes clogged, use a paper
clip to clean the hole.
ti23389a
ti23404a
NOTICE
The spray tip guard is permanently
attached to the sprayer. Removal for
cleaning is not necessary and will result in
damage to the sprayer.
ti23372a
ti23406a

