background image

Component Identification 

18

313873J

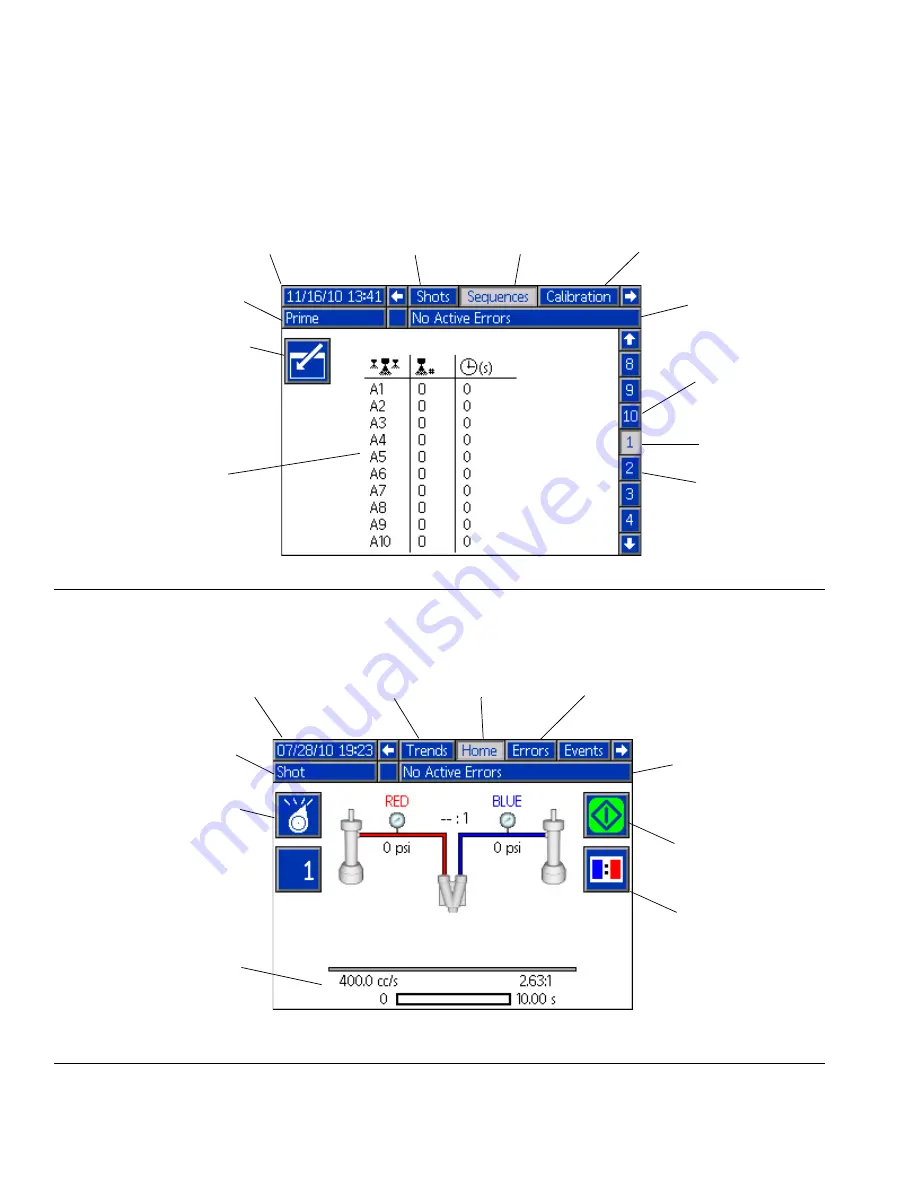
ADM Screen Components

See the ADM appendix sections beginning with 

Appendix A - ADM Icons Overview

 on page 57 for more informa-

tion.

F

IG

. 7: Main Display Components - Typical Setup Screen

F

IG

. 8: Main Display Components - Home Screen (Shot mode shown)

Current date and time

Current screen

Enter/Exit screen

Previous screen

Next screen

Settings Detail

Current
screen no.

Next
screen no.

Previous
screen no.

Operating Mode

Faults, Status

Current date and time

Current screen

Change Operating

Mode

Previous screen

Next screen

Dispense Details

Operating Mode

Faults, Status

Initiate Dispense

Initiate Ratio 
Check Dispense

Summary of Contents for VRM 24F391

Page 1: ...g sealants and adhesives For professional use only Not approved for use in European explosive atmosphere locations See page 4 for model information including max imum working pressure and approvals Important Safety Instructions Read all warnings and instructions in this manual Save these instructions ti17663a ...

Page 2: ...o Tolerance Entry 41 Off Ratio Time to Fault Entry 42 Flushing 43 Shutdown 44 Short term 44 End of Shift 44 Pressure Relief Procedure 45 Maintenance 46 Install Upgrade Tokens 47 Advanced Display Module ADM 47 Motor Control Module MCM 48 Fluid Control Module FCM 48 Troubleshooting 50 Light Tower Optional 50 Common Problems 50 ADM Troubleshooting 52 Motor Control Module 53 Fluid Control Module 55 Ap...

Page 3: ...39 Power Distribution Boxes Instruc tions Parts Pumpline Manuals 3A0022 U Cup Dura Flo Lowers 3A0021 Vertical Hydraulic Driver Repair Parts Feed System Manuals 3A1159 VRM Feed Systems Valve Manuals 310550 1 2 in NPT Fluid Port Ball Seat Applicator 310551 3 4 in NPT Fluid Port Ball Seat Applicator 3A1792 DV Series Dispense Valves Flow Meter Manual 309834 Helical Gear Fluid Flow Meter ...

Page 4: ...0 60 Hz If a motor control module is replaced see the Adjust Motor Control Module Selector Switch section in the VRM repair manual to set the machine to the proper maximum fluid working pressure System approved Full Load Peak Amps Per Phase Voltage phase System Watts Max Flow Rate lb min kg min Approximate Output per Cycle A B gal liter Hydraulic Pressure Ratio Maximum Fluid Working Pressure psi M...

Page 5: ...of it according to applicable guidelines Always wear chemically impermeable gloves when spraying dispensing or cleaning equipment PERSONAL PROTECTIVE EQUIPMENT You must wear appropriate protective equipment when operating servicing or when in the operating area of the equipment to help protect you from serious injury including eye injury hearing loss inhala tion of toxic fumes and burns This equip...

Page 6: ...t operate the unit when fatigued or under the influence of drugs or alcohol Do not exceed the maximum working pressure or temperature rating of the lowest rated system component See Technical Data in all equipment manuals Use fluids and solvents that are compatible with equipment wetted parts See Technical Data in all equipment manuals Read fluid and solvent manufacturer s warnings For complete in...

Page 7: ...ith protective guards or covers removed Pressurized equipment can start without warning Before checking moving or servicing equip ment follow the Pressure Relief Procedure and disconnect all power sources BURN HAZARD Equipment surfaces and fluid that s heated can become very hot during operation To avoid severe burns Do not touch hot fluid or equipment WARNING ...

Page 8: ...ith your system Never use reclaimed solvents which may contain moisture Always keep solvent containers closed when not in use Never use solvent on one side if it has been con taminated from the other side Always lubricate threaded parts with ISO pump oil or grease when reassembling Spraying or dispensing materials containing isocya nates creates potentially harmful mists vapors and atomized partic...

Page 9: ...when standing in front of the manifold on proportioner Component A Red is on the left side Component B Blue is on the right side NOTE On the VRM system A Red is on the left side of the base unit and B Blue is on the right side of the base unit The sides switch when going to the dispense valve stand so that A Red is on the right side of the dis pense valve stand and B Blue is on the left side of th...

Page 10: ...Driver AD Pump Lower AE Flow Meter AF Power Distribution Box AG Dispense Stand AH Mixer AJ Pump Wet Cup AK Main Power Switch AL Air Supply Inlet AM Electrical Enclosure AN Ratio Check Dispense Valves Ports AP Material Line AR A Red Dispense Valve AS B Blue Dispense Valve FIG 1 Component Identification AA ti17663a AC AB AG AH AE AM AF AN AP AS AR ...

Page 11: ...Component Identification 313873J 11 FIG 2 Component Identification AK ti17664a AL AN AN AJ AD ...

Page 12: ...kers in the power distribution box is shown below with detailed information in the following table See the power distri bution box manual for more information Ref Size Component 230V 3 phase 400V 3 phase CB1 30A 63A Motor Control Module CB5 5A 5A Miscellaneous CB6 5A 5A Miscellaneous CB10 30A 63A Motor Control Module CB1 CB5 CB10 CB6 24C687_313873 5_1c ...

Page 13: ... Reservoir see Technical Data on page 86 for specifications B Electric Motor C Dipstick D Hydraulic Housing E Motor Control Module see page 14 F Fan G Hydraulic Oil Filter H Hydraulic Fluid Drain Port FIG 3 A F C D G B E 257442_313873 5_1t Shown with shroud removed H 257442_313873 5_2t ...

Page 14: ...s up The Motor Control Module uses an 8 position selector switch to set the system maximum working pressure NOTICE If the Motor Control Module is replaced the selec tor switch must be set prior to initial startup of the Motor Control Module or damage may occur See system repair manual for MCM replacement proce dure FIG 4 MCM Component Identification A r_257396_3b9905_01b r_257396_3b9905_03b C 12 B...

Page 15: ...tswitch 3 Oil Temperature Sensor 5 Electric Motor Temperature Sensor 6 LVDT 7 A Red MCM only Three way Splitter to Hydraulic Directional Valve Oil Overtemperature Switch Ratio Check Solenoid Valve B Blue MCM only Three way Splitter to Hydraulic Directional Valve Oil Overtemperature Switch Third connection is not used 8 Pressure Transducer for material side controlled by the MCM 9 Not used 10 MCM t...

Page 16: ...e Enable disable ADM B System Status Indicator LED Displays system status C Stop Stop all system processes D Softkeys Defined by icon next to softkey E Abort Abort current operation F Enter Accept change acknowledge error select item toggle selected item G Run Setup Screens Toggle Toggle between Run and Setup screens H Arrow Keys Navigate within a screen or to a new screen Call out Button Function...

Page 17: ...0 M CAN Cable Connection to MCM N Module Status LEDs P Accessory Cable Connection R Software Token Access Cover S Battery Access Cover See ADM Troubleshooting on page 52 for LED status information See Maintenance section beginning on page 46 for battery replacement and software update procedures FIG 6 ADM Component Identification Rear R K J L P N M S ti12902a ...

Page 18: ...FIG 8 Main Display Components Home Screen Shot mode shown Current date and time Current screen Enter Exit screen Previous screen Next screen Settings Detail Current screen no Next screen no Previous screen no Operating Mode Faults Status Current date and time Current screen Change Operating Mode Previous screen Next screen Dispense Details Operating Mode Faults Status Initiate Dispense Initiate Ra...

Page 19: ...Control Module FCM The fluid control module is located inside the electrical enclosure Key A Module Connection Screws B Access Cover C Module Status LEDs D CAN Connectors one is connected to MCM other is unused FIG 9 ti12337a1 ti12336a1 C A B D ...

Page 20: ...nnect green wire to ground GND The machine is not properly grounded until this setup procedure is performed To prevent risk of electric shock do not start the machine until this setup proce dure is completed NOTICE Be careful not to hit hydraulic power pack drain port while moving machine Applying significant force to drain port may damage the hydraulic tank NOTICE To prevent machine damage do not...

Page 21: ...ded Consult a qualified electrician if there are any concerns about the available power supply Power Line Test Steps with Multimeter i Set multimeter to DC voltage ii Connect multimeter probes to supplied power line iii Press Min Max successively to show the peak positive and negative DC voltages iv Confirm readings do not exceed 400VDC Motor Control Module alarm issued at 420VDC The chart below s...

Page 22: ... the factory See Technical Data on page 86 for hydraulic fluid specifica tions 8 Fill pump wet cups 2 3 full with IsoGuard Select Fluid 9 Perform Startup page 24 10 Perform ADM setup NOTE All ADM setup items are located in the Setup screens See Appendix B ADM Setup Screens Over view beginning on page 59 for more information See ADM Operation Overview on page 26 for help with operating the ADM incl...

Page 23: ...te to Shots screen then define shots See page 59 h Navigate to Sequences screen then define sequences See page 60 i If desired navigate to Maintenance screen then reset counters See page 62 11 Perform Flushing procedure page 43 12 If not already open open the fluid inlet ball valves to load the system with material 13 Perform System Setup and Cali bration procedure page 29 NOTICE The machine is te...

Page 24: ...The splash screen will be displayed on the ADM until it is finished loading 7 When the ADM is finished loading press to enable the ADM The System Status Indicator Light next to will illuminate green 8 Press repeatedly to select a different operating mode then press to accept NOTE The Setup screens cannot be accessed when Disabled mode is the active operating mode Also cer tain machine functions an...

Page 25: ... change the dispense settings a Press to enter editing mode b Use the left and right arrow keys to select the item to change c Use the numeric keypad to type the new value d Press to accept the new value e Press to exit editing mode 5 Press to select the A Red side 6 Press to begin dispensing A Red material 7 Continue dispensing until clean air free material is dispensed from both sides then press...

Page 26: ...reens Events 1 Events 2 Events Errors 1 Errors 2 Errors Optional Diagnostic Calibration Maintenance Shot 1 Shot 2 Shot Sequences 1 Sequences 2 Sequences Advanced 1 Advanced 2 Advanced System 1 System 2 System 3 Supply Conditioning 1 Conditioning 2 Conditioning 3 Setup Screens Password Entry if enabled ...

Page 27: ...ill be disabled As applicable exit the screen and editing mode to re enable screen navigation Change ADM Values To edit information in a screen such as a shot definition or a system setting like time or date format follow this general process 1 Press NOTE Operator mode flow settings are edited using a slightly different process To edit dispensing settings when in Operator mode see Dispense in Oper...

Page 28: ...he B Blue side is the high volume side it is closer to its maximum flow rate capacity than the A Red side pump When the ramp up feature reduces the flow rate a Sys tem Dispensing Below Requested Set Point advisory is generated and the yellow advisory lamp on the light tower is illuminated If the system is able to achieve the desired flow rate the advisory is cleared Learning Mode When a flow rate ...

Page 29: ...ettings 1 With the machine on press to enable the ADM The LED next to the button should be green 2 Press repeatedly to select Standby mode then press to accept 3 Press to enter the Setup screens 4 Navigate to the System 1 screen 5 Verify the correct pumps and pump sizes are selected Most systems use Dura Flo 580 or 430 pumps 6 Select volume or weight for the dispense mode Weight mode is recommende...

Page 30: ...gravities for the two materials in the system NOTE The specific gravities do not need to be exact but should be close 18 Press to exit the Setup screens Prime the Machine Refer to Priming section on page 25 Piston Position Learning 19 Navigate to the Calibration screen 20 Perform Learn Mode NOTE Learn Mode will teach the system the mechani cal limits of piston travel It must be performed whenever ...

Page 31: ...te to the main Calibration screen Flow Meter No Flow Meter Calibration 24 If flow meters are installed refer to Flow Meter or Flow Ratio Calibration starting on page 34 If flow meters are not installed refer to No Flow Meter Machine Calibration starting on page 35 Flow Rate and Ratio Learning 25 At the main Calibration screen press to erase all learned data NOTE This will not affect the weight cal...

Page 32: ...ct Shot Mode then press to accept 35 Press to activate the ratio check valves NOTE Be ready to adjust ratio check valves immedi ately after performing the following step 36 With buckets below the ratio check valves press to begin dispensing 37 While dispensing adjust the ratio check opening adjustment screws until both material line pressures are approximately equal to the pressures recorded in st...

Page 33: ...low rate is changed to a ratio or flow rate that has not been calibrated by performing this procedure the system will generate a Learning New Setpoint advisory The system usually produces a good dispense ratio during the learning process however the advisory is generated to inform the user of the condition The system can store calibration data in its memory for up to five different flow rates and ...

Page 34: ... regardless of whether the selected dispense mode is weight or volume 5 Weigh two buckets and record the weight of each then place below the ratio check valves 6 With two buckets in place to catch material dis pensed from the ratio check valves press to begin dispensing 7 After dispensing for at least 10 seconds press to stop dispensing NOTE If available a footswitch can also be used 8 Weigh both ...

Page 35: ...ple If the dispense rate is 300 grams second set the amount to 3000 grams 3 Press to exit the setup screen and verify the ratio check option is not selected 4 Place a waste container under the mixer Press to begin dispensing and record the average A Red and B Blue pressures shown on the ADM NOTE The dispense can be aborted early after record ing by pressing 5 Select Standby mode and perform a base...

Page 36: ...ghts into the prompt boxes Enter the weight of each bucket for both materials NOTE After entering the net weight of B Blue material the ADM will inform the user how close the respective flow of the pump was to the desire rate 11 Press to accept the information NOTE The ADM will respond by generating a System Learning Setpoint advisory and the corresponding advi sory light will be illuminated on th...

Page 37: ...o 300 and 500 grams sec ond extremes then stop the calibration process The machine will be very close to all requested flows and ratios in between 14 Turn off the Enable Ratio Check Weight Mode Entry option in the Advanced 3 screen The user can verify the machine calibration by performing a ratio check dispense and weighing the A Red and B Blue materials NOTE Graco suggests to discard all material...

Page 38: ...cknowledge any displayed errors Dispense in Sequence Mode Sequences can be defined on the Sequences screen Sequences are defined on the Sequences screen see page 60 1 Navigate to the Home screen 2 Press repeatedly to select Sequence Mode then press to accept 3 If desired changed the selected sequence a Press once b Press the right arrow key on the ADM keypad once c Use the up and down arrow keys t...

Page 39: ...t the bottom of the screen 4 If desired change the dispense settings a Press to enter editing mode b Use the left and right arrow keys to select the item to change c Use the numeric keypad to type the new value d Press to accept the new value e Press to exit editing mode NOTE The user can disable changing the flow ratio or both on the Advanced 3 setup screen 5 Press to begin dispensing 6 Press to ...

Page 40: ...ed 4 setup screen by selecting the Display Ratio in 100 to xx option as indicated below After the above selection the same run screen will appear like the following As indicated above both the ratio set point bottom right and actual ratio dispensed top middle are output in the 100 xx format 100 XX Ratio Set point Entry When altering the ratio set point for a dispense the same control numeric entri...

Page 41: ... off ratio alarm Off ratio alarms will not only generate the error pop up window but will also terminate a dispense when 100 xx format the tolerances are entered as parts Hence as illustrated below for the 100 xx format system 3 setup screen The same 4 0 1 ratio in 100 xx format 100 25 has toler ances of and 0 5 parts for the deviations and and 1 5 parts the alarm tolerances So ratios greater than...

Page 42: ...ser needs to navigate to the Off Ratio Fault Password field as illustrated above on the System 3 setup screen then enter the password indicated below After the correct password is entered the Off Ratio Fault Time Override option will become available for editing as indicated below The user can now navigate to this field enter any num ber from 0 default value indicating the override feature if off ...

Page 43: ...inuity If flushing with a compatible solvent perform the follow ing procedure 1 Perform Shutdown procedure page 44 2 Close the feed system ball valve at inlet near the pump lower 3 Connect solvent flush feed system to unused inlet port near the pump lower 4 Open solvent flush ball valve 5 Perform Startup procedure page 24 6 Press repeatedly to select Operator Mode then press to accept 7 Press to e...

Page 44: ...ial to push all mixed material out of the mixer Base purge settings are defined on the System 2 screen see page 61 a Press b Press to begin dispensing c When all mixed material is pushed out of the mixer press to stop dispensing NOTE Approximately 1 to 2 liters of base material will need to be dispensed 5 Press to park pumps again 6 Press 7 Place container under the mixer and allow mixer to drain ...

Page 45: ...tton on top of the pneu matic valve nearest the mixer This will open the ratio check valves and relieve any residual pressure in the fluid lines In the following step any pressure in the lines will be instantly relieved which may lead to material spraying out of the valve and splashing in the bucket Use appropriate protective wear to prevent contact with materials ti17666a ...

Page 46: ... Replace hydraulic oil and filter See table Inspect fluid lines for leaks and signs of wear Daily Check wet cup fluid level add IsoGuard Select fluid as neces sary Weekly Check hydraulic fluid level Weekly Verify operation of tank air drying system to prevent isocyanate crystallization Weekly Verify vent holes on bottom of hydraulic power pack shroud are clear and unobstructed Weekly more often in...

Page 47: ...ade for ease of restoring them following the upgrade See manuals for locations of specific GCA compo nents The software version history for each system can be viewed in the technical support section at www graco com Advanced Display Module ADM Replace Battery A lithium battery maintains the ADM clock when power is not connected To replace the battery 1 Disconnect power to the ADM 2 Remove rear acc...

Page 48: ...m using compressed air NOTE Do not use conductive cleaning solvents on the module Install Upgrade Token See Install Upgrade Tokens on page 47 Fluid Control Module FCM Install Upgrade and Key Tokens See Install Upgrade Tokens on page 47 FIG 12 Clean Heat Sink Fins r_257396_3b9905_02b Heat Sink Fins ...

Page 49: ...Maintenance 313873J 49 ...

Page 50: ...arm occurring Problem Cause Solution General Display Module completely dark No power Verify main power switch is ON Thrown circuit breaker Check machine breakers and reset Loose connection Tighten 5 pin cable on Advanced Display Module Bad display module Replace Advanced Display Module No or incorrect amount of material dispensed from either side Ball valve closed if installed Open tank ball valve...

Page 51: ...vitation Feed pump pressure is too low adjust pressure to within required range Pump output low Obstructed fluid hose or mixer fluid hose ID too small Open clear use hose with larger ID Worn piston valve or intake valve in displacement pump See pump manual for appropriate repair procedure Inadequate feed pump pressure Check feed pump pressure and adjust to within required range Problem Cause Solut...

Page 52: ...l Description Green on Run mode System on Green flashing Setup mode System on Yellow on Run Mode System off Module Status LED Signal Description Green on System is powered up Yellow on Communication in progress Red solid ADM hardware failure Red flashing Uploading software Module Status LED Signal Description Green flashing System is powered up Yellow on Downloading information to USB Green Yellow...

Page 53: ...atus LED Signal Description Green on System is powered up Yellow on Internal communication in progress Red solid MCM hardware failure Replace MCM Red flashing fast Uploading software Red flashing slow Token error remove token and upload software token again FIG 14 LED Signals LED Signals r_257396_3b9905_07b ...

Page 54: ... permanently damage hard ware The chart below shows the permissible magnitude and duration of temporary over voltage events Consult a qualified electrician if there are any concerns about the available power supply Maximum Permissible Transient Voltage Surges Constructed from ITIC 1996 curve referenced by IEC 61000 2 4 1200Vac 1697Vdc 264Vac 373Vdc 336Vac 475Vdc 288Vac 407Vdc 480Vac 679Vdc 1 MW Ma...

Page 55: ...s LED Signal Diagnosis Green on System is powered up Yellow Internal communication in progress Red solid FCM hardware failure Replace FCM Red flashing fast Uploading software Red flashing slow Token error Remove token and upload software token again FIG 15 ti12337a1 Module Status LEDs ...

Page 56: ...Troubleshooting 56 313873J ...

Page 57: ...iston Position On Main Calibration screen Calibrate Weight Dispense On Flow Meter Calibration screen Use Dispensed Material Weight to Calibrate Flow Meters Use Dispensed Material Volume to Calibrate Flow Meters Calibrate Flow Meters Learn Bottom Most Piston Position Learn Top Most Piston Position Go to Next Calibration Screen Begin Weight Calibration Shot Dispense Valve Details Shot Number Sequenc...

Page 58: ...Close Dispense Valve Perform Base Purge Selected Shot Number No Shot Number Selected Selected Sequence and Sequence Position No Sequence Selected Skip to Next Shot in Sequence Abort Sequence Edit Operator Mode Flow Properties Prime A Red Side Prime B Blue Side Enter Screen Exit Screen Erase Selected Item Erase All Items Shown Weight Volume Duration Piston Cycles Icon Description ...

Page 59: ...finition value 4 Type the new value then press enter All values below the selected shot will change to the new value 5 Repeat the previous two steps as desired 6 Press to deactivate Using the button The button can be used to calculate an x 1 ratio from a non x 1 ratio For example if the desired ratio is 5 2 the button can be used to convert 5 2 to 2 5 1 1 From the Shots screen press 2 Navigate to ...

Page 60: ...s Calibration Main This screen shows calibration data for the system and provides access to the individual calibration screens See System Setup and Calibration on page 29 for how to use the calibration screens The date next to each key represents the last time that function was performed The Cal Min and Cal Max values are the system recognized extreme ends of piston travel Calibration Learn Mode T...

Page 61: ...een allows the user to set the Gel Timer proper ties and set which items are installed on the machine When enabling the Gel Timer the user must select one of the 100 available shot definitions to use as the Gel Shot This shot will be dispensed when the Idle Period expires The Idle Period will begin after a dispense is completed Any dispense operation in the middle of the timer countdown will reset...

Page 62: ...d HG6000 or SRZ 100 The ratio deviation value is the allowable per centage before the machine displays a pop up notifica tion The ratio alarm value is the allowable percentage difference before the machine will stop a dispense Keyboard Screen This screen is used to edit the A Red and B Blue labels on the ADM Use arrow keys to select the desired letter and press to accept the letter Press to exit t...

Page 63: ...g 2 NOTE The VRM does not use temperature condition ing Conditioning 3 NOTE The VRM does not use Night mode conditioning Do not enable night mode Advanced 1 This screen allows the user to set the language date format current date time setup screens password screen saver delay and turn on or off silent mode Advanced 2 This screen allows the user to set the units of measure ...

Page 64: ... alarm from any temperature zone will disable dispensing Complete Dispense with Setpoint Error When this box is checked the shot will continue dispens ing even if the system never reaches the desired setpoint Enable Shot Aborted Notification When this box is checked a pop up notification will be displayed when a shot is aborted Enable Ratio Check Weight Mode Entry This option is for machines witho...

Page 65: ... be selected from the Home screen The available operating modes are Operator Sequence Shot Standby Night and Disabled System Off This operating mode is only used at initial startup and when is pressed Disabled In Disabled mode machine operation is disabled and the setup screens cannot be accessed Standby In Standby mode the user can park the pumps perform a base purge and close the dispense valve ...

Page 66: ...de allows the user to dispense using one of the defined sequences See Sequences on page 60 The shot definition for the shot used in the current sequence position is shown at the bottom of the screen Shot defi nition information shown includes flow ratio progress and size Operator This mode allows users to dispense without using pre defined shot numbers or sequences Use to set flow rate and ratio T...

Page 67: ...Screen The Events screens display the 200 most recent events Each event includes a description and event code along with a date and time stamp There are 20 pages display ing 10 events each See the Troubleshooting section beginning on page 50 for a detailed description of all system events Maintenance This screen displays historical information for each pump including material usage and pump cycles...

Page 68: ...n Screens Overview 68 313873J Optional Screens The optional Diagnostic screen can be enabled in the Advanced 4 screen see page 64 Diagnostic The Diagnostic screen shows status information for var ious system components ...

Page 69: ...ree point calibration was entered ENC4 R Cal Point 1 Weight Erased The running average for point one of the three point calibration was erased ENC5 R Cal Point 2 Weight Erased The running average for point two of the three point calibration was erased END0 R Ratio Check Dispense A ratio check shot was dispensed from the ratio check calibration screen ENN0 R Automatic Cal Performed The system was s...

Page 70: ...4H1 Motor Over Current High current has been detected on a phase and has been shutdown to prevent damage Alarm Bad internal wiring of the motor Replace motor Short circuit of motor wiring Check wiring to the motor to ensure no bare wires are touching and that no wires are shorted to ground A4M1 Motor Over Current Too much current is being drawn from the wall Alarm Low voltage from the wall during ...

Page 71: ...olumes is the minimum Deviation Pumps are defined with the wrong size On the ADM go into the Setup screens to the System screens then make sure that the pump sizes are defined correctly Requested shot is below the capabilities of the current pump setup If the user has to be able to take the shot the system must be fitted with smaller pumps CAC1 Comm Error Motor Communication error Alarm Loose brok...

Page 72: ...at incoming ball valves are open DDB2 Blue Pump Cavitation Deviation Verify that feed pumps are supplying material Debris or packout in the incoming fluid filter Inspect filter for debris of filler packout and clean or replace as necessary DFA1 Pump Not Parked The pump failed to reach the park position Deviation Orifices blocked Clear blockage Hose blocked Clear or replace hose as necessary Dispen...

Page 73: ...lace lost oil Leak in the hydraulic reservoir heat exchanger Inspect the hydraulic reservoir fittings and filter for leaks Repair or replace as necessary and replace lost oil MBN1 Low Motor Performance The motor magnetism has decreased to the point where performance is greatly reduced Advisory Prolonged exposure to heat or high voltage If error persists and performance can no longer satisfy the us...

Page 74: ...adjusted to the fully open position then adjust accordingly Debris in the orifice block Relieve system pressure then remove the orifice from the orifice block and inspect for debris in the cavity Material fillers may have packed out in an orifice Relieve system pressure and remove the orifice from the orifice block and inspect for pack out Clean or replace as necessary Out of material Fill tanks w...

Page 75: ...essing on the center with a pencil eraser If the fan slows down easily it will need to be replaced T3N1 Motor Temp Cutback Motor temperature is approaching a level where damage is possible so the motor control module is limiting the output to a safe level Advisory No power to fan Check cord to make sure fan has power Debris in fan or fan grill clear debris from fan fan grill Low air volume from fa...

Page 76: ...grill Low air volume from fan Try to stop fan by lightly pressing on the center with a pencil eraser If the fan slows down easily it will need to be replaced Ambient environmental conditions are too hot Move machine to an area below 120 F Motor may be damaged Motor may need to be replaced T6A6 Red Tank RTD Fault RTD 1 is giving no or invalid data Alarm Loose or bad connection Check RTD wiring T6B5...

Page 77: ...ditioning zone off Wait a few minutes If the condition does not clear or regenerates consistently replace heater module T9C5 Blue Blanket Ctrl Shutdown Alarm T9C3 Red Inline Ctrl Shutdown Alarm T9C1 Blue Inline Ctrl Shutdown Alarm T9C2 Red Hose Ctrl Shutdown Alarm T9C4 Blue Hose Ctrl Shutdown Alarm T9C7 Red Chiller Ctrl Shutdown Alarm T9C8 Blue Chiller Ctrl Shutdown Alarm V1H1 Motor Control Underv...

Page 78: ...m No power to directional valve Make sure the directional valve has power Bad directional valve connection Make sure the cord to the directional valve is connected to the correct port and the cord is not damaged Directional valve failure The directional valve will need to be replaced Hydraulic power pack failure The hydraulic power pack will need repair Defective encoder Replace encoder Motor no l...

Page 79: ...stem Deviation System incorrectly setup On the ADM go into the setup screens System and ensure that all pages have properly defined values Shot incorrectly defined Redefine shot with control parameters within the limits of the system WSD0 Invalid Gel Timer Definition The shot that was entered for the gel timer is not a valid shot This must be fixed before the gel timer will function properly Devia...

Page 80: ... downloaded This will allow the user to download all USB log entries which may take over 2 hours if the log files are full The ADM does not monitor the USB logs to alert the user when data may be overwritten In order to minimize download times and the risk of losing data it is recommended that the user download the logs every 2 weeks or more often if the machine is used during more than one full s...

Page 81: ...older name is incremented each time a stick drive is inserted and data is transferred through the USB In each DATAxxxx folder there are three log files They are formatted as csv comma separated value files and can be opened by most text editors or data processing programs such as Excel Example 1 ERROR File The 1 ERROR file is the Errors and Events log file FIG 16 DOWNLOAD DATAxxxx Folders ...

Page 82: ...Appendix E USB Operation 82 313873J Example 2 JOB File The 2 JOB file is the Shot Data log file Example 3 SYSTEM File The 3 SYSTEM file is the Software Version log file ...

Page 83: ...the software is updating a pop up box will appear to inform the user of the update and the sys tem will lock Once the update is complete the ADM will tell the user to cycle power to apply the updates 6 When the software is done updating remove the USB stick drive 7 Turn the Main Power Switch to the OFF position then back to the ON position 8 Plug the USB stick drive into a computer 9 Navigate to t...

Page 84: ...ed DISPTEXT TXT file into the UPLOAD folder 7 Remove the USB stick drive from the computer and insert it into the ADM USB port The software will automatically begin updating NOTE Before the update begins the ADM automatically shuts down the system aborting any in progress dis pensing When the software is updating a pop up box will appear to inform the user of the update and the sys tem will lock O...

Page 85: ... 313873J 85 Example SETTINGS TXT File Example DISPTEXT TXT File NOTICE The user should never attempt to modify the SET TINGS TXT file in any way Graco is not responsi ble for damages caused by an improperly modified setup file ...

Page 86: ...to the dispense stand can be varied significantly because of the hoses Air Inlet Pressure 85 100 psi 0 59 0 69 MPa 5 9 6 9 bar Wetted Parts Stainless steel UHMW Hydraulic Reservoir Capacity 8 gal 30 liters each Recommended Hydraulic Fluid Citgo A W Hydraulic Oil ISO Grade 46 Ref in mm A Height 79 2007 B Width 63 1600 C Depth 115 2921 A C B ...

Page 87: ...not disclose any defect in material or workmanship repairs will be made at a reasonable charge which charges may include the costs of parts labor and transportation THIS WARRANTY IS EXCLUSIVE AND IS IN LIEU OF ANY OTHER WARRANTIES EXPRESS OR IMPLIED INCLUDING BUT NOT LIMITED TO WARRANTY OF MERCHANTABILITY OR WARRANTY OF FITNESS FOR A PARTICULAR PURPOSE Graco s sole obligation and buyer s sole reme...

Reviews: