12
USER GUIDE
WIRING UP
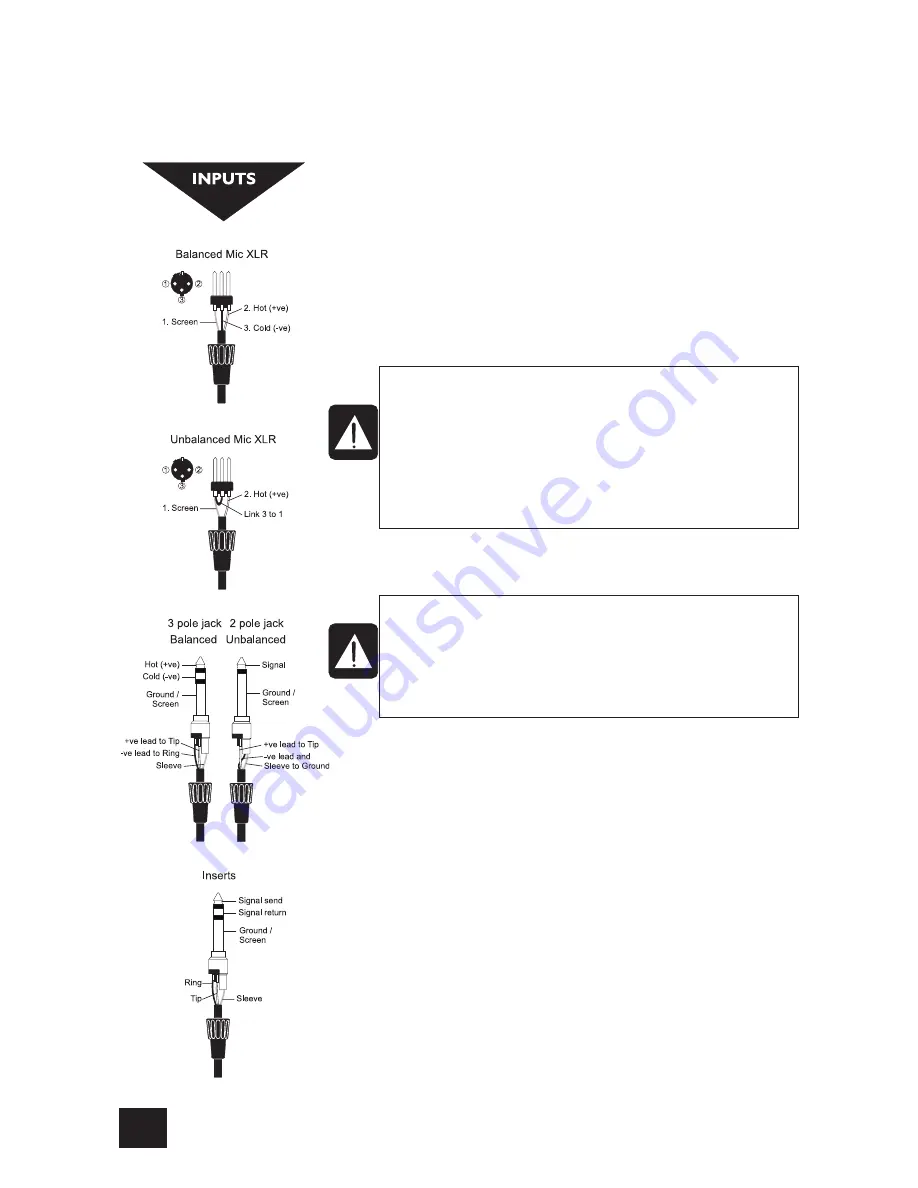
Please refer to pages 36/37 for additional wiring details.
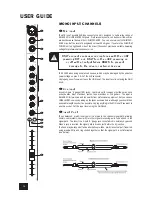
Mic Inputs 1-4
The MIC input accepts XLR-type connectors and is designed to suit a wide range of
BALANCED or UNBALANCED low-level signals, whether from delicate vocals requir-
ing the best low-noise performance, or drum kits needing maximum headroom.
Professional dynamic, condenser or ribbon mics are best because these will be
LOW IMPEDANCE. While you can use low-cost HIGH IMPEDANCE mics, you do not
get the same degree of immunity to interference on the microphone cable and as a
result the level of background noise may be higher. If you turn the PHANTOM
POWER on, the socket provides a suitable powering voltage for professional con-
denser mics.
The input level is set using the input GAIN knob.
The LINE input offers the same gain range as the MIC input, but at a higher input
impedance, and is 20dB less sensitive. This is suitable for most line level sources.
Line Input
Accepts 3-pole A gauge jacks, or 2-pole mono jacks which will automatically ground
the cold input. Use this input for sources other than mics, such as keyboards,
drum machines, synths, tape machines or guitars. The input is BALANCED for low
noise and immunity from interference, but you can use UNBALANCED sources by
wiring up the jacks as shown, although you should then keep cable lengths as short
as possible to minimise interference pick-up on the cable. Note that the ring must
be grounded if the source is unbalanced. Set the input level using the GAIN knob,
starting with the knob turned fully anticlockwise. Unplug any MIC connection when
using the LINE input.
Insert Point
The unbalanced, pre-EQ insert point is a break in the channel signal path, allowing
limiters, compressors, special EQ or other signal processing units to be added in
the signal path. The Insert is a 3-pole A gauge jack socket which is normally
bypassed. When a jack is inserted, the signal path is broken, just before the EQ
section.
The signal from the channel appears on the TIP of the plug and is returned on the
RING, with the sleeve as a common ground.
The Send may be tapped off as an alternative pre-fade, pre-EQ direct output if
required, using a lead with tip and ring shorted together so that the signal path is
not interrupted.
DO NOT use UNBALANCED sources with the
phantom power switched on. The voltage on pins
2 & 3 of the XLR connector may cause serious
damage. BALANCED dynamic mics may normally
be used with phantom power switched on
(contact your microphone manufacturer for
guidance)
WARNING !
Start with the input GAIN knob turned fully
anticlockwise when plugging high level sources
into the LINE input to avoid overloading the input
channel or giving you a very loud surprise!
Summary of Contents for SoundCraft E8
Page 1: ...Soundcraft E8 Mixer ...
Page 2: ......
Page 28: ...26 USER GUIDE FITTING RACKMOUNT EARS ...
Page 30: ...28 USER GUIDE APPLICATION 2 BROADCAST APPLICATION 3 RECORDING ...
Page 31: ...29 APPLICATION 4 KEYBOARD SUBMIXER APPLICATION 5 LINKING TWO SPIRIT ES CONSOLES ...
Page 36: ...34 USER GUIDE ES Dimensions ...
Page 37: ...35 SYSTEM BLOCK DIAGRAM ...
Page 38: ...36 USER GUIDE TYPICAL CONNECTING LEADS ...
Page 39: ...37 ...
Page 41: ......


