16
USER GUIDE
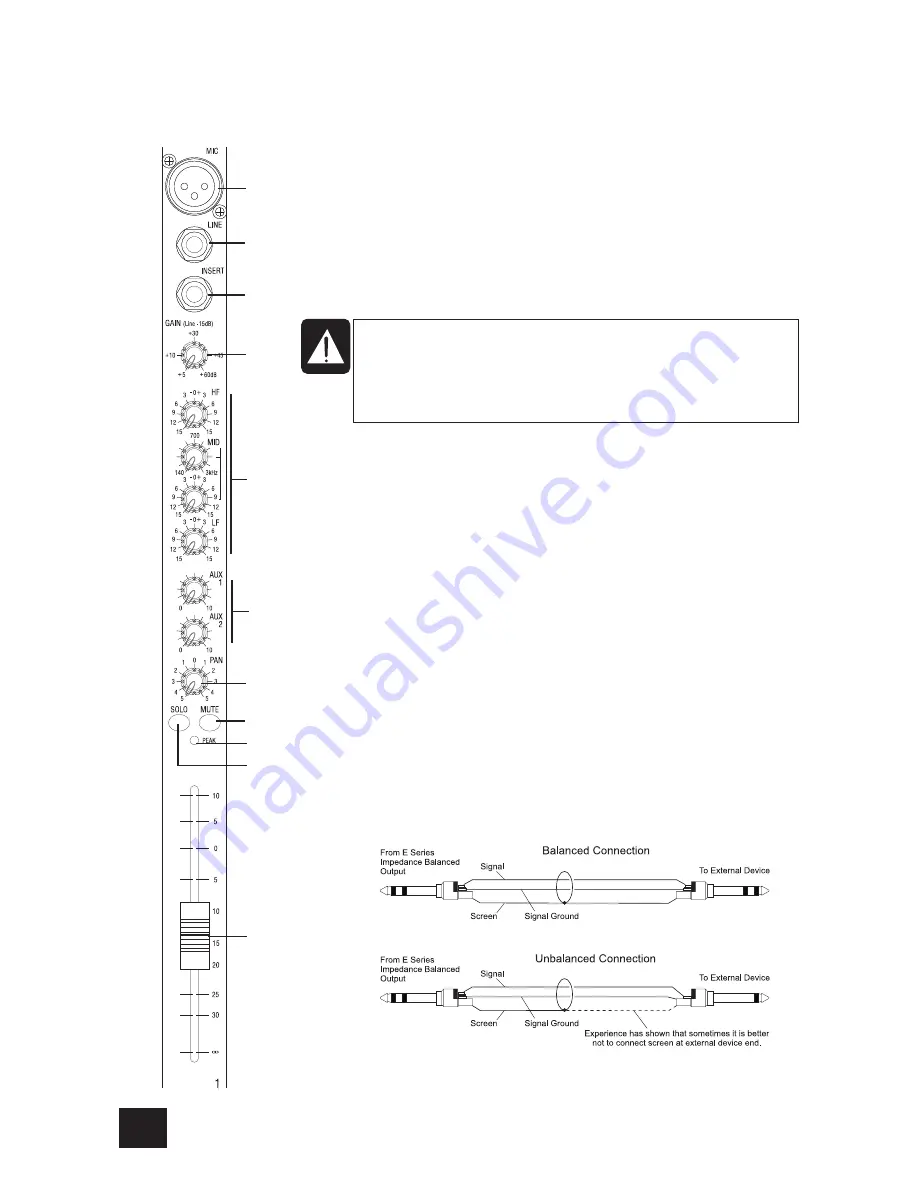
MONO INPUT CHANNELS
1
Mic Input
The MIC input accepts XLR-type connectors and is designed to suit a wide range of
BALANCED or UNBALANCED signals. Professional dynamic, condenser or ribbon mics
are best because these will be LOW IMPEDANCE. You can use low-cost HIGH IMPED-
ANCE mics, but the level of background noise will be higher. If you turn the PHANTOM
POWER on (top right-hand side of the mixer) the socket provides a suitable powering
voltage for professional condenser mics.
TAKE CARE when using unbalanced sources, which may be damaged by the phantom
power voltage on pins 2 & 3 of the XLR connector.
Unplug any mics if you want to use the LINE Input. The input level is set using the GAIN
knob.
2
Line Input
Accepts 3-pole A gauge (TRS) jacks. Use this input for sources other than mics, such
as keyboards, drum machines, synths, tape machines or DId guitars. The input is
BALANCED for low noise and top quality from professional equipment, but you can use
UNBALANCED sources by wiring up the jacks as shown below, although you should then
keep cable lengths as short as possible. Unplug anything in the MIC input if you want to
use this socket. Set the input level using the GAIN knob.
3
Insert Point
The unbalanced, pre-EQ insert point is a break in the channel signal path, allowing
limiters, compressors, special EQ or other signal processing units to be added in the
signal path. The Insert is a 3-pole A gauge jack socket which is normally bypassed.
When a jack is inserted, the signal path is broken, just before the EQ section.
The Send may be tapped off as an alternative pre-fade, pre-EQ direct output if required,
using a lead with tip and ring shorted together so that the signal path is not interrupted
(see below).
ONLY connect condenser microphones with the +48V
powering OFF, and ONLY turn the +48V powering on
or off with all output faders DOWN, to prevent
damage to the mixer or external devices.
q
7
1
2
3
4
5
6
8
0
9
Summary of Contents for SoundCraft E8
Page 1: ...Soundcraft E8 Mixer ...
Page 2: ......
Page 28: ...26 USER GUIDE FITTING RACKMOUNT EARS ...
Page 30: ...28 USER GUIDE APPLICATION 2 BROADCAST APPLICATION 3 RECORDING ...
Page 31: ...29 APPLICATION 4 KEYBOARD SUBMIXER APPLICATION 5 LINKING TWO SPIRIT ES CONSOLES ...
Page 36: ...34 USER GUIDE ES Dimensions ...
Page 37: ...35 SYSTEM BLOCK DIAGRAM ...
Page 38: ...36 USER GUIDE TYPICAL CONNECTING LEADS ...
Page 39: ...37 ...
Page 41: ......


