Luxxor
®
Portable Video Camera User Guide
Phone:
800.536.0790
fax 585.235.6645 gradientlens.com info@gradientlens.com
Luxxor
®
Portable Video Camera User Guide
Phone:
800.536.0790
fax 585.235.6645 gradientlens.com info@gradientlens.com
11
10
seTuP
seTuP
Also check to make sure there is no protective cap on the end of the scope’s
insertion tube.
The Video ToolBox Help file has a complete description of all the features
of the program as well as hints on how to capture the best quality images
and videos.
Refer to the included Video ToolBox manual to learn how to capture and store
images and videos, as well as how to annotate and label images and more.
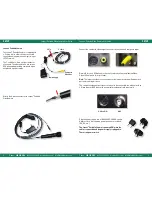
Composite input
Plug the power supply into a 100-240 VAC, 50-60 Hz outlet.
Adapters for a few common power outlets are included.
(UK, EU, etc.)
The Luxxor
®
Portable Camera is powered on when the
cable is connected and the power supply plugged in.
There is no power switch.
after the software has been properly installed,
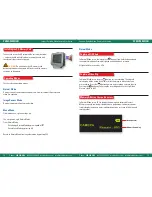
connect
the composite output from the Y-cable to the composite
input (yellow) of the VC-USB2.
If not already done, connect the 6-pin circular connector
of the Y-cable to the Luxxor
®
Portable Camera.
Now plug the USB connector of the VC-USB2 capture device into the USB
port you plan to use.
note:
If you later plug the VC-USB2 into a different
USB port on your computer, the Found New Hardware Wizard will run
again. In some versions of Windows you will see a warning screen that the
device driver has not passed Windows Logo testing. If this appears, click
CONTINUE ANYWAY.
Installation is now complete. Double-click the Video ToolBox icon on your
desktop to start the program. When the program starts up, you should
have a live image on your screen.
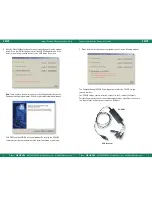
If you have no live image, click the Settings button and choose Video
Device in the left-hand column of the window that appears. Make sure that
the Video Source box is set to Video Composite as shown below.


