background image

3

• 

Please read and follow the instructions, and keep this manual in a safe place.

• 

 To avoid damage to this product, be careful not to overtighten or improperly 

thread any of the threaded fittings. 

• 

 Clean this product with only a soft, dry cloth. 

• 

 Make sure that this product is intact and that there are no missing parts. 

• 

 Support surfaces should be sturdy and flat. Do not install this product on a weak, 

uneven surface. 

• 

 Do not exceed the maximum load capacity.

• 

 It is recommended that at least 2 people perform the installation process to 

prevent injury from mishandling or dropping the product and/or flat-panel 
displays.  

• 

 Do not set up the product on an unsteady structure or one that is prone to 

vibration, has a chance of being impacted, or is susceptible to other movements; 
do not install near a heater, fireplace, or any other source of direct heat energy.
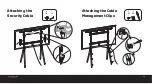
• 

 Always use the included security cable system when installing this product.  

• 

 Do not use this product for any flat-panel display other than what it is intended 

for; the exact specification, size parameters, and weight limits are found both on 
the product box and in the instruction manual. 

• 

 The included mounting hardware (anchor screws, anchors, and anchor washers) 

is not intended for use on metal studs, and may not be appropriate for old or 
weak walls; it is best to consult with a qualified professional to determine 
whether your wall is capable of supporting this bracket.

• 

This product may contain small parts which can possibly pose a choking hazard; 

keep out of reach of children and pets.  

• 

If you have safety concerns about assembling this product, contact a qualified 

professional or installation contractor. 

• 

If this product is missing hardware or there are defective parts, visit 

www.madebygabor.com or call Customer Service at 212-594-2353. 

• 

All images are for illustrative purposes only.

Safety Warnings

Summary of Contents for GABOR FPS-L

Page 1: ...UserManual FPS L MODERN EASEL DISPLAY STAND forLargeFlat PanelDisplays ...

Page 2: ...display flat panel monitors from 50 to 70 inches and up to 88 pounds Your screen will sit at an optimal viewing height on four stable wooden legs and the cable management will keep your setup looking clean without cords everywhere There is added security with an anti tipping system which protects your display from accidentally tipping if anyone gets too close Thank you for choosing Gabor ...

Page 3: ...ce of direct heat energy Always use the included security cable system when installing this product Do not use this product for any flat panel display other than what it is intended for the exact specification size parameters and weight limits are found both on the product box and in the instruction manual The included mounting hardware anchor screws anchors and anchor washers is not intended for ...

Page 4: ...idth 32 4 in 82 3 cm Depth 20 5 in 52 1 cm Max Weight Capacity 88 lb 40 kg Material Steel beechwood Weight 18 1 lb 8 2 kg VESA Mounting Patterns 200 200 mm 300 200 mm 300 300 mm 400 200 mm 400 300 mm 400 400 mm 500 400 mm 600 400 mm Product Specifications 700mm 200mm 600mm 800 mm 5 0 0 m m 200 400mm 1050 mm 1380 mm ...

Page 5: ...X K L M N O 4X 4X 4X 4X 8X Required Tools Drill Phillips screwdriver Hammer Stud finder 1 8 in 3 5 mm Wood drill bit 9 32 in 7 mm Concrete drill bit Pencil M5 M6 M8 Security clamp Security clip Security cable Wall anchors Security washer Large spacers Anchor screws 2 mm hex wrench Q 1X R S 2X 2X P 8X T 1X V 4X W 2X U 4X M8 30 mm screws M8 50 mm screws Rectangle washers M6 30 mm screws Small spacer...

Page 6: ... Assembling the Easel Stand H 1X A 1X B 2X C 4X A C B H Recommended distance 2 to 6 in 50 to 150 mm Note Secure the locking collar before attaching the TV screen Make sure the screw holes face backwards ...

Page 7: ... that best fit your display Hand thread the screws to determine the correct diameter J L M N K I O 8X 4X 4X 4X 4X 4X 4X D 1X P 8X R 2X W 2X E 1X If Your Display Has Recessed Mounting or a Curved Back install the spacers between the bracket and your display TOP D E R R N OR With combined spacers Too Short Too Long Warning If the screw is too short it may not hold the display If it s too long it may...

Page 8: ...8 Mounting the Display On the Easel Stand Mounting the Display On the Easel Stand Important We recommend that two people perform this step Note Make sure the display is not resting directly on the riser ...

Page 9: ... damage to your display or cause serious personal injury 1 Use a stud finder to locate the edges of the wooden studs and mark the center Use a pencil to mark drilling holes for the four anchor screws 2 Use a 1 8 inch 3 5 mm wood drill bit to predrill the marked spots 1 6 inches 40 mm deep and then clean out the debris from the holes Attaching the Security Clamps to Wooden Studs 3 Use the four anch...

Page 10: ...bits cracks or other defects this may result in failure of the clamp anchors and result in damage to your display or cause serious personal injury Warning Do not drill into the mortar between concrete blocks 1 Use a pencil to mark drilling holes for the four anchor screws 2 Use a 9 32 inch 7 mm concrete drill bit to predrill the marked spots 1 6 inches 40 mm deep and then clean out the debris from...

Page 11: ...11 Attaching the Security Cable Q 1X T 1X Attaching the Cable Management Clips G 6X F 6X ...

Page 12: ...age or defect caused by misuse neglect accident alteration abuse improper installation or maintenance EXCEPT AS PROVIDED HEREIN THE WARRANTY PROVIDER MAKES NEITHER ANY EXPRESS WARRANTIES NOR ANY IMPLIED WARRANTIES INCLUDING BUT NOT LIMITED TO ANY IMPLIED WARRANTY OF MERCHANTABILITY OR FITNESS FOR A PARTICULAR PURPOSE This warranty provides you with specific legal rights and you may also have addit...

Reviews: