background image

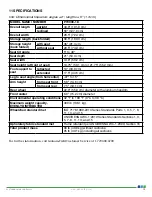
11 SPECIFICATIONS

Info: Dimensional tolerance: angles ± 2°, lengths ± .5" (1.3 cm)

MODEL NAME / NUMBER

PT3000-18

Overall length

upright

39.8" (101.0 cm)

reclined

50" (127.0 cm)

Overall width

28.5" (72.4 cm)

Storage length (back folded)

39.5" (100.3 cm)

Storage height 

(back folded)

with seat

36" (91.4 cm

without seat

29.5" (74.9 cm)

Seat tilt angle

5° to 40°

Seat depth

21" (53.3 cm)

Seat width

19.8" (50.2 cm)

Seat height (at front of seat)

19.75" (50.1 cm) or 21.75" (55.2 mm)

Foot support to 

seat

retracted

13" (33.0 cm)

extended

17.5" (44.5 cm)

Leg to seat angle (from horizontal)

-97° to 15°

Arm height

from seat front

5.8" (14.6 cm)

from seat rear

7.5" (19.1 cm)

Rear wheel

22.0" (55.9 cm) diameter with aluminum handrim

Front caster

6.0" (15.2 cm) diameter

Environmental operating conditions 32 °F to 100 °F (0 °C to 38 °C)

Maximum weight capacity, 

EVENLY DISTRIBUTED

300 lb (136.1 kg)

Wheelchair standard met

ISO 7176:1989-2014 Series Standards Parts 1, 3, 5, 7, 8, 

11, 13, and 15

ANSI/RESNA WC-1:2019 Series Standards Sections 1, 3, 

5, 7, 8, 11, 13, and 15

Upholstery fabric standard met

Flame retardant per ANSI/RESNA WC-1:2009, Section 16

Total product mass

90 lb (40.8 kg) without cushions; 

95 lb (43.1 kg) including all cushions

For further information, call Graham-Field Customer Service at 1.770.368.4700.

 28

EJ_PT3000-18-INS-LAB-RevC22 


www.grahamfield.com


Summary of Contents for Everest Jennings PURETILT PT3000-18

Page 1: ...EJ_PT3000 18 INS LAB RevC22 PURETILT PT3000 18 MANUAL TILT WHEELCHAIR SERVICE AND MAINTENANCE MANUAL SAVE THIS MANUAL FOR FUTURE USE ...

Page 2: ... 18 LEGREST FOOTPLATE 18 ADJUST LEGREST FOOTPLATE LENGTH 18 ADJUST LEGREST ANGLE 19 RETRACT LEGREST FOR STORAGE OR FOOT PROPULSION 19 SEAT 20 SEAT TILT FORCE 20 ADJUST SEAT TILT FORCE 21 WHEEL LOCKS 22 ADJUST WHEEL LOCKS 22 8 TRANSPORTING THE PURETILT 23 PREPARATION FOR TRANSPORT FOLDING THE WHEELCHAIR 23 FOLD BACK FORWARD 23 TRANSPORTING THE WHEELCHAIR 23 9 MAINTENANCE 24 SERVICE MANUAL 24 DO IT ...

Page 3: ...bleshooting procedures and adjustment procedures are included in this manual When it comes to service and repair remember that your GF authorized distributor knows your wheelchair best The person performing adjustments on the PureTilt has the responsibility of making certain that the user can safely operate the wheelchair with the adjustments selected This person must evaluate the user s ability w...

Page 4: ...the downward position WARNING Keep hands free of moving parts WARNING Do not operate this wheelchair on streets or roadways WARNING Do not operate this wheelchair on hilly or rough terrain sand mud snow wet or icy surfaces or surfaces with impaired traction Ensure that pathway is clear of all obstacles WARNING Do not operate this wheelchair in shower pool or water WARNING Do not turn wheelchair wh...

Page 5: ...and rotate casters fully toward front of wheelchair WARNING Unauthorized modification or the use of non Everest Jennings replacement parts could change the structure of the wheelchair void the warranty and create a hazardous condition resulting in serious personal injury WARNING Do not lean on this wheelchair or use it as a walker these are practices which could result in loss of balance and perso...

Page 6: ...d a headrest The following features are standard Tilting seat with adjustment capability from 5 to 40 depending on body weight and tilt force adjustment position User caregiver operated seat tilt adjustment mechanism assisted by a gas spring piston Hinged non detachable arms that swing up and back to facilitate transfer Built in housing for compatible transfer board Two 22 in 55 9 cm diameter rear...

Page 7: ...ervice or Technical Support staff at 1 770 368 4700 it will allow us to better assist you and quickly answer your questions and concerns B WARNING Do not Operate Before Reading And Understanding Operator s Manual C WARNING Do Not Occupy While In Motor Vehicle D WARNING Do Not Occupy Without Anti tippers Installed E WARNING Not A Step Do Not Stand Do not Lift From Here F WARNING Do Not Occupy Witho...

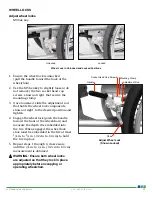
Page 8: ...ureTilt frame pull the wire lock off the end of the pin pivot wire lock out of the way and pull the pin from the tube 3 Insert a caster stem into the caster mounting tube 4 Align the upper caster stem through hole to match factory set rear wheel high height with the two mounting tube holes Info Contact your GF authorized distributor when your rear wheels or casters need adjustment or if you wish t...

Page 9: ...Ensure the lanyard is not caught in the moving parts of the wheelchair WARNING When in use anti tippers must be positioned with wheels downward Info To travel over curbs the anti tippers may be temporarily positioned with wheels upward INSTALLING THE HEADREST Info To install headrest orient the convex surface of the headrest padding toward the front of the wheelchair as shown at right 1 Insert the...

Page 10: ...earward The back will lock into place in the upright position WARNING Ensure seat back and arms are locked in place before occupying or operating wheelchair FOLDING the Wheelchair 1 Engage wheel locks on both sides 2 Push down on release bar and rotate back frame forward as shown above 3 Remove the seat cushion to further lower the back 10 EJ_PT3000 18 INS LAB RevC22 www grahamfield com ...

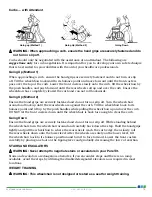
Page 11: ...ties do so as instructed in the following paragraphs to avoid tipping the wheelchair TRANSFER WARNING Always ensure the wheelchair is on a stable level surface before transfer WARNING Always engage wheel locks before transfer WARNING Do not step on the footplate this could cause the wheelchair to tip Fold it up and secure it under leg pads WARNING There is a critical moment when there is little or...

Page 12: ...ward 1 Maneuver the wheelchair as close as possible to the object you wish to reach 2 Rotate both casters fully forward Go forward and then back the wheelchair toward the object to swing the casters fully forward 3 Engage both wheel locks 4 Ensure the casters are rotated fully forward before reaching If not repeat step 2 Reaching Bending Backward WARNING Do not engage the wheel locks while reachin...

Page 13: ...ealthcare professional first before attempting any inclines declines or ramps Always inspect the ramp for hazards such as holes slippery or uneven surfaces etc before starting up or down If you can not see the entire ramp ask someone to inspect it for you Ascent Lean the upper part of your body slightly forward as shown above as you ascend the incline If it becomes necessary to stop on the incline...

Page 14: ... are against the curb Tilt the wheelchair back to its balance point and lift up by the push handles while pulling the wheelchair up and over the curb DO NOT let the front casters down until the wheelchair is back far enough to clear the curb Going Down Ensure the hand grips are securely fastened and do not turn or slip off While standing behind the wheelchair turn the wheelchair around and careful...

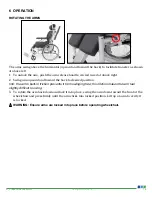
Page 15: ...ired position Info the arm s built in friction prevents it from swinging free this friction makes the arm feel slightly difficult to swing 3 To rotate the arm back down and lock it into place swing the arm down toward the front of the wheelchair and press firmly until the arm clicks into locked position Lift up on arm to verify it is locked WARNING Ensure arms are locked into place before operatin...

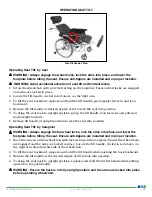
Page 16: ...forward 6 Release tilt handle at upright position to lock the seat into position Operating Seat Tilt by Caregiver WARNING Always engage the the wheel locks lock the arms into place and lower the footplate before tilting the seat Ensure anti tippers are installed and in proper location 1 Have the user sit on the wheelchair with feet resting on the footplate Ensure the wheel locks are engaged and th...

Page 17: ...er components yourself since special tools and training are required Please contact your GF authorized distributor when your rear wheels or casters need adjustment or if you wish to change seat height Info Seat height is factory set in the highest position Changing seat height wheel position requires wheel lock adjustment BACK The PureTilt back has the following features Adjustable back height pos...

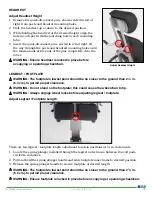
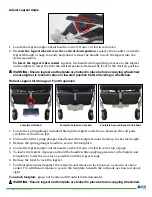
Page 18: ...be no closer to the ground than 2 1 2 in 6 4 cm to permit proper clearance WARNING Do not stand on the footplate this could cause the wheelchair to tip WARNING Always engage wheel locks before adjusting legrest footplate Adjust Legrest Footplate Length There are ten legrest footplate length adjustment location positions at 1 2 in increments 1 Locate the spring plunger installed through the legrest...

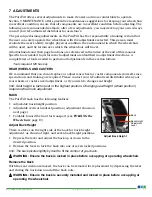
Page 19: ...plate Unfolded 1 Locate the spring plunger installed through the legrest outer frame between the calf pads circled in red at above left 2 Pull and hold the spring plunger handle and slide footplate inner frame up to shortest length 3 Release the spring plunger handle to secure the footplate 4 Locate the legrest angle control handle on the left arm circled in red at top of page 5 To lower the legre...

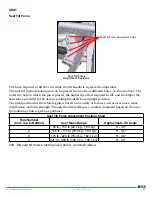
Page 20: ...f to an upright position The ideal position for the retaining pin is based on a variety of factors such as user mass mass distribution and arm strength Though the ideal setting is a comfort judgment based on the user the following chart is given as guidance Seat Tilt Force Adjustment Position Chart Hole Number from Top to Bottom User Mass Range Approximate Tilt Angle 1 50 lb 155 lb 22 7 kg 70 3 kg...

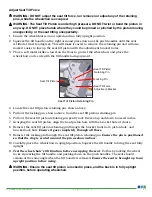
Page 21: ...lt piston retaining pin shown above 5 Pull out the locking pin shown above from the seat tilt piston retaining pin 6 Pull out the seat tilt piston retaining pin gently rock the seat up and down to assist in this 7 Grasping the seat tilt piston align the front piston hole with the bracket hole of choice 8 Reinsert the seat tilt piston retaining pin through the bracket front hole piston hole and bra...

Page 22: ...tighten 4 Engage the wheel lock push the handle toward the front of the wheelchair and measure the depth it is embedded into the tire When engaged the wheel lock shoe must be embedded in the tire at least 1 8 in to 1 4 in 32 cm to 64 cm to hold the tire in place 5 Repeat steps 1 through 4 if necessary until the 1 8 in to 1 4 in 32 cm to 64 cm measurement is obtained WARNING Ensure both wheel locks...

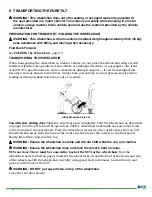
Page 23: ...personal injury when loading or lifting a wheelchair into or out of a vehicle Lifting Wheelchair into Van Van with side sliding door Slide the side door open completely Fold the wheelchair as described on page 10 and face it toward the open door Tilt the wheelchair backwards as shown above and roll it forward on the rear wheels Push the wheelchair forward so the casters enter the van Tilt the whee...

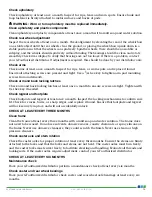
Page 24: ... or personal injury DO IT YOURSELF MAINTENANCE You can do many of the scheduled maintenance tasks yourself if you have mechanical ability and a few basic tools Refer to the following maintenance schedule for the recommended regularity of each procedure If any maintenance procedure is not clear to you ask your GF authorized distributor for assistance s NOTICE Improper maintenance can cause operatin...

Page 25: ... hardware is properly aligned and secure Check wheel lock engagement Check wheel lock engagement at least once a week See Adjust wheel locks in Section 7 to adjust wheel lock engagement If a wheel lock is worn or damaged replace it immediately Inspect the hardware for looseness or signs of wear Ensure the locking mechanism operates smoothly The locking assembly should be tight enough so that the w...

Page 26: ...ocking latches at least once a month to ensure screws are tight Tighten with 9 64 hex key if needed Check legrest and footplate Check footplate and legrest at least once a month Inspect the locking mechanisms to confirm sure fit Check for cracks burrs or sharp edges and replace if found Ensure that footplate and legrest will lock securely in place and will not accidentally unlock CHECK AT LEAST EV...

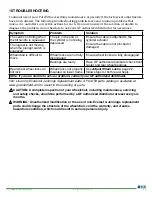
Page 27: ...nsure wheel locks are fully disengaged Bearings are faulty Have GF authorized distributor check front caster and rear wheel bearings Rear wheel wheel locks do not lock Wheel locks not properly mounted on lower frame See Adjust Wheel Locks page 22 follow steps for both rear wheels Note if you are unable to solve a problem contact your GF authorized distributor Info Use only Everest Jennings replace...

Page 28: ...15 Arm height from seat front 5 8 14 6 cm from seat rear 7 5 19 1 cm Rear wheel 22 0 55 9 cm diameter with aluminum handrim Front caster 6 0 15 2 cm diameter Environmental operating conditions 32 F to 100 F 0 C to 38 C Maximum weight capacity EVENLY DISTRIBUTED 300 lb 136 1 kg Wheelchair standard met ISO 7176 1989 2014 Series Standards Parts 1 3 5 7 8 11 13 and 15 ANSI RESNA WC 1 2019 Series Stand...

Page 29: ...12 DISPOSAL Dispose of wheelchair in accordance with local regulations 29 EJ_PT3000 18 INS LAB RevC22 www grahamfield com ...

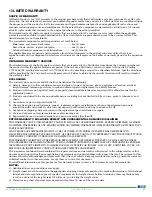
Page 30: ...of a non durable nature including but not limited to filters fuses gaskets lubricants and charts 4 Accessories or parts not provided by GF 5 Charges by anyone for adjustments repairs replacement parts installation or other work performed upon or in connection with such products which are not expressly authorized in writing in advance by GF 6 Any labor or shipping charges incurred in the replacemen...

Page 31: ...aintenance 24 Maintenance check at least every month 25 Maintenance check at least every six months 26 Maintenance check at least every three months 26 Maintenance check at least every week 25 N NOTICE statement significance 3 O Operating seat tilt by caregiver 16 Operating seat tilt by user 16 Operation 15 P PureTilt illustration 6 R Ramps and Inclines 13 Reaching bending 12 Rear wheel adjustment...

Page 32: ...on contained herein is subject to change without notice The most current and complete product information can be found on our website 2021 GF Health Products Inc All Rights Reserved Everest Jennings is a registered trademark of GF Health Products Inc PureTilt is a trademark of Proactive Comfort LLC Chantilly VA 20151 Manufactured By ...

Reviews: