background image

GD_6700-6800-INS-LAB-RevA21 • Regency 6700 / 6800 User Manual 

13

CURBS — WITH ATTENDANT


Going up (Method 1) 

Going Up (Method 2) 

(Going Down)

  WARNING: When approaching a curb, ensure the hand grips are securely fastened and do 

not turn or slip off.

Curbs should only be negotiated with the assistance of an attendant. The following are 

suggestions only

 for curb negotiation. It is important for you to develop your own safe technique 

that is best suited for your abilities with the aid of your healthcare professionals.

Going Up (Method 1)

When approaching a curb, ensure the hand grips are securely fastened and do not turn or slip off. 
Tilt the wheelchair backward to its balance point and move forward until the front casters pass 
over the top of the curb. Lower the front casters slowly onto the curb while lifting the wheelchair 
by the push handles, and push forward until the rear wheels roll up and over the curb. Ensure the 
wheelchair has completely cleared the curb and can not roll backwards.

Going Up (Method 2)

Ensure the hand grips are securely fastened and do not turn or slip off. Turn the wheelchair 
around and back up until the rear wheels are against the curb. Tilt the wheelchair back to its 
balance point and lift up by the push handles while pulling the wheelchair up and over the curb. 
DO NOT let the front casters down until the wheelchair is back far enough to clear the curb.

Going Down

Ensure the hand grips are securely fastened and do not turn or slip off. While standing behind 
the wheelchair, turn the wheelchair around and carefully back down the step. Hold the handgrips 
tightly and pull the wheelchair to where the rear wheels reach the curb edge, then slowly roll 
the rear wheels down onto the lower level. After the wheels are safely on the lower level, tilt the 
wheelchair back to its balance position and turn it face forward. Lower the front casters carefully 
by placing one foot on the tipping lever and gradually decreasing the force of exertion.

STAIRS AND ESCALATORS

  WARNING: Never attempt to negotiate stairs or escalators in your Regency 6700 / 6800.

Stairs and escalators are dangerous obstacles. If you encounter steps and there is no ramp 
available, avoid the steps by utilizing the disabled designated elevators now required in most 
locations.

WEIGHT TRAINING

  WARNING: This wheelchair is not designed or tested as a seat for weight training.

Summary of Contents for GENDRON 6700

Page 1: ...before operating your wheelchair Save this manual for future use The most current version of this manual can be found online at www grahamfield com 6700 Standard 6700 Recliner 6800 Standard 6800 Recl...

Page 2: ...14 REAR WHEELS CASTERS 14 ARMS 14 REMOVE ARM 14 INSTALL ARM 14 ADJUST ARM POSITION 15 SWINGAWAY FOOTREST ELEVATING LEGREST 15 SWING FOOTREST LEGREST AWAY FOR TRANSFER 15 RETURN FOOTREST LEGREST TO OP...

Page 3: ...inuing commitment to provide innovation and quality in our products The Regency 6700 6800 is a manual folding wheelchair suitable for frequent users who require a portable wheelchair fitted to their a...

Page 4: ...DISTRIBUTED WARNING Do not operate this wheelchair on streets or roadways WARNING Do not operate this wheelchair on hilly or rough terrain sand wet or icy surfaces or surfaces with impaired traction...

Page 5: ...efore leaning or reaching forward sit back in the seat and rotate casters fully toward front of wheelchair WARNING Unauthorized modification or the use of non Gendron replacement parts could change th...

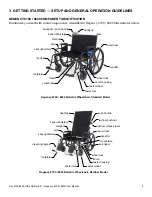
Page 6: ...atric Wheelchair Standard Model armpad back upholstery backpost push handle arm footrest seat upholstery rear wheel handgrip caster wheel wheel lock caster housing frame crossbrace caster fork handrim...

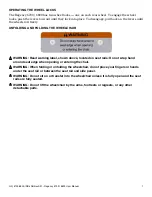
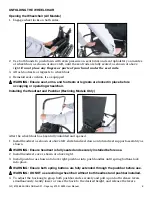
Page 7: ...OLDING THE WHEELCHAIR WARNING Read warning label shown above located on seat rails Do not wrap hand around seat edge when opening or entering the chair WARNING When folding or unfolding the wheelchair...

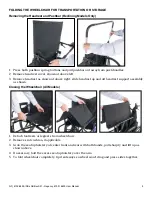
Page 8: ...elchair Installing the Headrest and Pushbar Reclining Models Only After the wheelchair has been fully unfolded and opened 1 Install headrest as shown at above left slide headrest down onto headrest su...

Page 9: ...left 3 Remove headrest as shown at above right slide headrest up and off headrest support assembly as shown Closing the Wheelchair All Models 1 Detach footrests or legrests from wheelchair 2 Remove s...

Page 10: ...n and center of gravity When performing such activities do so as instructed in the following paragraphs to avoid tipping the wheelchair TRANSFER WARNING Always ensure the wheelchair is on a stable lev...

Page 11: ...ld cause the wheelchair to tip Reach Forward Reach Sideward 1 Maneuver the wheelchair as close as possible to the object you wish to reach 2 Rotate both casters fully forward Go forward and then back...

Page 12: ...sional first before attempting any inclines declines curbs or ramps Always inspect the ramp for hazards such as holes slippery or uneven surfaces etc before starting up or down If you can not see the...

Page 13: ...the wheelchair around and back up until the rear wheels are against the curb Tilt the wheelchair back to its balance point and lift up by the push handles while pulling the wheelchair up and over the...

Page 14: ...el All adjustments and their page locations are referenced in the index at the end of this manual Specific tools needed to perform each adjustment are identified in adjustment directions A complete li...

Page 15: ...arance WARNING Do not stand on the footplates this could cause the wheelchair to tip SWING FOOTREST LEGREST AWAY FOR TRANSFER 1 Push swingaway release lever at top of Footrest Legrest rearward Footres...

Page 16: ...2 inches WARNING Ensure footplate extensions are securely installed inside footrest or legrest before occupying or operating wheelchair ELEVATING LEGREST RAISE LEGREST WARNING Avoid potential pinch p...

Page 17: ...t relative to the wheelchair s seat to floor height appropriate settings are shown at above right If seat to floor height is altered the anti tipper settings must also be changed All components remain...

Page 18: ...may need adjustment to prevent the rear wheels from turning when the wheel locks are engaged To adjust wheel locks 1 Use a 7 16 wrench to loosen the two locknuts shown at right until the lock slides...

Page 19: ...nal injury when loading or lifting a wheelchair into or out of a vehicle Lifting Wheelchair into Rear Seat or Trunk Rear Seat Move the front seat as far forward as possible Face the wheelchair toward...

Page 20: ...cause more serious problems and or personal injury DO IT YOURSELF MAINTENANCE You can do many of the scheduled maintenance tasks yourself if you have mechanical ability and a few basic tools Refer to...

Page 21: ...h handrim for rough or sharp edges and if any are found replace handrims immediately Ensure that all hardware is properly aligned and secure CHECK WHEEL LOCK ENGAGEMENT Check wheel lock engagement at...

Page 22: ...could weaken the arm and replace if found Ensure all attaching screws are present and tight Use a Phillips screwdriver to tighten armpad mounting screws Check for burrs on the screw heads and replace...

Page 23: ...nut is too loose the caster will flutter or shimmy if too tight the wheelchair will be difficult to steer If the caster stems require adjustment or the stem bearings require replacement contact your...

Page 24: ...positions and that casters are mounted in identical positions Caster stem s may be adjusted improperly See distributor to correct adjustment looseness in wheelchair squeaks rattles caster flutter slu...

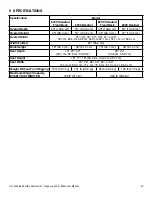
Page 25: ...33 35 37 39 41 or 43 78 7 cm 83 8 cm 88 9 cm 94 0 cm 99 1 cm 104 1 cm or 109 2 cm Width Folded 22 55 9 cm Back Height 18 45 7 cm 36 91 4 cm 18 45 7 cm 36 91 4 cm Seat Depth 18 20 22 45 7 cm 50 8 cm 5...

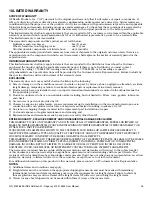
Page 26: ...the applicable product 3 Products considered to be of a non durable nature including but not limited to filters fuses gaskets lubricants and charts 4 Accessories or parts not provided by GF 5 Charges...

Page 27: ...ms check 21 Headrest installing reclining models only 8 I Info statement significance 3 Introduction 3 L Legrest adjust calf pad position 16 Legrest raise legrest 16 Limited warranty 26 M Maintenance...

Page 28: ...can be found on our website www grahamfield com www gendroninc com 2021 GF Health Products Inc All Rights Reserved Gendron is a trademark of GF Health Products Inc GF Health Products Inc is an ISO 13...

Reviews: