background image

LX_FR565G-INS-LAB-RevD21 8

Operation of the Position Stabilization Mechanism

  WARNING: Before engaging the position 

stabilization handle, lock all casters.

1.  To hold the recliner in any position, rotate the 

position stabilization handle so that it points 
upward.

2.  To release the position stabilization mechanism, 

rotate the position stabilization handle so that it 
points downward.

Info: The position stabilization mechanism is factory 

set. If the position stabilization mechanism does not 

hold, follow the Adjustment Instructions for Position Stabilization Mechanism below. The plate 

has 5 position marks for repeatable positions (see picture below).
RECLINER POSITION STABILIZATION MECHANISM TROUBLESHOOTING GUIDE
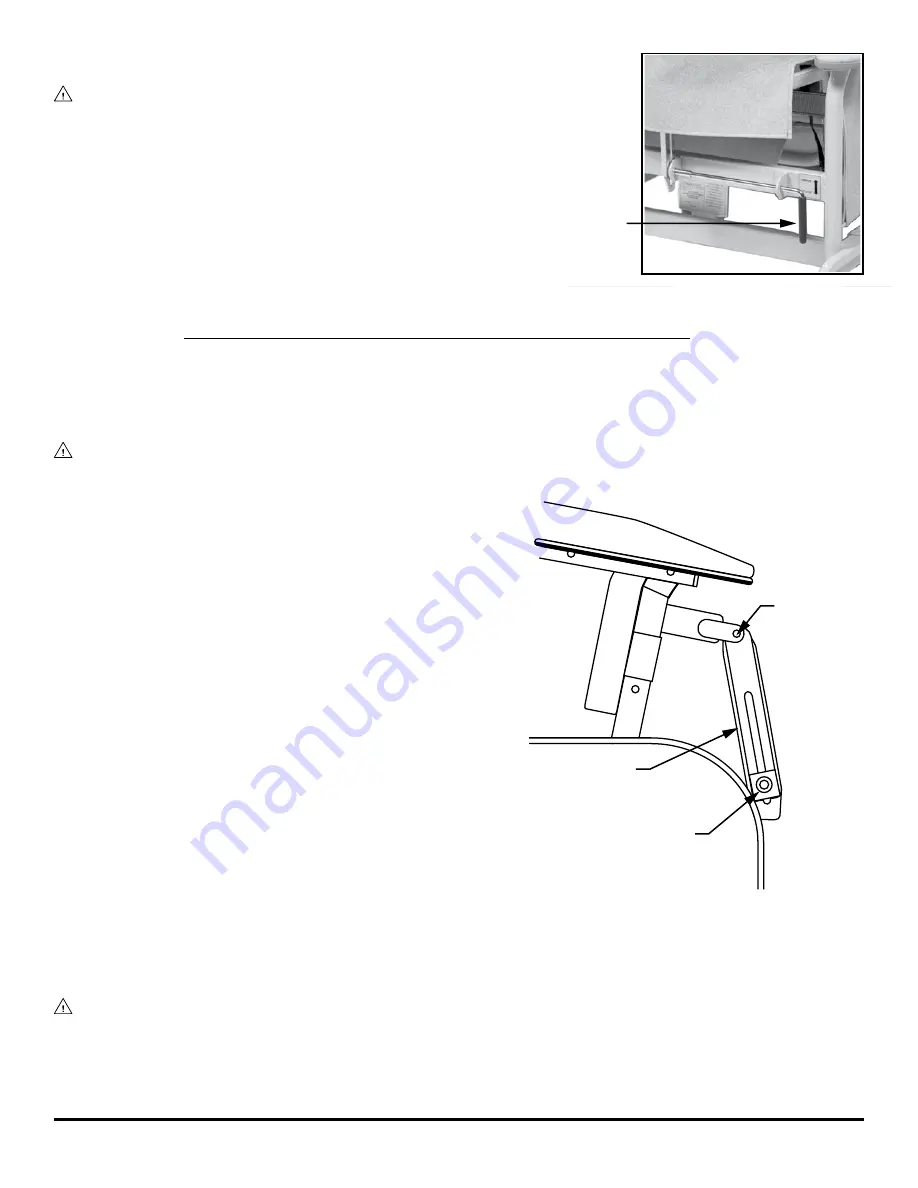
Adjustment Instructions for Positioning Stabilization Mechanism

  WARNING: DO NOT lubricate the position stabilization mechanism assembly. The recliner 

could fail to stabilize in position and cause severe personal injury.

1.  Refer to illustration at right.
2.  Turn the position stabilization handle 

downward to the release position. Remove 
the top clevis pin by removing the ring cotter 
pin and sliding the clevis pin out of the 
mechanism.

3.  Slide the positioning plate upward so that you 

can turn the square washer clockwise until it is 
snug again.

4.  Slide the positioning plate down over the 

square washer and put the clevis pin in, but 
do not put the ring cotter pin in. Rotate the 
position stabilization handle upward to ensure 
that the correct tension is on the positioning 
plate. If the position stabilization handle is 
still too loose, remove the clevis pin again 
and repeat Step 2. Once the proper amount of 
tension is on the positioning plate, slide the 
positioning plate down over the square washer, 
put the clevis pin back into place, and secure 
with the ring cotter pin.

5.  The position stabilization handle should engage at about the halfway point.

  WARNING: Before use, ensure that clevis pin and ring cotter pin are secure.

Recliner Position Stabilization Mechanism

Troubleshooting

clevis pin with

ring cotter pin

positioning plate

square washer

position 

stabilization handle

(shown engaged)

position 

stabilization handle

(shown engaged)

position 

stabilization handle

(shown released)

Semi Recline

Full Recline

Position Stabilization Handle

Summary of Contents for Lumex FR565G Series

Page 1: ...d Operating Instructions IMPORTANT READ THIS MANUAL BEFORE OPERATING THE LUMEX FR565G PREFERRED CARE RECLINER SAVE THIS MANUAL FOR FUTURE USE THE MOST CURRENT VERSION OF THIS MANUAL CAN BE FOUND ONLIN...

Page 2: ...7 OPERATION OF THE POSITION STABILIZATION MECHANISM 8 RECLINER POSITION STABILIZATION MECHANISM TROUBLESHOOTING GUIDE 8 ADJUSTMENT INSTRUCTIONS FOR POSITIONING STABILIZATION MECHANISM 8 UPHOLSTERY REM...

Page 3: ...s which may be the same as or similar to the following or specific to the operations Please note the following special statements used throughout this manual and their significance WARNING Indicates a...

Page 4: ...to www p65warnings ca gov furniture WARNING GF Health Products Inc specifically disclaims responsibility for any bodily injury or property damage which may occur during any use which does not comply...

Page 5: ...t b One upholstered back c Two clevis pins with ring cotter pins 3 DO NOT remove the wooden shipping support that is attached to the recliner s upholstered back until after the recliner s upholstered...

Page 6: ...nd ring cotter pins Remove the wooden shipping support and discard 6 Slide the lower elastic band on back frame downward to cover the clevis pins Position other straps evenly on back frame Info The 2...

Page 7: ...tension on the reclining mechanism This stabilization mechanism can only be activated by the caregiver It is not a patient activated feature Operation of the Recline Mechanism By the patient Place han...

Page 8: ...ase position Remove the top clevis pin by removing the ring cotter pin and sliding the clevis pin out of the mechanism 3 Slide the positioning plate upward so that you can turn the square washer clock...

Page 9: ...leg cushion forward and release the two hooks that hold the seat leg cushion to the legrest frame Slide the seat leg cushion downward and forward and remove it from the recliner frame To Replace Rever...

Page 10: ...ible Check compatibility when using this product in combination with painted or varnished surfaces Disinfectants In addition to cleaning healthcare facilities maintain disinfecting regimens to reduce...

Page 11: ...ng purposes in patient care areas where Uncertainty exists as to the nature of the soil on the surfaces whether it is blood or body fluid or just normal dust or dirt Uncertainty exists regarding the p...

Page 12: ...astic components are provided with a plastic types code and fiber content to aid sorting of plastic parts Product Metal Scrap Cable Scrap Electronic Scrap Plastic Recycling or Combustion FR565G X X N...

Page 13: ...ing Weight 76 lb 34 5 kg Maximum Weight Capacity 250 lb 113 kg EVENLY DISTRIBUTED For complete technical specifications please call the Graham Field Technical Support Group at 1 770 368 4700 ACCESSORI...

Page 14: ...filters fuses gaskets lubricants and charts 4 Accessories or parts not provided by GF 5 Charges by anyone for adjustments repairs replacement parts installation or other work performed upon or in con...

Page 15: ...itioning stabilization mechanism adjustment instructions and troubleshooting guide 8 Position stabilization mechanism operation 8 Proposition 65 WARNING 4 R Recline mechanism operation 7 Recliner oper...

Page 16: ...on can be found on our website www grahamfield com 2006 GF Health Products Inc All Rights Reserved Lumex is a trademark of GF Health Products Inc GF Health Products Inc is an ISO 13485 2016 MDSAP Cert...

Reviews: