background image


     21/37 


GrainPro® Solar Bubble Dryer™50 Instruction Manual 


MA4040RAD0914-9 


5.10.


UNLOADING 

5.10.1.


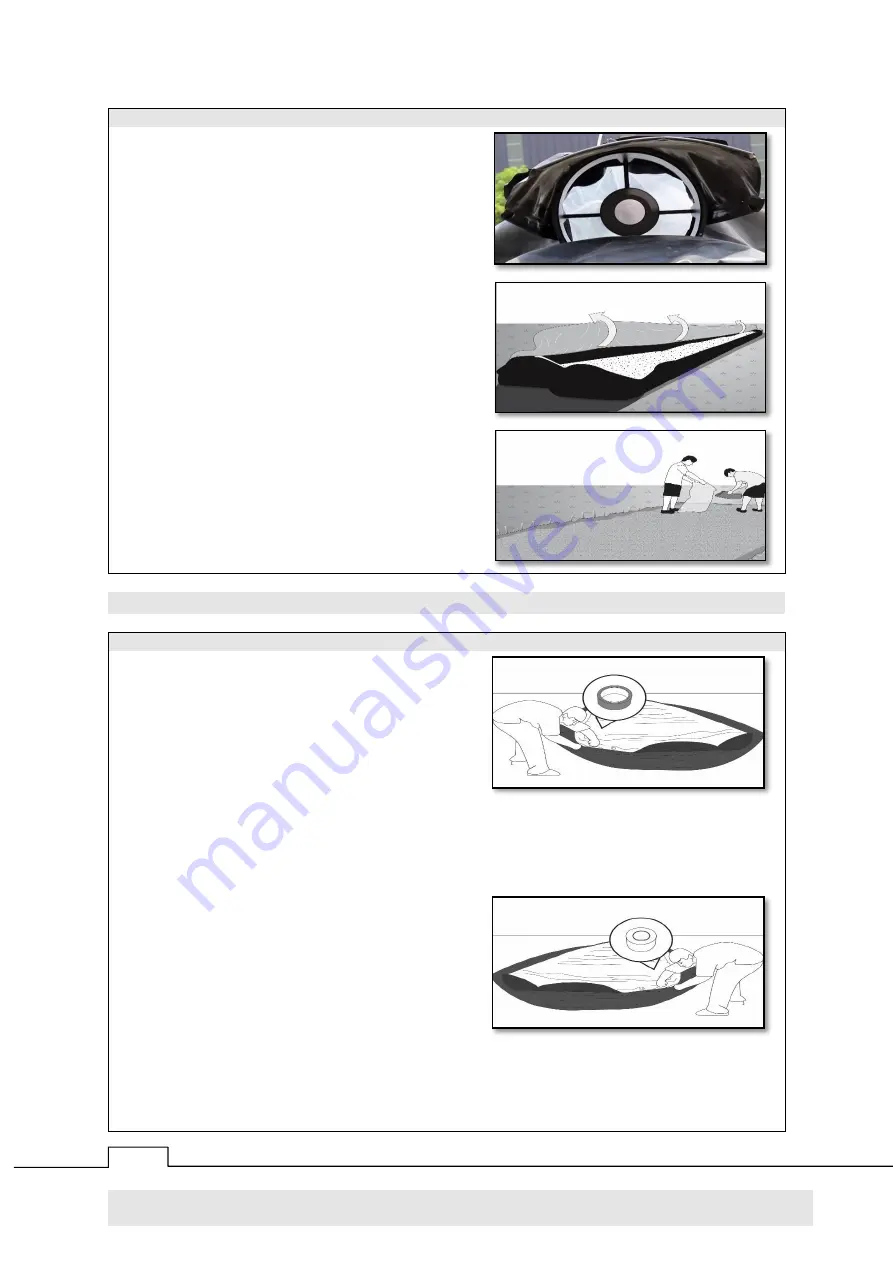
Switch-Off  the  ventilator  after  drying  the 
commodity to the desired moisture content. 


5.10.2.


Open  the  bubble  and  bring  the  top  cover  to 
the other side. 
NOTE: 


The  top  cover  can  also  be  completely 
detached  but  it  is  advisable  not  to 
completely  remove  it  to  protect  the 
commodity in case of sudden rain. 


5.10.3.


Transfer  the  commodity  to  bags  or  other 
preferred container for transport floor. 
NOTE:  


Make  sure  the  tool  for  scooping  the 
commodity  does  not  have  sharp  edges 
that may damage the drying floor. 


6.


MAINTENANCE AND CARE 


6.1.


REPAIRING PUNCTURES AND OTHER DAMAGES 

6.1.1.


Repair procedures (Drying floor): 
a.


Use the ducting tape (grey) found in the 
repair kit to patch the damaged section. 

b.


Clean  the  surface  of  the  damaged  area 
with damp cloth and allow to dry before 
applying the PVC duct tape. 


c.


Cut-out a piece large enough to cover the damaged section to be applied at the outside surface of 
the drying floor preventing from drumming of rake during mixing the commodity. 

d.


Manually press the patching tape against the damaged area. 

6.1.2.


Protective maintenance:  
a.


Check the patched ducting tape occasionally and replace or re-patch if necessary. 

6.1.3.


Repair procedures (Transparent top cover): 
a.


Use the UV-Transparent PE tape found in 
the  repair  kit  to  patch  the  damaged 
section. 

b.


Clean the surface of the damaged section 
with damp cloth and allow to dry before 
applying the PE tape. 


c.


Cut-out a piece large enough to cover the damaged section and to be applied at the outside surface 
of the transparent cover preventing rain water. 

d.


Manually press the patching tape against the damaged section. 

6.1.4.


Protective maintenance: 
a.


Check the patched PE tape occasionally and replace or re-patch if necessary. 

Summary of Contents for Solar Bubble Dryer 50

Page 1: ...GRAINPRO SOLAR BUBBLE DRYER 50 INSTRUCTION MANUAL MA4040RAD0914 9...

Page 2: ...oad Near T Mall Nairobi KENYA Phone 254 710 933 717 Website www grainpro com Email saleseafrica grainpro com GrainPro Mexico Cto Garona No 903 Secci nTres Col Amberes 37237 Le n Gto Mexico Phone Mobil...

Page 3: ...y charging maintenance and storage 23 Safekeeping 24 Recycling 24 Platform installation of Rodent Guard 24 7 TROUBLE SHOOTING SBD SOLAR WIRING HARNESS 25 Case 1 Battery indicator status is steady off...

Page 4: ...that can be used to dry paddy corn coffee and others There are two GrainPro SBD50 commercial models namely SBD50 Solar which operates purely on solar energy to dry the commodity and run the ventilato...

Page 5: ...rent top cover UV LDPE 2 2 2 Drying floor made of black reinforced PVC 610gsm 2 3 REPAIR TAPE 2 3 1 PE repair tape UV resistant and transparent for repair patching of the top cover 2 3 2 PVC duct tape...

Page 6: ...VENTILATOR 2 8 1 12V DC ventilators Two 2 units for SBD50 Solar 2 9 VENTILATOR FRAME 2 9 1 Supporting aluminum clamp to hold the ventilator Two 2 sets 2 10 SOLAR PANELS 2 10 1 Used to convert light in...

Page 7: ...nd toggle switch One 1 assembly 2 14 EXTENSION CORD 2 14 1 Extension wire for SBD50 Electric Ten 10 meter 2 15 AGM BATTERY OPTIONAL 2 15 1 Used to store energy to run the ventilator of SBD50 Solar 70...

Page 8: ...frame Aluminum bars Exhaust Support Frame Aluminum bars Solar panel frame Aluminum profiles N A Ventilator 12V DC Ventilator 2 units 220V AC Ventilator 2units Solar Panel 100W 2 units N A Wiring Harne...

Page 9: ...ing of the SBD50 and solar panel should be on a location where maximum exposure to solar radiation can be obtained 5 2 INSTALLATION 5 2 1 Set up installation a Unfold the SBD50 Take note of the foldin...

Page 10: ...bag is located along the heating area extension of the drying floor 5 Connect the ventilator to the SBD50 body Make sure that the direction of airflow is correct see the arrow printed on the ventilato...

Page 11: ...itry Use bolts and winged nuts as fastener and the provided screw driver to tighten d Horizontal brace One 1 piece e Bolts and winged nuts Sixteen 16 pairs 5 2 4 Exhaust support assembly COMPONENT IMA...

Page 12: ...ree 3 pieces c Iron connector d Bolt and hex nut One 1 set 5 2 6 Tube mixer assembly COMPONENT IMAGE SEQUENCE OF ASSEMBLY a Disassembled tube mixer One 1 unit 1 Connect the three 3 parts of the tube m...

Page 13: ...overcharging will reduce the battery capacity and shorten the battery life span e Do not short circuit the positive and negative terminal otherwise it will easily cause electric shock fire or breakdo...

Page 14: ...If terminal voltage is lower than 12 40V boostcharge battery before installation 5 3 2 Solar Wiring Schematic Diagram for SBD50 Solar 5 3 3 Battery Connection WARNING DO NOT REMOVE SOLAR PANEL COVER U...

Page 15: ...then displaysseven dot 7 The battery indicator also lights up otherwise check whether the connection is right 5 3 4 Solar Panel Connection a Connect the T branch MC4 connectors of the wiring harness...

Page 16: ...Check wires with snap in bullet connectors Connect the longer red wire and longer black wire to 1 ventilator and shorter red wire and shorter black wire to other ventilator Note Shorter wires control...

Page 17: ...ight time operations Turn off the ventilator before loading of commodities 5 3 6 Grounding Connection a Connect the grounding connector green yellow green wire to the two ventilator frames LED lamp In...

Page 18: ...A 10 meter extension cord is provided with the SBD50 Electric Use a longer extension cord if needed Be careful to avoid possible grounding 5 4 2 Grounding Connection Make sure to connect the grounding...

Page 19: ...in the opposite manner 5 7 FIXING WALL WITH SUPPORT LOOPS 5 7 1 There are six 6 support loops which are located at the SBD50 wall a Near the heating area b At halfway length of the drying floor c Nea...

Page 20: ...NG 5 9 1 Rake mixer a Insert the rake mixer along the partly opened zipper liner b Close both zippers up to the rake handle c Mixing is done like a normal rake mixing in sun drying method As the rake...

Page 21: ...of the damaged area with damp cloth and allow to dry before applying the PVC duct tape c Cut out a piece large enough to cover the damaged section to be applied at the outside surface of the drying fl...

Page 22: ...BODY FOLDING INSTRUCTION 6 3 1 Lay down the SBD50 body on a flat surface and be sure that all the components of the body are assembled top cover shall be attached to drying floor 6 3 2 Fold the SBD b...

Page 23: ...y distilled water Do not use tap water d Never add acids electrolyte to cells e Check your batteries once a month after installation to determine the proper watering schedule 6 4 2 Battery Inspection...

Page 24: ...d bumps decks or roadway gutters 6 4 3 Plastic 4 LDPE Low Density Polyethylene can be recycled into compost bins paneling trash can liners and cans floor tiles and shipping envelopes 6 6 PLATFORM INST...

Page 25: ...25 37 GrainPro Solar Bubble Dryer 50 Instruction Manual MA4040RAD0914 9 7 TROUBLE SHOOTING SBD SOLAR WIRING HARNESS 7 1 CASE 1 BATTERY INDICATOR STATUS IS STEADY OFF BATTERY NOT CONNECTED...

Page 26: ...26 37 GrainPro Solar Bubble Dryer 50 Instruction Manual MA4040RAD0914 9 7 2 CASE 2 BATTERY INDICATOR STATUS IS SLOW FLASHING BATTERY UNDER VOLTAGE...

Page 27: ...27 37 GrainPro Solar Bubble Dryer 50 Instruction Manual MA4040RAD0914 9 7 3 CASE 3 BATTERY INDICATOR STATUS IS QUICK FLASHING BATTERY OVER DISCHARGED...

Page 28: ...28 37 GrainPro Solar Bubble Dryer 50 Instruction Manual MA4040RAD0914 9 7 4 CASE 4 SOLAR PANEL CHARGE INDICATOR IS STEADY OFF SOLAR PANEL NO VOLTAGE...

Page 29: ...29 37 GrainPro Solar Bubble Dryer 50 Instruction Manual MA4040RAD0914 9 7 5 CASE 5 SOLAR PANEL CHARGE INDICATOR IS QUICK FLASHING SYSTEM OVER VOLTAGE...

Page 30: ...30 37 GrainPro Solar Bubble Dryer 50 Instruction Manual MA4040RAD0914 9 7 6 CASE 6 LOAD INDICATOR IS STEADY ON BUT THERE IS NO OUTPUT LOAD TURNED ON BUT WITHOUT OUTPUT...

Page 31: ...31 37 GrainPro Solar Bubble Dryer 50 Instruction Manual MA4040RAD0914 9 7 7 CASE 7 LOAD INDICATOR IS STEADY OFF LOAD TURNED OFF...

Page 32: ...32 37 GrainPro Solar Bubble Dryer 50 Instruction Manual MA4040RAD0914 9 7 8 CASE 8 LOAD INDICATOR IS SLOWLY FLASHING AND THERE IS NO OUTPUT OVERLOAD PROTECTION...

Page 33: ...33 37 GrainPro Solar Bubble Dryer 50 Instruction Manual MA4040RAD0914 9 7 9 CASE 9 LOAD INDICATOR IS QUICK FLASHING AND THERE IS NO OUTPUT SHORT CIRCUIT PROTECTION...

Page 34: ...34 37 GrainPro Solar Bubble Dryer 50 Instruction Manual MA4040RAD0914 9 7 10 CASE 10 SOLAR CHARGE CONTROLLER IS NOT WORKING PROPERLY...

Page 35: ...ied in about 8 hours from 22 to 14 moisture but the drying rate can be increased by increasing the mixing frequency The average drying rate for paddy and maize is about 1 MC per 2 hours under intermit...

Page 36: ...gy stored in the AGM battery the ventilator will automatically stop The AGM battery is protected by the solar charge controller When the solar charge controller detects a critical energy level of the...

Page 37: ...returning good Products to Buyer The Warranty does not cover the cost of any service work or material required for the replacement of defective Products at the site of installation GrainPro shall hav...

Reviews: