background image

26

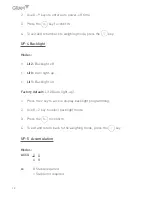
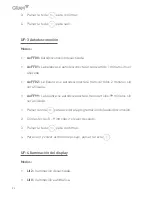
3.  Pulsar la tecla 

 para confirmar.

4.  Para salir y volver al modo de pesaje, pulsar la tecla 

.

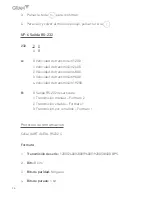
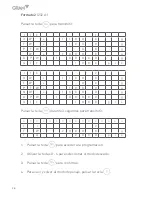
UF-6 Salida RS-232

232  

0  0


A B

A:  

0. Velocidad de transmisión 1200


1. Velocidad de transmisión 2400


2. Velocidad de transmisión 4800


3. Velocidad de transmisión 9600


4. Velocidad de transmisión 19200

B: 

0. Salida RS-232 desactivada


1. Transmisión manual – Formato 2


2. Transmisión estable – Formato 1


3. Transmisión por comando – Formato 1

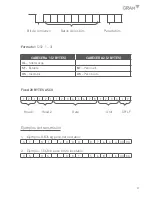
Protocolo de comunicación

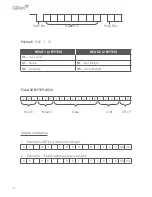
Señal UART de EIA-RS232 C

Formato:

1.  Transmisión de serie: 1200/2400/4800/9600/19200/38400 BPS.

2.  Bits: 8 bits.

3.  Bits de paridad: Ninguno.

4.  Bits de parada: 1 bit.

Summary of Contents for CK-15 Series

Page 1: ...SERIES SERIE S RIE SERIEN CK 3 6 15 30 OPERATION MANUAL MANUAL DE UTILIZACION MANUEL D UTILISATION BENUTZERHANDBUCH...

Page 2: ...pieces function 9 Piece weight setup 9 Number of pieces setup 10 Limits function 10 Functions setup 10 UF 1 Internal Value Display Battery Voltage 10 UF 2 Piece Weight Auto average 11 UF 3 Auto Power...

Page 3: ...cci n del peso unitario 22 Muestra N mero de piezas 22 L mites de peso 22 Configuraci n de funciones 23 UF 1 Valor interno Voltaje de la bater a 23 UF 2 Promedio autom tico del peso unitario 23 UF 3 A...

Page 4: ...de pi ces 36 Comptage par chantillonnage 36 Limite de poids sup rieure 36 Configuration des param tres 37 UF 1 Valeur interne Voltage de la batterie 37 UF 2 Moyenne automatique du poids unitaire 38 U...

Page 5: ...elgewichts 51 Stichprobe st ckzahl 51 St ckz hlen mit toleranzbereich 51 Funktionseinstellungen 52 UF 1 Interner Wert Akkuspannung 52 UF 2 Automatische Optimierung des durchschnittlichen Einzelgewicht...

Page 6: ...utput DC 12V 1A 12W Rechargeable battery 6V 4AH POWER CONSUMPTION Approx 12mA Approx 36mA with backlight display Approx 48mA with backlight display and the RS 232 optional BATTERY Approx 320 hours wit...

Page 7: ...he desired weighing unit Function 1 To reset the weight to 0 but the displayed weight value has to be less than 2 of maximum capacity Function 2 To move one space to the left or downward in setup mode...

Page 8: ...and Span ECF 2 Zero Calibration ECF 3 SPAN Calibration ECF 1 Weight Calibration 1 Press the key to start and go to the ECF 1mode and press the key to exit menu and back to weighing mode 2 Press the k...

Page 9: ...he key to exit menu and back to weighing mode 2 Use 0 9 keys to enter the weight to be calibrated and confirm with 3 Place the required weight mass onto the scale and press the key 4 Calibration proce...

Page 10: ...sample place the maximum weight on the pan high limit value press the key to confirm the high limit value Remove the weight from the pan from this moment the balance will beep and will show the messa...

Page 11: ...able or disable auto average function 3 Press the key to confirm 4 Press the key to exit UF 3 Auto Power off Modes AoFF 00 Auto Power off disable AoFF 01 The scale turns off automatically in 1 minute...

Page 12: ...it 2 Backlight off Lit 0 Auto light up Lit 1 Backlight on Factory default Lit 0 Auto light up 1 Press the v key to access display backlight programming 2 Use 0 2 key to select backlight mode 3 Press t...

Page 13: ...the weight has to return to zero UF 6 RS232 Output 232 0 0 A B A 0 Baud rate 1200 1 Baud rate 2400 2 Baud rate 4800 3 Baud rate 9600 4 Baud rate 19200 B 0 RS232 output disable 1 Manual output Format...

Page 14: ...Stable NT Net Weight US Unstable GS Gross Weight Fixed 20 BYTES ASCII 1 2 1 1 2 1 1 2 3 4 5 6 7 8 1 2 3 4 1 2 Head 1 Head 2 Data Unit CR LF Output examples 1 Example 0 876 kg stable net weight S T N...

Page 15: ...W 1 1 0 0 0 g T W 0 0 g P T W 1 0 0 0 g N W 1 0 0 0 0 g A P W 1 0 0 0 0 0 g Q T Y 1 0 0 0 p c s Press the key for 3 seconds key to output T I 2 T W 2 0 0 0 0 g T Q 2 0 0 0 p c s 1 Press the key to ac...

Page 16: ...hing mode press the key UF 8 Display Condition at Zero ZP 0 Off ZP 1 One division not to display at zero ZP 2 Two division not to display at zero ZP 3 Three division not to display at zero ZP 4 Four d...

Page 17: ...2 before sampling Then follow the same routine as explained before To delete a PLU memory first press on the key you want to delete M1 to M20 then press and now press again GUARANTEE This scale is gua...

Page 18: ...a recargable 6V 4AH CONSUMO Aprox 12mA Aprox 36mA con la iluminaci n interna del display Aprox 48mA con la iluminaci n interna del display y el interface RS 232 opcional DURACI N DE LA BATER A Aprox 3...

Page 19: ...a Para seleccionar la unidad de pesada deseada Funci n 1 Para poner a cero la lectura del display siempre y cuando el valor del peso sea menor al 2 de la capacidad m xima Funci n 2 Para desplazarse ha...

Page 20: ...orias de PLU CALIBRACI N STANDARD Pulsar las teclas y para acceder a la funci n de calibraci n standard ECF 1 Calibraci n de peso Cero y span ECF 2 Calibraci n del cero ECF 3 Calibraci n de span Calib...

Page 21: ...la pulsar para ajustar el cero 3 La balanza efectuar la calibraci n del cero autom ticamente y volver al modo normal de pesaje Calibraci n del span ECF 3 1 Pulsar la tecla para acceder al modo ECF 3 l...

Page 22: ...correspondiente Cuando el display Peso muestre el peso total de las piezas pulsar la tecla en este momento el display Peso Unit mostrar el peso unitario de cada pieza y el display Total el n mero tot...

Page 23: ...aje de la bater a 1 Pulsar la tecla para visualizar los siguientes valores internos En el display Weight Peso se mostrar el valor interno del span En el display Unit Weight Peso Unit se mostrar el vol...

Page 24: ...odesconectar transcurridos 2 minutos sin ser utilizada AoFF 99 La balanza se autodesconectar transcurridos 99 minutos sin ser utilizada 1 Pulsarlatecla paraaccederalaprogramaci ndelaautodesconexi n 2...

Page 25: ...umulaci n de pesadas Modos ACCU 0 0 A B A 0 Estabilidad requerida 1 Estabilidad no requerida B 0 Lalecturadebevolveraceroparaaceptarlasiguienteacumulaci n 1 No es necesario que la lectura vuelva a cer...

Page 26: ...ad de transmisi n 4800 3 Velocidad de transmisi n 9600 4 Velocidad de transmisi n 19200 B 0 Salida RS 232 desactivada 1 Transmisi n manual Formato 2 2 Transmisi n estable Formato 1 3 Transmisi n por c...

Page 27: ...recarga ST Estable NT Peso neto US Inestable GS Peso bruto Fixed 20 BYTES ASCII 1 2 1 1 2 1 1 2 3 4 5 6 7 8 1 2 3 4 1 2 Head 1 Head 2 Data Unit CR LF Ejemplos de transmisi n 1 Ejemplo 0 876 kg peso ne...

Page 28: ...0 0 g T W 0 0 g P T W 1 0 0 0 g N W 1 0 0 0 0 g A P W 1 0 0 0 0 0 g Q T Y 1 0 0 0 p c s Pulsar la tecla durante 3 segundos para transmitir T I 2 T W 2 0 0 0 0 g T Q 2 0 0 0 p c s 1 Pulsar la tecla par...

Page 29: ...confirmar 4 Para salir y volver al modo de pesaje pulsar la tecla UF 8 Configuraci n del cero ZP 0 Funci n desactivada ZP 1 1 divisi n no se muestra ZP 2 2 divisiones no se muestran ZP 3 3 divisiones...

Page 30: ...11 a M20 pulse para cambiar a PLU2 antes de colocar la muestra Repita los pasos que se explican m s arriba Para eliminar una memoria de PLU primero pulse la tecla que quiere eliminar de M1 a M20 y a c...

Page 31: ...tterie rechargeable 6V 4AH CONSOMMATION Aprox 12mA Aprox 36mA avec l clairage interne du display Aprox 48mA avec l clairage interne du display et l interface RS 232 optionnel DUR E DE LA BATTERIE Appr...

Page 32: ...z ro la lecture de l cran 2 de la capacit maximale Fonction 2 Se d placer vers la gauche dans le mode configuration Fonction 1 Soustraire le poids d un r cipient pour obtenir le poids net du produit...

Page 33: ...Weight Peso Unit le nombre total des pes es effectu es sera affich Sur l cran Count Piezas le total des pi ces des pes es effectu es sera affich Fonction compte pi ces par chantillonage Pr d finir la...

Page 34: ...la touche 3 Avec les touches 0 9 introduire la valeur du poids de calibration et confirmer avec la touche 4 Mettre le poids sur le plateau et appuyer sur la touche 5 La balance effectuera la calibrati...

Page 35: ...de pesage Placer le poids sur le plateau de la balance L cran Poids affichera le poids brut Fonction de tare Placer un r cipient sur le plateau et lorsque le poids est stable appuyer sur la touche po...

Page 36: ...antillonnage 1 D poser sur le plateau le nombre de pi ces qui correspondra l chantillonnage initial Introduire via le clavier num rique la quantit du nombre de pi ces d pos es sur le plateau 2 Quand l...

Page 37: ...sera la limite sup rieure pr d termin e CONFIGURATION DES PARAM TRES Appuyer sur les touches et pour entrer dans les param tres Pour acc der la configuration des fonctions Utiliser la touche pour se d...

Page 38: ...r acc der la configuration 2 Utiliser les touches 0 1 pour s lectionner le mode souhait 3 Appuyer sur la touche pour sortir du menu UF 2 Appuyer sur la touche pour revenir au mode pes e normal UF 3 Au...

Page 39: ...venir au mode pes e normal UF 4 R tro clairage de l cran Modes Lit 2 R tro clairage d sactiv Lit 0 R tro clairage automatique Lit 1 R tro clairage toujours activ Note La valeur par d faut est Lit 0 au...

Page 40: ...z ro pour faire une autre accumulation 2 Il n est pas n cessaire d effectuer une tare pour avoir lieu une autre accumulation Note La valeur par d faut est ACCU00 Stabilit n cessaire et lecture doit r...

Page 41: ...mission 9600 4 Vitesse de transmission 19200 B 0 Sortie RS 232 d sactiv e 1 Transmission manuelle Format 2 2 Transmission stable Format 1 3 Transmission par commande Format 1 Protocole de communicatio...

Page 42: ...T Stable NT Poids net US Instable GS Poids brut Fixed 20 BYTES ASCII 1 2 1 1 2 1 1 2 3 4 5 6 7 8 1 2 3 4 1 2 Head 1 Head 2 Data Unit CR LF Exemples de transmissions 1 Exemple 0 876 kg Stable et Poids...

Page 43: ...0 g P T W 1 0 0 0 g N W 1 0 0 0 0 g A P W 1 0 0 0 0 0 g Q T Y 1 0 0 0 p c s Appuyer sur la touche pendant 3 secondes pour transmettre T I 2 T W 2 0 0 0 0 g T Q 2 0 0 0 p c s 1 Appuyer sur la touche po...

Page 44: ...ortir et revenir au mode de pesage appuyer sur la touche UF 8 Configuration du z ro ZP 0 Fonction d sactiv e ZP 1 1 division ne s affiche pas ZP 2 2 divisions ne s affichent pas ZP 3 3 divisions ne s...

Page 45: ...ensuite sur la touche o vous souhaitez enregistrer la m moire de produit 10 m moires directes sont disponibles de M1 M10 La m moire sera enregistr e Pour utiliser les 10 autres m moires directes de M1...

Page 46: ...ON SL se chargera de la r paration de la balance Cette garantie n inclut pas les dommages caus s par une utilisation impropre surcharge ou par faute de ne pas avoir suivi les recommandations crites da...

Page 47: ...V 4Ah VERBRAUCH Etwa 12mA Etwa 36mA bei aktivierter interner Displaybeleuchtung Etwa 48mA bei aktivierter interner Displaybeleuchtung und mit RS 232 Schnittstelle Optional AKKU BETRIEBSDAUER Etwa 320...

Page 48: ...um die Waage einzuschalten Zur Auswahl der gew nschten Wiegeeinheit Funktion1 ZumNullstellenderDisplayanzeige insoferndasGewichtswert unter 2 des maximalen W gebereichs liegt Funktion2 UminnerhalbdesE...

Page 49: ...wahl der PLU Nummern STANDARD KALIBRIERUNG Dr cken Sie die Tasten und um die Funktion der Standard Kalibrierung aufzurufen ECF 1 Gewicht Kalibrierung Nullpunkt und Messbereich ECF 2 Nullpunkt Kalibrie...

Page 50: ...us zur ckzukehren 2 Dr cken Sie die Taste um den Nullpunkt festzulegen 3 Die Waage f hrt die Nullpunkt Kalibrierung automatisch durch und kehrt dann in den normalen Wiegemodus zur ck Messbereich Kalib...

Page 51: ...ie entsprechende St ckzahl einzugeben Wenn das Display Weight Peso das Gesamtgewicht aller Gegenst nde anzeigt dann dr cken Sie die Taste Daraufhin zeigt das Display Unit Weight Peso Unit das Gewicht...

Page 52: ...n szuwechseln UF 1 Interner Wert Akkuspannung 1 Dr cken Sie die Taste um die folgenden internen Werte anzeigen zu lassen Im Display Weight Peso wird der interne Wert des Messbereichs angezeigt Im Disp...

Page 53: ...t AoFF 01 Die Waage schaltet nach 1 Minute Nichtverwendung automatisch ab AoFF 02 Die Waage schaltet nach 2 Minuten Nichtverwendung automatisch ab AoFF 99 Die Waage schaltet nach 99 Minuten Nichtverwe...

Page 54: ...ch 1 Dr cken Sie die Taste um die Einstellung der Displaybeleuchtung aufzurufen 2 Verwenden Sie die Tasten 0 oder 2 um den gew nschten Modus auszuw hlen 3 Dr cken Sie die Taste um die Eingabe zu best...

Page 55: ...rlich und die Gewichtsanzeige muss zur ck auf Null fallen 1 Dr cken Sie die Taste um die Einstellung der Summenfunktion aufzurufen 2 Verwenden Sie die Tasten 0 oder 2 um den gew nschten Modus auszuw h...

Page 56: ...t 1 Kommunikationsprotokoll UART Signal von EIA RS232 C Format 1 Serielle Daten bertragung 1200 2400 4800 9600 19200 38400 BPS 2 Bit Anzahl 8 Bits 3 Parit tsbits keine 4 Stoppbits 1 Bit Start Bit Date...

Page 57: ...0D 0A 2 Beispiel 1 568 lb instabiles Bruttogewicht U S G S 0 0 1 5 6 8 l b 0D 0A Format 2 232 x1 Dr cken Sie die Taste um die Daten bertragung zu starten I T E 1 G W 1 1 0 0 0 g T W 1 0 0 0 g P T W 0...

Page 58: ...um in den Wiegemodus zur ckzukehren dr cken Sie die Taste UF 7 Aktualisierung der ADC Frequenz SPEEd 0 Niedrige Geschwindigkeit 7 5 Hz SPEEd 1 Regul re Geschwindigkeit 15 Hz SPPEd 2 Hohe Geschwindigke...

Page 59: ...n nicht angezeigt ZP 4 4 Nachkommastellen werden nicht angezeigt ZP 5 5 Nachkommastellen werden nicht angezeigt Standardeinstellung ZP 1 1 Dr cken Sie die Taste um die Einstellungen aufzurufen 2 Verwe...

Page 60: ...ken unter der der Artikelspeicher gespeichert werden soll es stehen 10 direkte Speicher zur Verf gung M1 bis M10 Der Speicher wird gespeichert Zur Verwendung der anderen 10 Direktspeicher M11 bis M20...

Page 61: ...es Zeitraums von einem Jahr ab Lieferdatum Innerhalb dieser Zeit bernimmt GRAM PRECISION SL die Reparatur der Waage Diese Garantie schlie t keine Sch den durch unsachgem e Verwendung oder berlastungen...

Page 62: ...62...

Page 63: ...63...

Page 64: ...Gram Precision S L Traves a Industrial 11 08907 Hospitalet de Llobregat Barcelona Spain Tel 34 902 208 000 34 93 300 33 32 Fax 34 93 300 66 98 comercial gram es www gram group com 004 11012018...

Reviews: