background image


58 


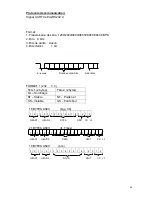
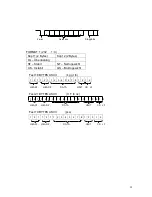
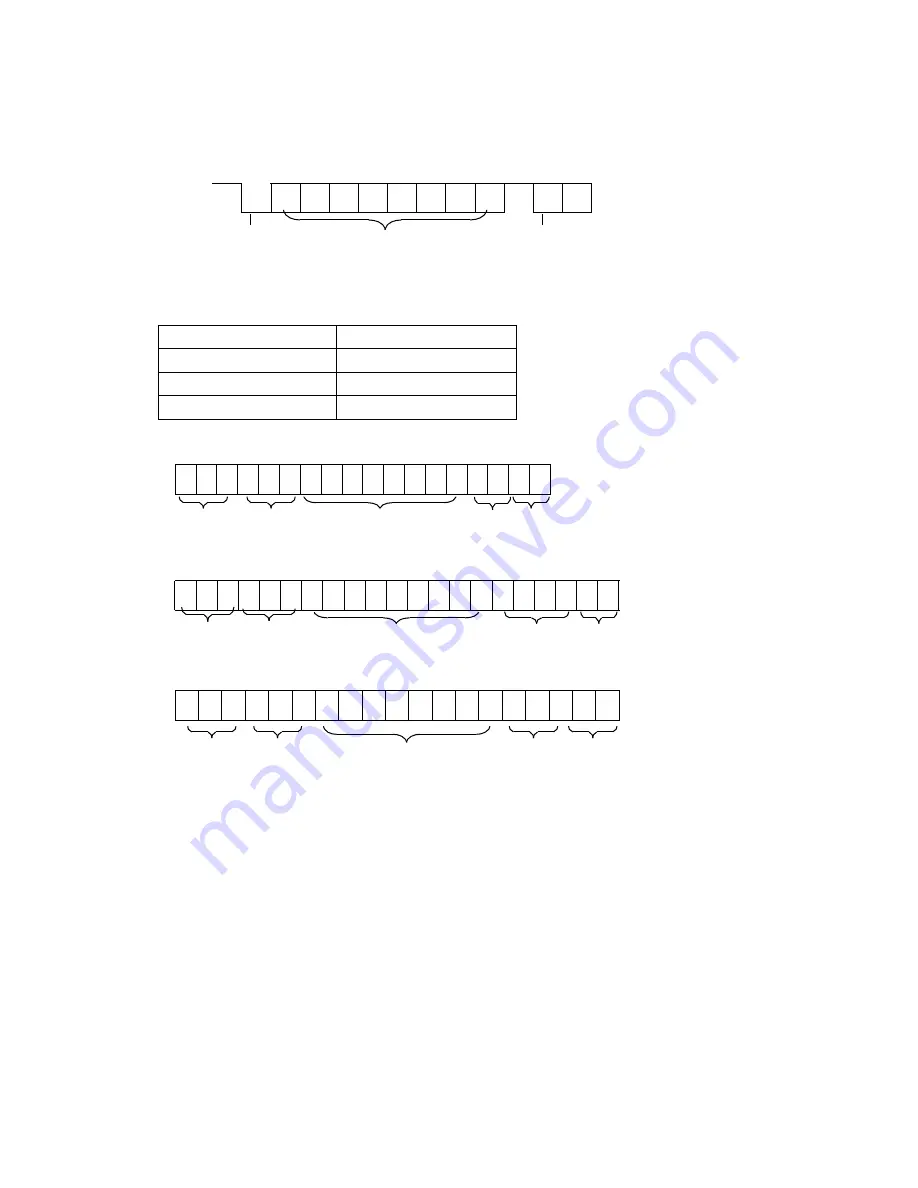
Startbit 

Datenbits


Stoppbits 


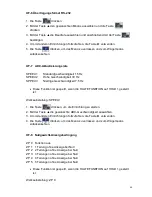
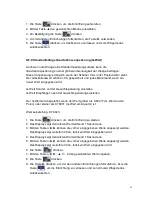
FORMAT 1 (232      1~3) 

Kopf 1 (2 Bytes) 

Kopf 2 (2 Bytes) 

OL – Überlastung 


ST – Stabil 

NT – Nettogewicht 

US - Instabil 

GS – Bruttogewicht 

   
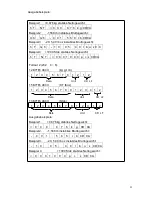
    Fest 18 BYTES ASCII              (kg g t lb) 


1


2


1


1


2


1


1


2


3


4


5


6


7


8


1


2


1


2


HEAD1 

,     

HEAD2 

DATA 

UNIT  CR  LF 


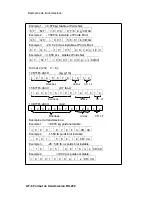
    Fest 21 BYTES ASCII              (tl. T lb oz) 


1    2    1    1    2    1    1    2    3    4    5    6    7    8    9 1      2    3    4    1    2 


HEAD1 

HEAD2 

DATA 

UNIT 

CR  LF 

 
    Fest 19 BYTES ASCII            (pcs) 


1


2


1


1


2


1


1


2


3


4


5


6


7


8


1


2


3


1


2


HEAD1 

HEAD2 

DATA 

UNIT 

CR  LF 


Summary of Contents for CM-15 Series

Page 1: ...1 USER MANUAL MANUAL DE UTILIZACION MANUEL D UTILISATION BEDIENERHANDBUCH SERIES SERIE S RIE SERIE CM Models Modelos Mod les Modelle CM 3 CM 6 CM 15 CM 30...

Page 2: ...2 REV 1A11M06...

Page 3: ......

Page 4: ...ng Function configuration 8 Weights accumulation 8 How to enter the sample for piece counting 9 Piece counting function 9 Standard calibrations 9 Functions setup 10 Internal value 10 Check weighing 11...

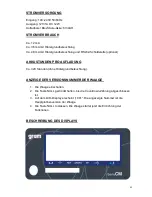
Page 5: ...d RS232 interface optional BATTERY HOURS PER CHARGE Approx 320 hours backlight off SCALE S VERSION NUMBER DISPLAY 1 Turn on the scale 2 Press and hold the ZERO key until the countdown sequence has com...

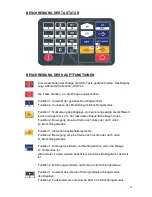
Page 6: ...f maximum capacity Function 2 To move one space to the left or downward in setup mode Function 1 To subtract the container weight Function 2 To move one space to the right or upward in setup mode Func...

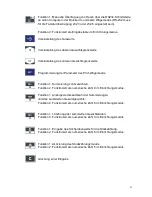
Page 7: ...Function 2 Works as numeric number 9 in setup mode Function 1 To display total accumulation count and total accumulated weight Function 2 Works as numeric number 6 in setup mode Function 1 To clear al...

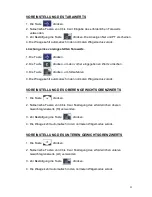
Page 8: ...tered value 3 Press the key to continue 4 The scale will return to normal weighing mode automatically PRESET THE HIGH WEIGHT VALUE 1 Press the key 2 Use the numeric keys from 0 to 9 to set the require...

Page 9: ...CCUMULATION 1 Place the product onto the scale and press the key 2 During 2 seconds the screen will display the number of weights carried out 1 3 During 2 seconds the screen will display the total acc...

Page 10: ...ight is less than 0 2 d The screen will display the message S when the sample weight is less than 20 d The screen will display the message U S if the unit weight and sample weigh are less than 0 2 and...

Page 11: ...Z press the key 3 The scale will complete the zero calibration automatically and will return back to weighing mode Span Calibration ECF 3 1 Press the key to start Span Calibration ECF 3 or the key to...

Page 12: ...Modes AoFF 00 Auto Power off disable AoFF 01 The scale turns off automatically in 1 minute when the scale is not in operation and weight at 0 Auto power off timer up to 99 minutes AoFF01 AoFF99 the fa...

Page 13: ...esired mode 3 Press the key to confirm 4 To continue with other setups use the key 5 To exit menu and return back to weighing mode press the key UF 5 RS 232 Output 232 0 RS 232 disable 232 1 Stable Ou...

Page 14: ...US Unstable GS Gross Weight Fixed 18 BYTES ASCII kg g t lb 1 2 1 1 2 1 1 2 3 4 5 6 7 8 1 2 1 2 HEAD1 HEAD2 DATA UNIT CR LF Fixed 21 BYTES ASCII tl T lboz 1 2 1 1 2 1 1 2 3 4 5 6 7 8 9 1 2 3 4 1 2 HEA...

Page 15: ...c s 0D0A Format 2 232 4 6 12 BYTES ASCII kg g t lb 1 2 3 4 5 6 7 8 1 2 1 2 Data Unit CR LF 15 BYTES ASCII tl T lboz 1 2 3 4 5 6 7 8 9 1 2 3 4 1 2 Datos Unit CR LF 13 BYTES ASCII pcs 1 2 3 4 5 6 7 8 1...

Page 16: ...ocked when the function HOLD is set as HOLD 1 Factory default SPEEd 1 1 Press the key to start setting up 2 Use the to select the desired ADC speed 3 To continue with other setups use the key 4 To exi...

Page 17: ...been entered Sender G value set it before Weight Calibration Recipient G value set if after Weight Calibration The G value will be denied when the value is greater than 9 83217 Polar G value or less t...

Page 18: ...ion defect of the material During this period GRAM PRECISION covers the manpower and the spare parts for the reparation of the scale This guarantee does not cover the failures caused by an inappropria...

Page 19: ...redeterminar el valor del l mite inferior 22 Configuraci n de la funci n l mites de peso 23 Acumulaci n de pesadas 23 Introducci n de la muestra para funci n cuentapiezas 24 Funci n cuentapiezas 24 Ca...

Page 20: ...2 opcional DURACION DE LA BATERIA Aprox 320 horas con la iluminaci n del display desactivada VISUALIZACION DEL NUMERO DE VERSION DE LA BALANZA 5 Conectar la balanza 6 Pulsar y mantener la tecla ZERO h...

Page 21: ...apacidad m xima Funci n 2 Para desplazarse hac a la izquierda hac a abajo dentro del modo de programaci n Funci n 1 Para sustraer el peso de un recipiente u objeto Funci n 2 Para desplazarse hac a la...

Page 22: ...lizar acumulaci n de pesadas Funci n 2 Act a c mo el n mero 9 dentro del modo de programaci n Funci n 1 Para visualizar la acumulaci n total de pesadas Funci n 2 Act a c mo el n mero 6 dentro del modo...

Page 23: ...amente 3 Pulsar la tecla para confirmar 4 La balanza volver autom ticamente al modo normal de pesaje PREDETERMINAR EL VALOR DEL LIMITE SUPERIOR 1 Pulsar la tecla 2 Utilizar las teclas num ricas del 0...

Page 24: ...l modo normal de pesaje ACUMULACION DE PESADAS 1 Colocar el producto sobre el plato y pulsar la tecla 2 El display mostrar durante 2 segundos el n mero de pesadas efectuadas 1 3 El display mostrar dur...

Page 25: ...o de la muestra es inferior a 0 2d El display mostrar el mensaje S cuando el peso de la muestra est por debajo de 20d El display mostrar el mensaje U S si el peso unitario y el peso de la muestra es i...

Page 26: ...pulsar la tecla 3 La balanza efectuar la calibraci n del cero autom ticamente y volver al modo normal de pesaje Calibraci n del span ECF 3 1 Pulsar la tecla para acceder al modo ECF 3 la tecla para sa...

Page 27: ...conexi n desactivada AoFF 01 La balanza se autodesconectar transcurrido 1 minuto sin utilizarla La autodesconexi n se puede programar hasta 99 minutos AoFF01 AoFF99 el valor por defecto es AoFF10 10 m...

Page 28: ...la tecla para confirmar 4 Para pasar al siguiente par metro pulsar la tecla 5 Para salir y volver al modo de pesaje pulsar la tecla UF 5 Salida RS 232 232 0 RS 232 desactivado 232 1 Transmisi n estab...

Page 29: ...ST Estable NT Peso neto US Inestable GS Peso bruto 18 BYTES ASCII kg g t lb 1 2 1 1 2 1 1 2 3 4 5 6 7 8 1 2 1 2 HEAD1 HEAD2 DATA UNIT CR LF 21 BYTES ASCII tl T lboz 1 2 1 1 2 1 1 2 3 4 5 6 7 8 9 1 2 3...

Page 30: ...p c s 0D0A Formato 2 232 4 6 12 BYTES ASCII kg g t lb 1 2 3 4 5 6 7 8 1 2 1 2 Datos Unid CR LF 15 BYTES ASCII tl T lboz 1 2 3 4 5 6 7 8 9 1 2 3 4 1 2 Datos Unid CR LF 13 BYTES ASCII pcs 1 2 3 4 5 6 7...

Page 31: ...baja 7 5 hz Esta funci n est bloqueada si se ha configurado la funci n HOLD como HOLD 1 Valor por defecto SPEEd 1 1 Pulsar la tecla para acceder a la programaci n 2 Utilizar la tecla para seleccionar...

Page 32: ...de la calibraci n del peso Valor de la gravedad del Usuario configurado despu s de la calibraci n del peso El valor de la gravedad ser denegado cuando sea mayor a 9 83217 Gravedad Polar menor a 9 780...

Page 33: ...eriodo de 1 a o a partir de la fecha de entrega Durante este periodo GRAM PRECISION se har cargo de la reparaci n de la balanza Esta garant a no incluye los da os ocasionados por uso indebido o sobrec...

Page 34: ...ir la valeur de la limite inf rieure 38 Configuration de la fonction limites de poids 38 Accumulation de pes es 39 Introduction de l chantillon pour fonction compte pi ces 39 Fonction compte pi ces 39...

Page 35: ...RS 232 optionnel DUR E DE LA BATTERIE Approx 320 heures avec l clairage du display d sactiv AFFICHAGE DU NUM RO DE VERSION DE LA BALANCE 1 Connecter la balance 2 Appuyer et mantenir la touche Z RO jus...

Page 36: ...acit maximale Fonction 2 Pour se d placer vers la gauche ou vers le bas dans le mode de programmation Fonction 1 Pour enlever le poids d un r cipient ou d un objet Fonction 2 Pour se d placer vers la...

Page 37: ...ulation de pes es Fonction 2 Fonctionne comme le num ro 9 dans le mode de programmation Fonction 1 Pour visualiser l accumulation totale de pes es Fonction 2 Fonctionne comme le num ro 6 dans le mode...

Page 38: ...3 Appuyer sur la touche pour confirmer 4 La balance reviendra automatiquement au mode normal de pesage PR D FINIR LA VALEUR DE LA LIMITE SUP RIEURE 1 Appuyer sur la touche 2 Utiliser les touches num...

Page 39: ...r la fonction souhait e A B C 3 Appuyer sur la touche pour confirmer 4 La balance reviendra automatiquement au mode normal de pesage ACCUMULATION DE PES ES 1 Mettre le produit sur le plateau et appuye...

Page 40: ...tir de la fonction de compte pi ces appuyer sur la touche L cran affichera le message U quand le poids unitaire de l chantillon est inf rieur 0 2d L cran affichera le message S quand le poids de l cha...

Page 41: ...touche 3 La balance effectuera la calibration du z ro automatiquement et reviendra au mode normal de pesage Calibration du span ECF 3 1 Appuyer sur la touche pour acc der au mode ECF 3 ou sur la touc...

Page 42: ...tod connexion Modes AoFF 00 Autod connexion d sactiv e AoFF 01 La balance se d sactivera automatiquement apr s 1 minute sans utilisation L autod connexion peut tre programm e jusqu 99 minutes AoFF01 A...

Page 43: ...ouche pour acc der la programmation de la fonction HOLD 2 Utiliser la touche pour s lectionner le mode souhait 3 Appuyer sur la touche pour confirmer 4 Pour passer au param tre suivant appuyer sur la...

Page 44: ...s des bits Arr t bits FORMAT 1 232 1 3 T te 1 2 bytes T te 2 2 bytes OL Surcharge ST Stable NT Poids net US Instable GS Poids brut 18 BYTES ASCII kg g t lb 1 2 1 1 2 1 1 2 3 4 5 6 7 8 1 2 1 2 HEAD1 HE...

Page 45: ...232 4 6 12 BYTES ASCII kg g t lb 1 2 3 4 5 6 7 8 1 2 1 2 Donn es Unit s CR LF 15 BYTES ASCII tl T lboz 1 2 3 4 5 6 7 8 9 1 2 3 4 1 2 Donn es Unit s CR LF 13 BYTES ASCII pcs 1 2 3 4 5 6 7 8 1 2 3 1 2 D...

Page 46: ...la touche pour s lectionner la vitesse ADC souhait e 3 Appuyer sur la touche pour passer au param tre suivante 4 Pour sortir et revenir au mode de pesage appuyer sur la touche UF 8 Configuration du z...

Page 47: ...de 3 Avec les touches on pourra afficher les valeurs introduites pr c dement L cran restera 00 si aucune valeur n est pas introduite 4 L cran affichera la derni re valeur pendant 1 seconde 5 Avec les...

Page 48: ...chtsgrenzwerts 52 Voreinstellung des unteren Gewichtsgrenzwerts 52 Konfiguration des Pr f W gemodus 53 Summenfunktion 53 So geben Sie die Stichprobe f r die St ckz hlung ein 54 St ckz hlungsfunktion 5...

Page 49: ...optional AKKUSTUNDEN PRO AUFLADUNG Ca 320 Stunden ohne Hintergrundbeleuchtung ANZEIGE DER VERSIONSNUMMER DER WAAGE 1 Die Waage einschalten 2 Die Taste NULL gedr ckt halten bis die Countdown Z hlung ab...

Page 50: ...der maximalen Kapazit t betragen muss Funktion 2 Bewegung um eine Stelle nach links oder nach unten im Einrichtungsmodus Funktion 1 Abziehen des Beh ltergewichts Funktion 2 Bewegung um eine Stelle nac...

Page 51: ...tion 1 Summierung von Gewichten Funktion 2 Funktioniert als numerische Zahl 9 im Einrichtungsmodus Funktion 1 Anzeige der Gesamtzahl der Summierungen und des summierten Gesamtgewichts Funktion 2 Funkt...

Page 52: ...fortzufahren 4 Die Waage kehrt automatisch in den normalen W gemodus zur ck VOREINSTELLUNG DES OBEREN GEWICHTSGRENZWERTS 1 Die Taste dr cken 2 Numerische Tasten von 0 bis 9 zur Festlegung des erforde...

Page 53: ...sch in den normalen W gemodus zur ck SUMMENFUNKTION 1 Das Produkt auf die Waage legen und die Taste dr cken 2 Der Bildschirm zeigt w hrend 2 Sekunden die Anzahl der durchgef hrten W gevorg nge an 1 3...

Page 54: ...icht U an wenn das St ckgewicht der Probe weniger als 0 2 d betr gt Der Bildschirm zeigt die Nachricht S an wenn das Gewicht der Probe weniger als 20 d betr gt Der Bildschirm zeigt die Nachricht U S S...

Page 55: ...n 3 Die Waage schlie t die Nulljustierung automatisch ab und kehrt in den W gemodus zur ck Justierung Verh ltnisbereich ECF 3 1 Die Taste dr cken um die Bereichsjustierung ECF 3 zu starten bzw die Tas...

Page 56: ...0 Automatische Ausschaltung deaktiviert AoFF 01 Die Waage schaltet sich nach 1 Minute Inaktivit t automatisch aus wenn das Gewicht bei 0 ist Die Zeitschaltuhr zur automatischem Abschaltung kann bis au...

Page 57: ...hten 2 Mit der Taste den gew nschten Modus ausw hlen 3 Zur Best tigung die Taste dr cken 4 Um mit anderen Einrichtungen fortzufahren die Taste verwenden 5 Die Taste dr cken um das Men zu verlassen und...

Page 58: ...ht US Instabil GS Bruttogewicht Fest 18 BYTES ASCII kg g t lb 1 2 1 1 2 1 1 2 3 4 5 6 7 8 1 2 1 2 HEAD1 HEAD2 DATA UNIT CR LF Fest 21 BYTES ASCII tl T lb oz 1 2 1 1 2 1 1 2 3 4 5 6 7 8 9 1 2 3 4 1 2 H...

Page 59: ...p c s 0D0A Format 2 232 4 6 12 BYTES ASCII kg g t lb 1 2 3 4 5 6 7 8 1 2 1 2 Data Unit CR LF 15 BYTES ASCII tl T lboz 1 2 3 4 5 6 7 8 9 1 2 3 4 1 2 Data Unit CR LF 13 BYTES ASCII Stck 1 2 3 4 5 6 7 8...

Page 60: ...se Funktion ist gesperrt wenn die HALTEFUNKTION auf HOLD 1 gestellt ist Werkseinstellung SPEEd 1 1 Die Taste dr cken um die Einrichtung zu starten 2 Mit der Taste die gew nschte ADC Geschwindigkeit au...

Page 61: ...llen G Wert Empf nger nach der Gewichtsjustierung einstellen Der G Wert wird abgelehnt wenn der Wert gr er als 9 83217 G Wert an den Polen oder kleiner als 9 78031 G Wert am quator ist Werkseinstellun...

Page 62: ...nd Materialfehler W hrend dieses Zeitraums deckt GRAM PRECISION die zur Reparatur der Waage erforderlichen Personal und Ersatzteilkosten ab Diese Garantie erstreckt sich nicht auf Ausf lle aufgrund un...

Reviews: