INSTALLATION INSTRUCTIONS
R
−
410A Split System Heat Pump
12
428 01 5301 05
Specifications subject to change without notice.
START
−
UP PROCEDURE
1. Set indoor thermostat selector switch to OFF.
2. Turn ON all electrical disconnect devices.
3. If unit has a crankcase heater, energize the heater
and wait 24 hours before proceeding.
4. Set indoor thermostat at desired temperature. Be
sure setpoint is below indoor ambient temperature
to call for cooling, or above indoor ambient to call
for heating.
5. Set indoor thermostat selector switch to COOL or
HEAT. Operate unit for minimum 15 minutes, then
check the system refrigerant charge.
REFRIGERANT CHARGE
Factory charge amount and desired subcooling are
shown on unit rating plate. Charging method is shown on
information plate inside unit. Additional subcooling may
be required to achieve optimal heating performance
based on installed indoor unit. (see figure 16)
For TXV, use subcooling method.
For Piston, use superheat method.
To properly check or adjust charge, conditions must be
favorable for subcooling or superheat charging.
Favorable conditions exist when the outdoor temperature
is between 70
_
F and 100
_
F (21
_
C and 38
_
C), and the
indoor temperature is between 70
_
F and 80
_
F (21
_
C and
27
_
C).
Follow the procedure below.
Unit is factory charged for 15 feet (4.6m) of lineset. Adjust
charge by adding or removing 0.6 oz/ft (17 g/mm) of 3/8
liquid line above or below 15 feet (4.6 m) respectively.
For standard refrigerant line lengths 80 feet (24.4m) or
less, allow system to operate in cooling mode at least 15
minutes. If conditions are favorable, check system
charge by super heat method for fixed metering device
and subcooling method for TXV. If any adjustment is
necessary, adjust charge slowly and allow system to
operate for 15 minutes to stabilize before declaring a
properly charged system. Refer to figure 16 for additional
subcooling required.
If the indoor temperature is above 80
_
F (27
_
C), and the
outdoor temperature is in the favorable range, adjust
system charge by weight based on line length and allow
the indoor temperature to drop to 80
_
F (27
_
C) before
attempting to check system charge by subcooling method
as described above.
If the indoor temperature is below 70
_
F (21
_
C), or the
outdoor temperature is not in the favorable range, adjust
charge for line set length above or below 15 feet (4.6m)
only. Charge level should then be appropriate for the
system to achieve rated capacity. The charge level could
then be checked at another time when the both indoor and
outdoor temperatures are in a more favorable range.
NOTE:
If line length is beyond 80 feet (24.4m) or greater
than 20 feet (6.1m) vertical separation, See Long Line
Guideline for special charging requirements.
A. UNITS WITH COOLING MODE TXV
Units installed with cooling mode TXV require charging by
the subcooling method.
1. Operate unit a minimum of 15 minutes before
checking charge.
NOTE:
If outdoor unit has a 2
−
speed fan motor,
motor will operate in low speed when outdoor
ambient temperature is below 82
_
F (28
_
C). Pull
the BRN/YEL low voltage wire off the fan control
and the unit will default to high speed fan for
servicing. Reconnect wire after servicing.
2. Measure liquid service valve pressure by attaching
an accurate gage to service port.
3. Measure liquid line temperature by attaching an
accurate thermistor type or electronic
thermometer to liquid line near outdoor coil.
4. Refer to unit rating plate for required subcooling
temperature.
5. Refer to figure 15. Find the point where required
subcooling temperature intersects measured
liquid service valve pressure.
6. To obtain required subcooling temperature at a
specific liquid line pressure, add refrigerant if liquid
line temperature is higher than indicated or reclaim
refrigerant if temperature is lower. Allow a
tolerance of
"
3
_
F (
|
1.7
_
C).
B. UNITS WITH INDOOR PISTON
Units installed with indoor pistons require charging by the
superheat method.
The following procedure is valid when indoor airflow is
within
"
21 percent of its rated CFM.
1. Operate unit a minimum of 15 minutes before
checking charge.
2. Measure suction pressure by attaching an
accurate gage to suction valve service port.
3. Measure suction temperature by attaching an
accurate thermistor type or electronic
thermometer to suction line at service valve.
4. Measure outdoor air dry
−
bulb temperature with
thermometer.
5. Measure indoor air (entering indoor coil) wet
−
bulb
temperature with a sling psychrometer.
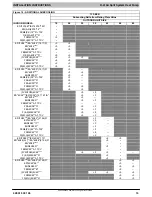
6. Refer to figure 13. Find outdoor temperature and
evaporator entering air wet
−
bulb temperature. At
this intersection, note superheat. Where a dash
(
−−
) appears on the table, do not attempt to charge
system under these conditions or refrigerant
slugging may occur. Charge must be weighted in,
adding or removing 0.6 oz/ft of 3/8 liquid line above
or below 15 feet (4.6m) respectively.
7. Refer to figure 14. Find superheat temperature
(from #6 above) and suction pressure. At this
intersection, note suction line temperature.
8. If unit has a higher suction line temperature than
charted temperature, add refrigerant until charted
temperature is reached.
9. If unit has a lower suction line temperature than
charted temperature, reclaim refrigerant until
charted temperature is reached.
10. When adding refrigerant, charge in liquid form into
suction service port using a flow
−
restricting
device.

