background image


 Pag

23   


 Warranty 

If your product does not work properly because of a defect in materials or workmanship, 

Grandbeing Company (referred to as “the warrantor”) will, for the length of the period indicated 

as below,

 (Parts (1) Year, Labor(90) Days)

which starts with the date of original purchase 

(“Limited Warranty period”), at its option either (a) repair your product with new or refurbished 

parts, or (b) replace it with a new or a refurbished product. The decision to repair or replace will 

be made by the warrantor. 

During the “Labor” Limited Warranty period there will be no charge for labor. During the “Parts” 

warranty period, there will be no charge for parts. You must mail-in your product during the 

warranty period. This Limited Warranty is extended only to the original purchaser and only 

covers product purchased as new. A purchase receipt or other proof of original purchase date 

is required for Limited Warranty service. 


 Warranty Limits And Exclusions 

1)  This Limited Warranty ONLY COVERS failures due to defects in 

materials or workmanship, and DOES NOT COVER normal wear and 
tear or cosmetic damage. 

The Limited Warranty ALSO DOES NOT COVER 

damages which occurred in shipment, or failures which are caused by products not 

supplied by the warrantor, or failures which result from accidents, misuse, abuse, 

neglect, mishandling, misapplication, alteration, faulty installation, set-up adjustments, 

maladjustment of consumer controls, improper maintenance, power line surge, lightning 

damage, modification, or service by anyone other than a Factory Service Center or other 

Authorized Service, or damage that is attributable to acts of God. 

2) 

There are no express warranties except as listed under “limited warranty 
coverage”. The warrantor is not liable for incidental or consequential 
damages resulting from the use of this product, or arising out of any 
breach of this warranty.

 (As examples, this excludes damages for lost time, cost of 

having someone remove or re-install an installed unit if applicable, travel to and from the 

service location, loss of or damage to media or images, data or other recorded content. 

The items listed are not exclusive, but are for illustration only.) 

3)  Parts and service, which are not covered by this limited warranty, are 

your responsibility. 

Summary of Contents for MX0808-N50

Page 1: ...Model No MX0808 N50 Operating Instructions Thanks for purchasing our product Please be sure to read this instruction manual carefully before using our product...

Page 2: ...remote control IR emitters in the matrix are for controlling the sources the IR control signal could be from remote locations when work with EX0101 N53 The transmission distance of UTP outputs reaches...

Page 3: ...onnections and Operations 5 Operation 6 1 Operation on Front Panel 6 2 Control via IR remote 7 3 Control via RS232 7 4 LAN control 15 Specifications 21 Typical Application 21 Maintenance 22 Product Se...

Page 4: ...HDCP or not z The UTP Outputs must work with EX0101 N53 or other specified UTP receiver z Reading and saving EDID function from displays z Support high definition resolutions including 1080p 1080i 720...

Page 5: ...space Ensure the unit is well ventilated 3 To prevent risk of electric shock or fire hazard due to overheating do not obstruct the unit s ventilation openings with newspapers tablecloths curtains and...

Page 6: ...mitter cable 8x IR RX Broadband IR receiver cable 30KHz 50KHz 1x USB to UART cable 1x RS232 to RS485 converter 1 x 100 240V AC Power cable Operating Instructions P N_INS MX0808 N50 Mounting ears Stylu...

Page 7: ...8 Power input IR extension LAN port RS232 port RS485 port DIP for Matrix Setting IR emitter corresponding to the Input port from 1 to 8 NOTE RS232 port and LAN port are for matrix control The LAN por...

Page 8: ...08 N50 IR RX ports and EX0101 N53 IR RX port 6 Connect the IR emitter cables into MX0808 N50 IR emitter ports and EX0101 N53 IR TX port 7 Power on the input source you want to show Keep the unused inp...

Page 9: ...he Left or Right Button to select Output Channel the corresponding LED of the Output Channel will blink slowly Second Press Up or Down Button to choose the desired Input Channel Third Press the Enter...

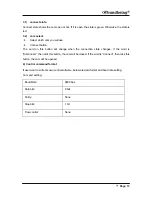
Page 10: ...Control via IR remote NOTE if the IR remote isn t work please press the system code switch key but please do not put the remote against the MX0808 N50 3 Control via RS232 1 The Interface of MX0808 N5...

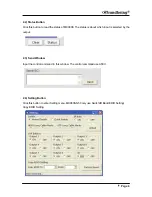
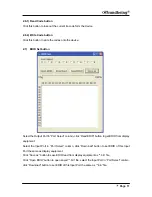
Page 11: ...1 Receive Window The receive window will show the message received from MX0808 When you click the Control Buttons see step 4 or send Control Command see 2 3 to MX0808 it will send out the message abo...

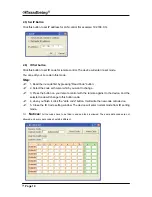
Page 12: ...The status is about which input is selected by the output 2 3 Send Window Input the control command in this window The control command use ASCII 2 4 Setting Button Click this button to enter Setting...

Page 13: ...Select the code with cursor which you want to change 3 Press the button on your remote control with the remote against to the device And the selected code will change to this button code 4 when you f...

Page 14: ...t column click Read EDID button to get EDID from display equipment Select the Input Port in Port Select column click Download button to set EDID of this Input Port the same as display equipment Click...

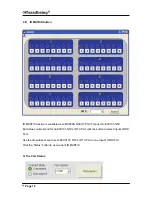
Page 15: ...P OUT connect to EX0101 N53 Each blue column stand for an EX0101 N53 s IR TX Port click the button to select Input s IR RX Port Use the drop down menu to set all EX0101 N53 s IR TX Port to one Input s...

Page 16: ...ton will change when the connection state changes If the word is Disconnect then click this button the com will be closed If the word is Connect then click this button the com will be opened 4 Control...

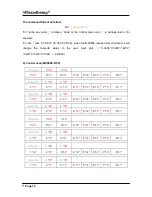
Page 17: ...0x20 3 0x33 9 0x39 0x0d0a 5 Control code MX0808 N50 Outport1 08 09 1 00 2 01 3 02 4 03 5 04 6 05 7 06 8 07 Outport2 18 19 1 10 2 11 3 12 4 13 5 14 6 15 7 16 8 17 Outport3 28 29 1 20 2 21 3 22 4 23 5 2...

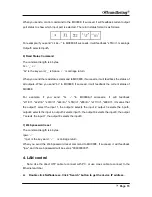
Page 18: ...f you send bc to MX0808 if succeeds it will feedback s11 r n s22 r n s33 r n s44 r n s55 r n s66 r n s77 r n s88 r n it means that the output 1 select the input 1 the output 2 selects the input 2 outp...

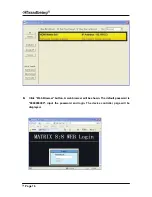
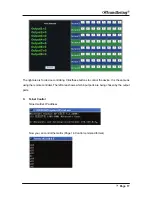
Page 19: ...Page 16 B Click Web Browser button A web browser will be shown The default password is 0000000000 input the password and login The device controller page will be displayed...

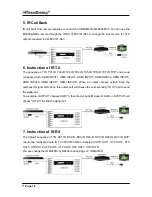
Page 20: ...e buttons to control the device It is the same as using the remote controller The left area shows which input ports are being chosen by the output ports C Telnet Control Telnet matrix s IP address Now...

Page 21: ...5 HDMI INPUT6 HDMI INPUT7 HDMI INPUT8 When an output chooses certain input the call back IR signal of RJ45 on this output port will choose the corresponding IR TX port to send the signal out For examp...

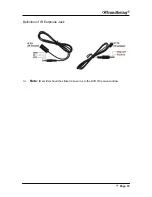
Page 22: ...Page 19 Definition of IR Earphone Jack Note IR emitter should be sticked as near as to the DVD IR receive window...

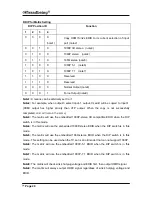
Page 23: ...ly completed edid will remain the same Note3 The matrix will use the embedded 1080P stereo 3D compatible EDID when the DIP switch is in this mode Note4 The matrix will use the embedded 1080P stereo ED...

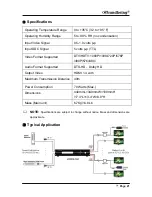
Page 24: ...Video Format Supported DTV HDTV 1080P 1080i 720P 576P 480P 576i 480i Audio Format Supported DTS HD Dolby HD Output Video HDMI 1 4 with Maximum Transmission Distance 40m Power Consumption 70 Watts Max...

Page 25: ...arts When parts need replacing ensure the service uses parts specified by the manufacturer or parts that have the same characteristics as the original parts Unauthorized substitutes may result in fire...

Page 26: ...manship and DOES NOT COVER normal wear and tear or cosmetic damage The Limited Warranty ALSO DOES NOT COVER damages which occurred in shipment or failures which are caused by products not supplied by...

Page 27: ...being Technology Co Ltd Address B 301 Science and Technology Building Phase II 1057 Nanhai Rd Nanshan District Shenzhen P R China Tel 86 755 21620566 Fax 86 755 21620564 Post Code 518067 www grandbein...

Reviews: