background image


12 

Trouble-Shooting Guide 


Sometimes you may come across minor problems that in most cases do not require a service 
call  and  can  be  easily  eliminated.  The  problem  may  have  resulted  from  improper  handling 
and/or installation of the appliance. Please refer to the trouble-shooting guide to assist you in 
identifying  the  possible  cause  and  solution  to  your  problem.  Should  the  problem  still  persist 
after completing these checkpoints, please contact the closest authorized service agent in your 
area for assistance. 
 

The Appliance Fails to Operate After Connecting to Electrical Power Supply 


Check the power cord is properly connected. 


Check the power supply in the electrical outlet.(blown fuse/ circuit breaker) 


Make sure the appliance is switched on. 

 
Continuous Operation of the Cooling System 


The door is frequently open or left open too long. 


The  door  is  not  properly  closed  (the  door  may  sag;  the  gasket  may  be  polluted  or 
damaged). 


Perhaps you may have overloaded the appliance with fresh foods. 


The  reason  may  be  inadequate  ventilation  of  the  compressor  (assure  adequate  air 
circulation). 


Ice Formation on the Inner Rear Wall 


As long as the defrost water runs to the channel and through the outlet to the drain pan on 
the compressor, automatically defrosting of the appliance is assured. 


In  case  the  ice  formation  on  the  inner  back  wall  is  increased  (3-5mm),  ice  should  be 
manually defrosted (See: Operation Control).   


Never use electric devices for defrosting and do not scrape the ice or frost layer with sharp 
objects. 


Water is Leaking from the Refrigerator 

If the discharge water outlet is clogged, or the defrost water drips over the channel, water will 
leak from the refrigerator. 


Clean the clogged outlet, for example with a plastic straw 


Manually defrost the increased ice layer.(See: Operation Control) 


Summary of Contents for BC-161A

Page 1: ...door Refrigerator Before Putting Into Use Important Placing and Installation Description of the Appliance Operation Control Use Maintenance and Cleaning Changing the Direction of opening the Door Trouble Shooting Guide ...

Page 2: ...9 Instructions for Use Storing Fresh Foods We care for the Environment Maintenance and Cleaning 10 Tips for Energy Savings Automatic Defrosting of the Refrigerator Important 3 Cleaning of the Appliance Disposing of Worn Out Appliances Switch Off the Appliance When Not In Use Placing and Installation 4 Changing the Direction of Choosing the Right Place Opening the Door 11 Placing the Self standing ...

Page 3: ...ispose your appliance please call your nearest authorized service agent See Disposing of Worn Out Appliance Tips for Energy Savings Try not to open the door too often especially when the weather is hot and humid Once you open the door close it as soon as possible Periodically check if the appliance is sufficiently ventilated adequate air circulation behind the appliance Set the thermostat from hig...

Page 4: ...ction safeguards See We Care for the Environment The rating plate containing Model No Serial No and other technical date specific to this unit is located either inside the unit or outside on the rear wall If there is any damage to the power supply cord please contact local service center for help WARNING repairs should be performed by qualified service personnel only Dispose of Worn Out Appliances...

Page 5: ...should be a free space at least 200 c wide and above the appliance kitchen units cupboards should be at least 5 cm away from the appliance in order to assure adequate ventilation Since this product has many ventilation holes underneath please make sure there is a gap of at least 3cm between the bottom of the product and the ground there is nothing stuck underneath INSTALLATION Place the appliance ...

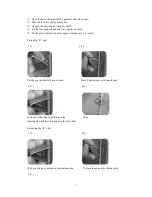
Page 6: ...es on them Put the glass shelf on the four cupules make sure it is steady Fixing the K clip ⅰ ⅱ Put the peg into the hole you choose Press it downwards with your thumb ⅲ ⅳ With your other fingers pushing on the Done slanting side put the other peg into the third hole Removing the K clip ⅰ ⅱ With your fingers pushing on the slanting side Pull out the peg on the slanting side ⅲ ...

Page 7: ...uipment grounding conductor and grounding plug The plug must be plugged into an appropriate wall outlet that is installed and grounded in accordance with all existing local codes and ordinances Consult a qualified electrician or serviceman if the grounding instructions are not clearly understood or if doubt exists as to whether the appliance is properly grounded CONNECTION TO POWER SUPPLY Connect ...

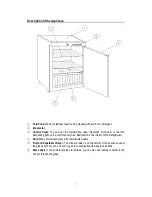
Page 8: ...t on the control panel See Illumination in the interior of the Refrigerator Door Made of stainless steel with replaceable gasket Fruit and Vegetable Crisper The crisper drawer is on the bottom of the appliance under the glass shelf You can pull out or push in conveniently with wheels and slides Glass shelf It can pride level place for articles you can also see loading contents in the Crisper throu...

Page 9: ...en the compressor is on the indicator light is on when the temperature is stable on the set temperature the indicator light is off during latency period the light is twinkling c Illumination in the Interior of the Refrigerator When the refrigerator door is open the light is on when closed the light is off d conversion when you press you can make conversions between and when LED2 is on it shows tem...

Page 10: ...ohol percentage shall be stored in tightly sealed bottles in vertical position Food should not touch the rear wall of the refrigerator Foods should be cooled down before storing Crispy and delicate foods should be stored in the coldest parts of the refrigerator Try not to open the door too often Some organic solutions like volatile oils in lemon and orange peel acid in butter etc can cause damage ...

Page 11: ...ance Disconnect the power bar before cleaning the appliance Do not use coarse or aggressive cleaning agents as you can damage the surface Clean the exterior with water and detergent Remove the detachable accessories in the interior of the appliance and clean with water and liquid detergent Plastic parts can not be washed in dishwashers Wash the interior of the appliance with lukewarm water adding ...

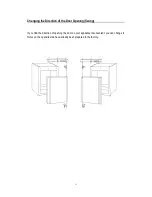
Page 12: ...ging the Direction of the Door Opening Swing If you find the direction of opening the door on your appliance inconvenient you can change it Holes on the opposite side have already been prepared in the factory ...

Page 13: ...or is frequently open or left open too long The door is not properly closed the door may sag the gasket may be polluted or damaged Perhaps you may have overloaded the appliance with fresh foods The reason may be inadequate ventilation of the compressor assure adequate air circulation Ice Formation on the Inner Rear Wall As long as the defrost water runs to the channel and through the outlet to the...

Page 14: ... the appliance the operation of the compressor and the refrigerant flow may be louder which does not mean that something is wrong with the appliance and it has no influence on the lifetime of the appliance Gradually this noise is reduced Sometimes unusual and louder noise is heard which is rather unusual for the appliance This noise is often a consequence of inadequate installation The appliance m...

Page 15: ...14 Exploded View ...
Page 16: ...Outer water drain pan BC161 00 06 10 Evaporator fan motor 17701131803 35 Whorl pole BC161 07 02 11 Fan support BC161 03 01 36 Upper hinge BC161 07 01 12 Digital display circuit 17505080703 37 Circuit box 16316040001 13 Digital display circuit box 16306020002 Circuit box cover 16316040002 Digital display circuit box cover 16351031216 Circuit 38610100002 Digital display panel 38610100002 38 Condense...

Page 17: ...8 21 Cupules support BC161A 01 01 46 Power cord clamp 16357030001 22 Glass shelf BC161A 00 1 47 Bottom fixing support BC121 05 03 23 Wheel BD121 05 03 48 Cord Outlet washer 16349120001 24 Slide BC161A 02 49 Liquid tank 17112150001 25 Crisper BC 161A 10 ...

Reviews: