There are a few things every foundation should provide:
1.
Your foundation must be securely anchored to the ground (Wind gusts can move or turn over a greenhouse because of its low
weight to surface area ratio). Before you start any foundation, you should know the greenhouse's outside base dimensions. The
dimensions are listed in the Grandio Manual for each size base kit. Be sure to prepare and level your surface prior to installation.
2.
There must be a way for water to drain out of the greenhouse (If water doesn't drain, it will collect on the floor and become
stagnant promoting algae, disease, and insect growth). You may want to treat your ground for weeds and grass weeks prior to
installing the base kit, and may consider applying weed barrier also. Plan for drainage using gravel or rocks that may be applied to
the interior floor of your greenhouse to keep puddles from forming.
3.
Measures should be taken to prevent weeds and grass from growing on the greenhouse floor (Greenhouses provide optimum
conditions for weeds to grow along with your other plants. Weeds can harbor harmful insects and diseases and should be kept
out of the greenhouse).
4.
Assemble your Grandio Base Kit according to the instructions in your greenhouse manual. The dimensions are also listed in the
manual for each size base kit so you may plan accordingly.
5.
You will need to install your BA-A1 / L-Bolts and BA-S10 bolts into the appropriate holes for your greenhouse base installa-
tion. Follow the steps for installing your anchor BA-A1 / L-Bolts and BA-S10 on the next page.
Outdoor
Ground
Assembly
1.2
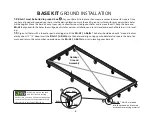
BA-A1 must be buried in ground. See . Lay your Base Kit into place, then measure corner to corner for square. Once
you have aligned and squared your base into the desired location, mark the earth/ground surface with spray paint where holes
will be dug out. Move the base kit out of your way to allow for room to dig your holes and remove the dirt. Keep the base and
BA-A1’s aligned with the holes they will go back into for quicker installation and to test level and depth of hole to assist in level-
ing.
1.3
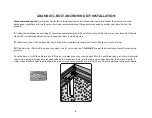
Dig out all holes with a shovel or post hole digger to fit the BA-A1 / L-Bolts. The holes should be about 6” around in diam-
eter by about 12”-14” deep. Insert the BA-A1 / L-Bolts into the holes and align using your bubble level to square the base. You
may need to turn the nut combos up or down on the BA-A1 / L-Bolts to assist in leveling your base kit.
BASE KIT GROUND INSTALLATION
BA-S2
BA-A1
BA-S1
BA-S03
BA-A1
* Must be inserted
into the ground, and secured
with concrete setting material.
GRANDIO
T I P
Make sure base is squared
and level before setting
anchor into concrete. Use a measuring tape
to ensure all corner to corner measures are
the same. Use level on all four sides.
4


