background image

1.11

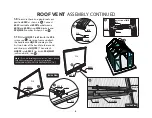
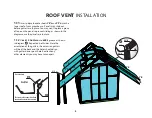
 Insert polycarbonate sheets Y8’s and Y9’s into the 

lower roof of your greenhouse.  Panels may slide out 

before gutters are in place. You may want to place a piece 

of tape on the panel to prevent sliding as shown in the 

diagram once the panels are in place.

1.12 

Slide 610 Gutters into 609’s groove as shown 

in diagram       . Repeat on both sides. Note the 

orientation of the gutters, the extension gutters 

will be at the back and the holes should align 

with gutter down spout hole. Reattach any 

other elements you may have taken apart.  

601B

601A

610

609

609

610

Gutter

Outside View

The two profiles should be flush 

at ends when installed correctly.

ROOF VENT INSTALLATION

Y8

Y9

Y8

Y8

Y8

Y8

Y8

610

5

Summary of Contents for GRA-ELEM-VEN

Page 1: ...T ROOF VENT PACKING LIST GRANDIO ELEMENT ADDITIONAL ROOF VENT KIT FOR NEW AND EXISTING GREENHOUSE CUSTOMERS 2016 Grandio Greenhouses Backyard Living Source Inc All rights reserved April 15 2016 Manual...

Page 2: ...that you need to get to the area you are going to replace with a roof vent Repeat on other side if you have multiple vents you are going to install Be sure to mark all panels you remove with an X to...

Page 3: ...7 16 570mm 22 3 4 578mm 22 3 4 578mm Cut Cut 2 Transparent Clear Film Opal White Film Polycarbonate Panels Sun The UV Protected side is covered with clear film and must face toward the sun The side c...

Page 4: ...ames are assembled according to images below 1 7 Insert assembled window into the end of ridge of 607 and slide into position See Window positions are your discretion a 6x4 will have 1 roof vent and a...

Page 5: ...e first two holes of the handle to the second and third pins of HQC02 Then attach HQC02 into 603C s track with S04 ML01 nuts and bolts see 603B 618 616 616 603B 616 Z04 HQC02 Y10 Y10 HQC01 Handle Note...

Page 6: ...are in place 1 12 Slide 610 Gutters into 609 s groove as shown in diagram Repeat on both sides Note the orientation of the gutters the extension gutters will be at the back and the holes should align...

Page 7: ...caps to the ridge and gutters on both front and back as shown below Squeeze a small amount of rubberized silicone or construction adhesive into the ends of ridge to secure pressure fit end caps You wi...

Reviews: