2.7
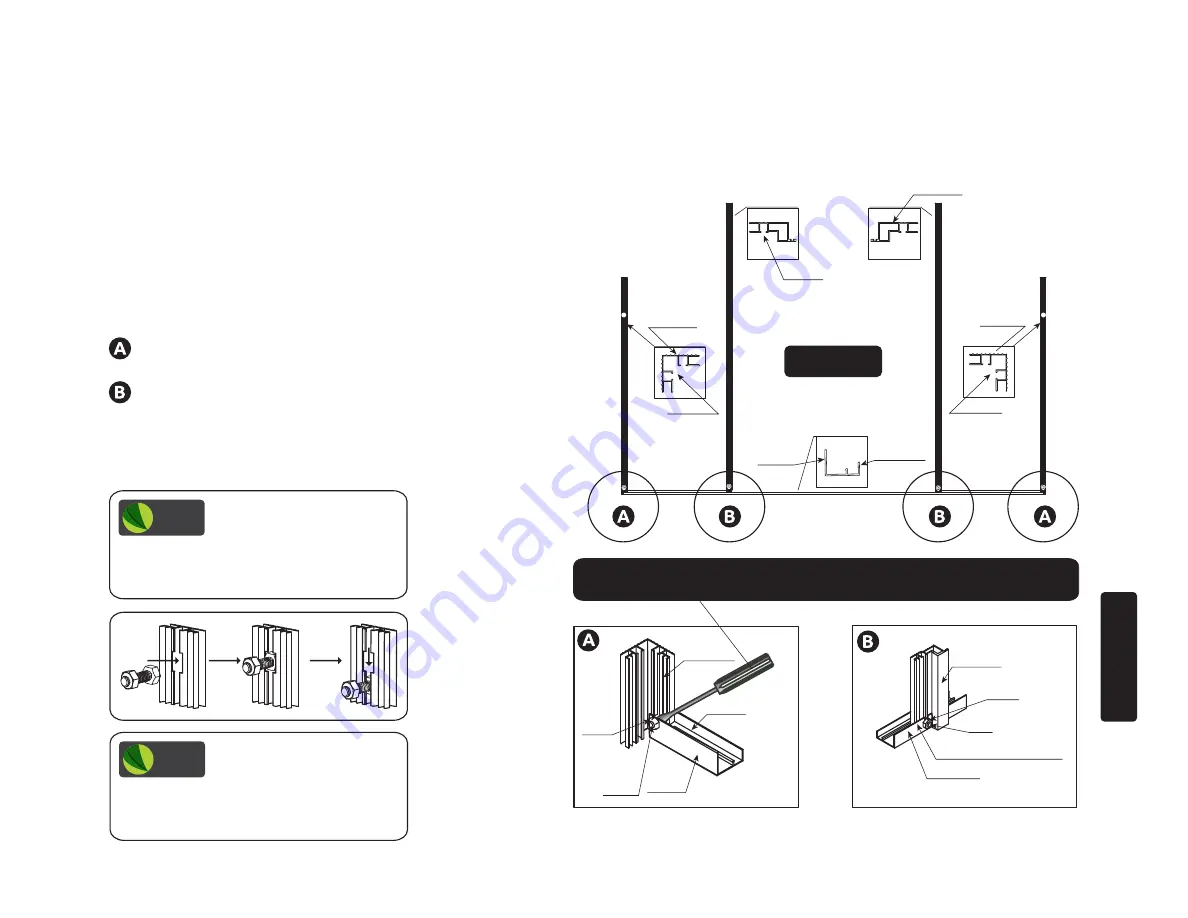
View diagrams and attach the (2) 604’s and (2)
601A’s to the 619. Note the orientation of the 604’s,
there are 4 different 601A’s (2) for the front and (2) for
the back with different hole placements. The large holes
should be at the top and facing forward on the front
frame assembly. See diagram on this page. The 601-FR
and the 601-FL will have a hole at the top side and will
face forward.
shows where the corner pieces attach to 619.
shows where the door frame attaches to the 619.
*If assemblling the back door you will need to drill 1/4
inch holes in 601-B’s to match the front wall, these holes
should face the ground during assembly.
S04
ML01
604-R
619
INSIDE DOOR FRAME
TIP:
If necessary
you may use a screwdriver to wedge behind the bolt head.
This prevents bolt from falling into the track.
S04
601A-FR
ML01
619
INSIDE
Inside View
GRANDIO
T I P
Make sure the hole on the
601A-FL and 601A-FR
face to the front of greenhouse for future
install of the L21 and L28 bracket that
holds the door header in place.
GRANDIO
T I P
BOLT INSTALLATION TIP:
Locate all nuts and bolts, pre
thread and place in the groove of the
extrusion to make installation easier. Move
up or down for exact placement.
601A-FL
601A-FR
604-R
604-L
619
INSIDE
OUTSIDE
INSIDE
OUTSIDE
INSIDE
OUTSIDE
OUTSIDE
INSIDE
Inside View
19
STEP T
W
O
FRONT FRAME ASSEMBLY CONTINUED
ALWAYS ASSEMBLE FRONT HORIZONTAL
Summary of Contents for GRANDIO ELITE 8x12 2015
Page 71: ...NOTES NOTES 70 NOTES...


