background image

Note: For the detailed user manual, please download from:  

http://www.grandstream.com/support/gxp_series/general/gxp_support.html

5

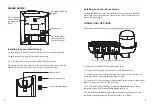
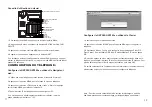
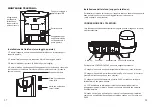
Configure the GXP280/GXP285 using the Keypad:

1. Make sure the phone is idle 

2. Press the “MENU” button to access the keypad MENU to configure the phone.

3. Select MENU-> Config, to configure settings for SIP Proxy, Outbound Proxy, 

SIP User ID, SIP Auth ID, SIP Password.

4. Follow MENU options to configure the basic features of the phone –

for example: the IP address if using a static IP. For details, please check GXP 

Series User Manual.

5. Please contact your ITSP (Internet Telephony Service Provider) for additional 

settings that may be necessary to configure the phone.
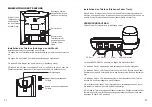
6

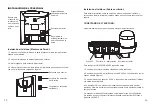
1. To access the  MENU, press the round MENU button.

2. Navigate the menu by using the UP/DOWN and LEFT/RIGHT buttons.

3. Press the round MENU button to confirm a menu selection.

4. Delete an entry by pressing the MUTE button.

5. The phone automatically exits MENU mode when there is an incoming call, the 

phone goes off-hook, or when the MENU mode is left idle for 20 seconds. 

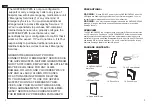
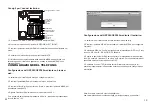
Tips For Using the Keypad:

Menu/OK Key

Hold 

Speaker 

Send 

Headset 

Standard Keypad
Mute

Soft Keys

Message  Waiting Indicator

Transfer

Conference 

Flash

Message

Navigation Keys

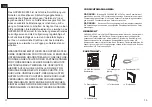
PHONE CONFIGURATION:

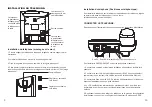
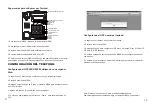
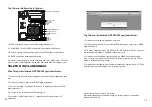
Configure the GXP280/GXP285 using a Web Browser:

1. Ensure your phone is powered up and connected to the Internet.

2. Press MENU button to go into menu of the phone.

3. Press the “down” arrow button to “Status” and press MENU button to see the 

IP address. 

4. Type the phone’s IP address in your PC browser.

5. The default administrator password is “admin”; the default end-user password 

is “123”.

Summary of Contents for GXP-280

Page 1: ...c 1297 Beacon Street 2nd Floor Brookline MA 02446 USA Tel 1 617 566 9300 Fax 1 617 249 1987 www grandstream com For Warranty and RMA information please visit www grandstream com GXP280 GXP285 1 Line IP Phone Quick Start Guide ...

Page 2: ...HE GXP280 GXP285 TO CONTACT EMERGENCY SER VICES AND YOUR FAILURE TO MAKE ADDI TIONAL ARRANGEMENTS TO ACCESS EMER GENCY SERVICES IN ACCORDANCE WITH THE IMMEDIATELY PRECEDING PARAGRAPH The GXP280 GXP285 is a next generation entry level SIP phone that features an LCD screen and 3 soft keys The GXP280 GXP285 delivers superior audio quality comprehensive telephony features automated provisioning securi...

Page 3: ...electrical outlet GXP280 only 4 The LCD will display provisioning or firmware upgrade information Before continuing please wait for the date time display to show up 5 Using the phone embedded web server or keypad configuration menu you can further configure the phone using either a static IP or DHCP Installing the phone Wall Mount 1 Attach the phone stand to the bottom of the phone as wall mount s...

Page 4: ...s the round MENU button 2 Navigate the menu by using the UP DOWN and LEFT RIGHT buttons 3 Press the round MENU button to confirm a menu selection 4 Delete an entry by pressing the MUTE button 5 The phone automatically exits MENU mode when there is an incoming call the phone goes off hook or when the MENU mode is left idle for 20 seconds Tips For Using the Keypad Menu OK Key Hold Speaker Send Heads...

Page 5: ... METTRE EN PLACE DES ARRANGEMENTS SUP PLEMENTAIRES POUR ACCEDER AUX SERVICES D URGENCE CONFORMEMENT AU PARAGRAPHE PRECEDENT Le GXP280 GXP285 est la nouvelle génération des téléphones SIP d entrée de gamme qui comporte un écran LCD et 3 boutons programmables Le GXP280 GXP285 offre une qualité audio supérieure toutes les fonctionnalités de télé phonie d approvisionnement automatisé de la sécurité po...

Page 6: ... à jour du firmware Avant de continuer veuillez patienter jusqu à que la date heure s affiche 5 En utilisant le serveur web intégré du téléphone ou le menu de la configuration du téléphone vous pouvez le configurer en utilisant soit IP statique ou DHCP Installation du téléphone montage sur le mur 1 Fixez le support de téléphone à la base du téléphone comme support mural entretoises 2 Joindre le té...

Page 7: ...culaire MENU 2 Naviguez dans le menu en utilisant les boutons HAUT BAS et GAUCHE DROITE 3 Appuyez sur le bouton circulaire MENU pour confirmer la sélection 4 Supprimer une entrée en appuyant sur le bouton MUET 5 Le téléphone quitte automatiquement le mode MENU quand il y a un appel entrant le téléphone est décroché ou lorsque le mode MENU est laissé inactif pendant 20 secondes Conseils d utilisati...

Page 8: ...HABER HECHO LOS ARREGLOS DE LUGAR PARA ACCESAR ESTOS SERVICIOS DE EMERGENCIA DE ACUERDO CON EL PÁRRAFO ANTERIOR El GXP280 GXP285 es un teléfono SIP de baja gama que cuenta con una línea una pantalla LCD 128x32 y 3 teclas programables El GXP280 GXP285 entrega una calidad de audio impecable amplia variedad de opciones telefónicas protección de seguridad para privacidad y compatibilidad con la mayorí...

Page 9: ...amiento o actual ización de firmware Antes de continuar espere hasta que la pantalla muestra el tiempo y la fecha 5 Utilizando la interfase Web integrada o mediante el menú de configuración por teclado puede configurar el teléfono utilizando una dirección IP estática o dinámica con DHCP Instalando el teléfono Montura de Pared 1 Coloque el soporte del teléfono a la parte inferior del mismo como par...

Page 10: ...U para confirmar su selección 4 Borre los datos presionando la tecla de MUTE 5 El teléfono va a salir del MENU cuando hay una llamada entrante el auricular es levantado o cuando el teléfono permanece en reposo por 20 segundos Sugerencias para cofigurar por Teclado Tecla de Menú OK Retener Altavoz Enviar Diadema Telefónica Teclado Estándar Silencio Teclas Suaves Programables Indicador de Mensaje en...

Page 11: ...RCH IHR VERSÄUMNIS DIE GEMÄß DEM VORHERGEHEN DEN PARAGRAPH NOTWENDIGEN ZUSÄTZLICHEN EINSTELLUNGEN FÜR DEN ZUGANG ZU NOTRUFEN VORZUNEHMEN VERURSACHT WERDEN KÖNNEN GXP280 GXP285 ist ein kleines SIP Businesstelefon der neuen Generation mit einem LCD Display und 3 Softkeys Es bietet ausgezeichnete Audioqualität umfassende Telefoniefeatures automatisches Provisioning Sicherheits und Datenschutz sowie e...

Page 12: ...or Sie fortfahren warten Sie auf die Zeit Datumsanzeige 5 Über den im Telefon integrierten Webserver oder das Konfigurationsmenü der Tastatur können Sie weitere Konfigurierungen vornehmen und dabei entweder statisches IP oder DHCP benutzen Installation des Telefons Anbringen an der Wand Installation des Telefons Anbringen an der Wand 1 Bringen Sie den Telefonhalter als Abstandhalter an der Unterse...

Page 13: ...unde MENU Taste 2 Navigieren Sie im Menü über die UP DOWN bzw LINKS RECHTS Tasten 3 Drücken Sie die runde MENU Taste um die Menüauswahl zu bestätigen 4 Über die MUTE Taste können Sie Einträge löschen 5 Das Telefon verlässt den Menü Modus automatisch bei einem eingehenden Anruf wenn der Hörer abgenommen wird oder wenn länger als 20 Sekunden keine Taste gedrückt wurde Tipps für die Benutzung der Tas...

Page 14: ... GXP285 PER CHIAMATE AI SERVIZI DI EMERGENZA E ALL IMPOSSIBILITÀ DI EFFETTUARE ACCORDI SUPPLEMENTARI PER ACCEDERE AI SERVIZI DI EMERGENZA IN CONFORMITÀ AL PARAGRAFO PRECEDENTE Il GXP280 GXP285 è un telefono SIP di nuova generazione caratterizzato da uno schermo LCD e 3 tasti funzione Il GXP280 GXP285 garantisce una qualità di audio superiore tutte le funzioni della telefonia protezione di sicurezz...

Page 15: ...ni relative allo stato dell apparecchio o all aggiornamento del firmware Prima di continuare attendere che il display visualizzi data ora 5 Usando il server web del telefono o il menu di configurazione del tastierino numerico è possibile inoltre configurare il telefono usando o un IP statico o un DHCP Installazione del telefono montaggio a parete 1 Fissare il supporto del telefono alla base del te...

Page 16: ...olare MENU 2 Muoversi nel menu usando i pulsanti UP DOWN e LEFT RIGHT 3 Premere il pulsante circolare MENU per confermare una scelta effettuata nel menu 4 Cancellare un immissione premendo il pulsante MUTE 5 Il telefono esce automaticamente dalla modalità MENU quando arriva una chiamata quando il telefono è sganciato o quando la modalità MENU non è usata per 20 sec Consigli per l uso del tastierin...

Page 17: ... ERİŞİM İÇİN EK AYARLAMALARI YAPMAMANIZDAN KAYNAKLANAN YA DA BUN LARLA İLİŞKİLİ HER TÜRLÜ İDDİADAN VE DAVA HAKKI VEREN NEDENLERDEN FERAGAT ETMİŞ OLURSUNUZ GXP280 GXP285 LCD ekran ve 3 adet yumuşak tuş özelliğine sahip gelecek nesil giriş düzeyinde bir SIP telefonudur GXP280 mükemmel bir ses kalitesi kapsamlı telefon özellikleri otomatik konfigürasyon gizlilik için güvenlik koruma ve bir çok 3 tara...

Page 18: ... donanım yazılımı güncelleme bilgisini gösterecektir Devam etmeden önce lütfen tarih zaman ekranının görünmesini bekleyiniz 5 Telefonun gömülü olduğu web sunucusunu ya da tuş takımı yapılandırma menüsünü kullanarak statik IP ya da DHCP kullanarak telefonun ileri yapılandırmasını yapabilirsiniz Telefonun Kurulumu Duvara Monte 1 Duvar monte ara parçaları olarak telefon standını telefonun altına takı...

Page 19: ...e erişmek için yuvarlak MENÜ düğmesine basınız 2 YUKARI AŞAĞI ve SOL SAĞ düğmelerini kullanarak menüde gezin 3 Bir menü seçimini yapılandırmak için yuvarlak MENÜ düğmesine basınız 4 SESSİZ düğmesine basarak girdileri siliniz 5 Gelen bir çağrı olduğunda ahize kaldırıldığında ya da MENÜ modu 20 saniye boyunca işlem yapılmadığında telefon otomatik olarak MENÜ modundan çıkar Tuş Takımını Kullanımı içi...

Reviews: