1
2
3
4
5
6
7
14
16
18
20
22
24
Res. Menu OK
1h
0 2 4
6
8
10 12
Res. Menu OK
1h
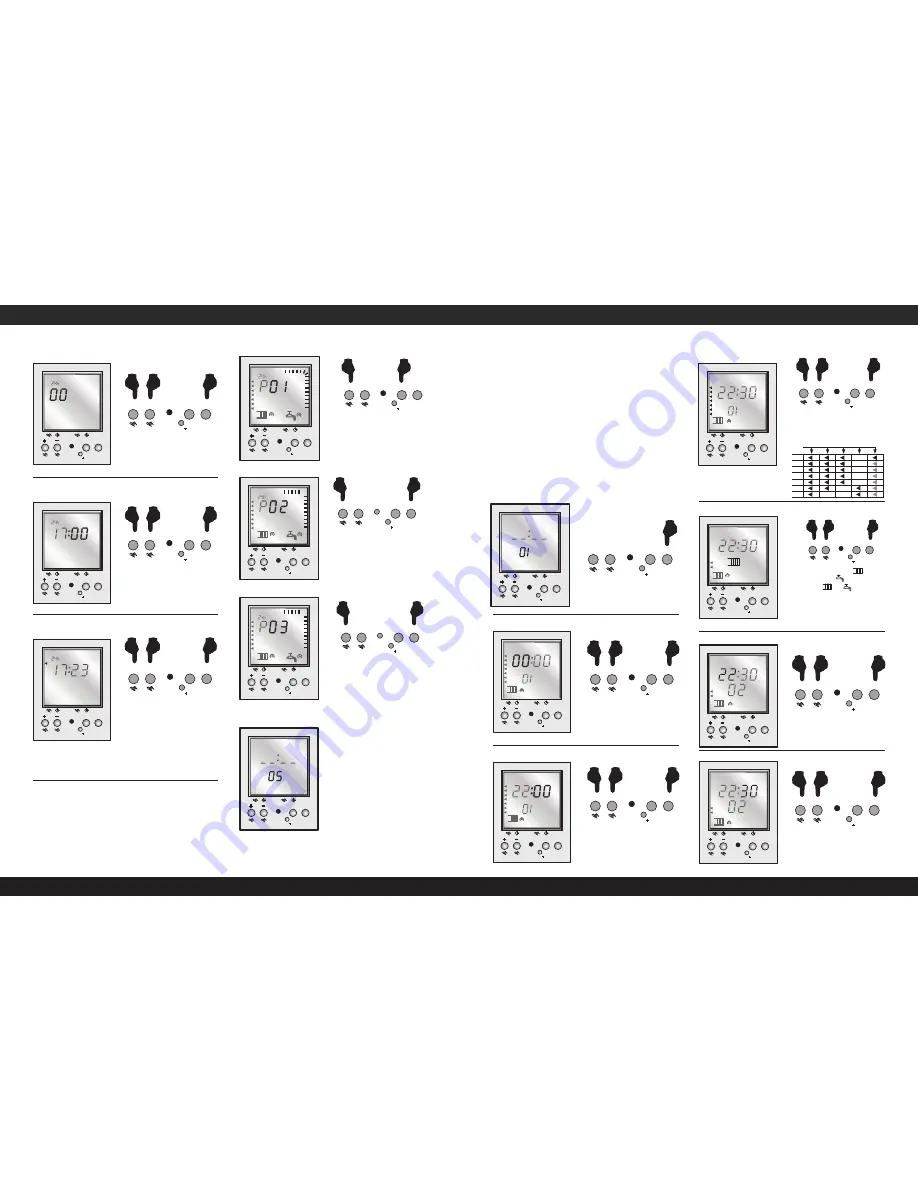
1.4 Set minutes
1
2
3
4
5
6
7
14
16
18
20
22
24
0 2 4
6
8
10 12
1
1
2
1 = Monday
2 = Tuesday
3 = Wednesday
4 = Thursday
1.5 Set week day
5 = Friday
6 = Saturday
7 = Sunday
1
2
3
4
5
6
7
14
16
18
20
22
24
0 2 4
6
8
10 12
1.6 Select one of the pre-set programs
Use the following sequence after setting the time,
week day etc.
*
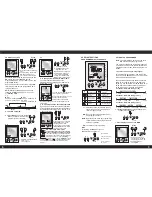
If you wish to modify a pre-set program
do NOT press
Menu
after selecting the program
– but go to
1.7 To modify pre-set programs
next.
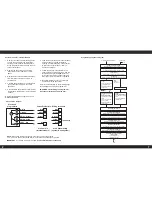
Setting your own program
Follow this sequence after setting the time,
week day, etc. as shown in steps 1.1 to 1.5 then
press
‘+’
three times until ‘
P
’ shows on the
--
display. Then press
OK
.
1
2
3
4
5
6
7
14
16
18
20
22
24
0 2 4
6
8
10 12
prog
Res. Menu OK
1h
Press
OK
to confirm setting
1
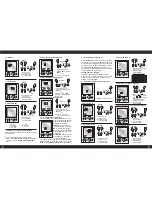
2.1 Select first program ON time (prog 01)
1
2
3
4
5
6
7
prog
14
16
18
20
22
24
0 2 4
6
8
10 12
Res. Menu OK
1h
2.2 Set hour ON
1
1
2
1
2
3
4
5
6
7
prog
14
16
18
20
22
24
0 2 4
6
8
10 12
2.3 Set minutes ON
Res. Menu OK
1h
1
1
2
2.4 Set week day ON
1
2
3
4
5
6
7
prog
14
16
18
20
22
24
0 2 4
6
8
10 12
Res. Menu OK
1h
1
1
2
1
2
3
4
5
6
7
Possible week blocks and individual days
1
2
3
4
5
6
7
prog
14
16
18
20
22
24
0 2 4
6
8
10 12
Res. Menu OK
1h
1
1
2
2.7 Set minutes OFF
1
2
3
4
5
6
7
prog
14
16
18
20
22
24
0 2 4
6
8
10 12
2. To set individual program P--
Under the
Menu
option
P
you have the option
--
of creating your own user defined program. This
program can be changed at any time. There are
up to 20 memory locations available for 10 OFF
10 ON commands throughout the week. You
can allocate a corresponding week day or week
block to each memory location.
e.g. after selecting P02 you should also program:
Sa-Su 22.30 ON (prog 05) 23.00 OFF (prog 06)
Note:
Pressing
Menu
terminates programming
2.5 Set channel (heating or hot water)
1
2
3
4
5
6
7
prog
14
16
18
20
22
24
0 2 4
6
8
10 12
Res. Menu OK
1h
1
1
2
5
4
Res. Menu OK
1h
1.3 Set hour
1
1
2
+ -
1. Select hour by
pressing
+ or -
2. Confirm setting
by pressing
OK
1. Select minutes by
pressing
+ or -
2. Confirm setting
by pressing
OK
+ -
1. Select week day or by
pressing
+ or -
2. Confirm setting
by pressing
OK
Res. Menu OK
1h
1
1
2
+ -
1. Either select pre-set
program
P01
by pressing
Menu
or
2. Press
‘+’
to go to
P02
1. Either select pre-set
program
P02
by pressing
Menu
or
2. Press
‘+’
to go to
P03
Pressing ‘
-
’ will take you
back to P01
1. Either select pre-set
program
P03
by pressing
Menu
or
2. Press
‘+’
to go to
P--
to set your own program
+ -
1. Select hour by
pressing
+ or -
2. Confirm setting
by pressing
OK
+ -
1. Select minutes by
pressing
+ or -
2. Confirm setting
by pressing
OK
+ -
1. Select week day or days
by pressing
+ or -
2. Confirm setting
by pressing
OK
1. Select heating or
hot water by pressing
+ or -.
or will show
on display.
NB. illustration shows
heating is selected
2. Confirm setting
by pressing
OK
2.6 Set first program hour OFF time (prog 2)
1. Select hour
by pressing
+ or -
2. Confirm setting
by pressing
OK
Res. Menu OK
1h
1
1
2
1. Select minutes
by pressing
+ or -
2. Confirm setting
by pressing
OK
Res. Menu OK
1h
Res. Menu OK
1h
1
2
3
4
5
6
7
14
16
18
20
22
24
0 2 4
6
8
10 12
Res. Menu OK
1h
1
2
3
4
5
6
7
14
16
18
20
22
24
0 2 4
6
8
10 12
Res. Menu OK
1h
1
2
3
4
5
6
7
14
16
18
20
22
24
0 2 4
6
8
10 12
Res. Menu OK
1h
1
2
3
4
5
6
7
14
16
18
20
22
24
0 2 4
6
8
10 12
prog
Res. Menu OK
1h
Res. Menu OK
1h
Res. Menu OK
1h
+ -
Res. Menu OK
1h
Res. Menu OK
1h
Res. Menu OK
1h
+ -
+ -
Res. Menu OK
1h
+ -
Res. Menu OK
1h
1.6a Select P01 preset program
1.6b Select P02 preset program
1.6c Select P03 preset program
Res. Menu OK
1h
1
2
+ -
Press or
Press
or
Press
or
Press
or
1.7 To modify preset programs
First press
OK.
Then, using the
OK
key you can
now run through the pre-set
program and modify any of
the ON/OFF settings.
Either:
Use
'+'
or
'-'
keys
to modify setting, then press
OK
to confirm new setting.
Or:
Accept pre-set setting by
pressing
OK
to move on to
next setting.
Press
Menu
when you have
completed your changes to
the pre-set program.
Press
or
Press
or
Press
or
Press
or
Press
or
Press
or
Res. Menu OK
1h
1
2
+ -
Press or
Res. Menu OK
1h
1
2
+ -
Press or
*
*
*


