background image


10 


‘24 hour’ mode – to automatically fill the hopper with pellets, up to the trap door of the vacuum 
unit trap door, every 24 hours starting when the ON/OFF switch on the SpiraVac control panel  is 
first set to ON. 
 

In both cases the operation of the vacuum unit is as follows – Refer to the flow diagram in Figure 3-6. 
 
The vacuum motor will start and create a vacuum in the cyclone. This pulls closed the trap door at the 
base of the cyclone. The vacuum switch, inside the vacuum unit, is activated. Power is supplied to the 
pellet auger located in the base of the bulk pellet store. 
 
The auger starts and pulls pellets into the suction chamber of the auger unit, where they are drawn into 
and through the flexible suction tube to the vacuum unit, and then deposited in the cyclone. The red 
indicator neon on the vacuum unit control panel will blink on and off during this process. 
 
The pellet auger runs for 60 seconds and is then automatically switched off. The vacuum motor runs on 
for a further 15 seconds after the auger has stopped (to ensure no pellet build up in the tubes) before it is 
automatically switched off (i.e. a total vacuum motor running time of 75 seconds). 
 
When the vacuum unit stops, the loss of the vacuum allows the weight of the pellets to open the trap door 
and the pellets fall into the hopper.  
 
The vacuum system will deliver approximately 6kg of pellets in each operation, and will therefore have to 
operate several times to either top up or fill the pellet hopper. 
 
When the ‘VACUUM SYSTEM’ ON/OFF switch is first set to ON 
The vacuum system will operate repeatedly, as described above, until the hopper is filled with pellets up 
to the level of the trap door of the cyclone. In this condition the trap door will be prevented from closing 
by the pellets. This is intentional as further operation of the vacuum system is not required with this 
amount of pellets in the hopper. 


Thereafter the vacuum unit will operate automatically in one of the two following ways: 
 
‘Top-up’ mode  
In this operating mode the SpiraVac system will only operate if the level of the pellets in the hopper falls 
below the minimum level monitored by the contents diaphragm switch. 
 
The vacuum system will operate repeatedly to top-up the hopper until it is filled with pellets up to the level 
of the trap door of the cyclone as on the initial operation of the vacuum system. In this condition the trap 
door will be prevented from closing by the pellets.  


If the pellet hopper contents switch has detected a low pellet level and the vacuum motor system is 
operating, but the pellet hopper contents switch is not satisfied after 26 attempts (e.g. due to the bulk 
pellet store being empty) then the system will go into ‘fault’ mode.  


The indicator neon on the control panel will remain on constantly. The user can over-ride this by switching 
the ‘VACUUM SYSTEM’ switch to OFF and filling the pellet hopper manually (see Section 3.4.2 – Manual 
Mode below). 

 
NOTE  
When the ‘VACUUM SYSTEM’ switch is set to OFF the indicator neon will remain lit. When it is 
switched back to ON the indicator neon will now go out. 

Summary of Contents for WPVKIT10

Page 1: ...1 Grant SpiraVac Pellet Feed System For Grant Spira Boiler Pellet Hoppers Installation User Instructions Part No DOC 43 Rev 07 17 05 17 ...

Page 2: ...omagnetic Compatibility Directive and its amending Directives Has been designed and manufactured to the following Specifications EN60335 1 2012 Household and similar electrical appliances Safety General requirements EN60335 2 2 2010 Household and similar electrical appliances Safety Particular requirements for vacuum cleaners and water suction cleaning appliances EN55014 1 2006 Electromagnetic Com...

Page 3: ...ellet tubes 17 5 Electrical 5 1 General 19 5 2 Connection of pellet hopper 19 5 3 Connection of vacuum unit to pellet hopper 19 5 4 Connection of vacuum unit to auger unit 20 5 5 Wiring diagrams 21 6 Commissioning 6 1 General 26 6 2 Procedure 26 7 Servicing 7 1 Vacuum unit 28 7 2 Auger unit 29 7 3 Pellet tubes 29 8 User Instructions 8 1 Introduction 30 8 2 About the Spira Vac system 30 8 3 Control...

Page 4: ...ng appliances It is intended to convey 6mm diameter EN Plus A1 BS EN ISO17225 2 2014 wood pellets only and should not be used for any other application Grant Engineering UK Ltd shall not be liable for any injury or damage arising from the incorrect use of this system For correct usage refer to these Installation and User instructions Installation of the Grant Spira wood pellet boiler and the Spira...

Page 5: ...below Installation User Instructions Note The electrical cable required to connect the auger unit to the vacuum unit to be supplied by installer SpiraVac Kit Ref No Length of flexible tube between auger unit and vacuum unit Number and lengths of tube supplied Quantity of metal pipe support clips WPVKIT5 5m 1 x 10m length 10 WPVKIT10 10m 2 x 10m length 20 WPVKIT15 15m 2 x 15m length 30 WPVKIT20 20m...

Page 6: ...ly Voltage 230V 50HZ 1ph 13A fused Running Current 8 6A Power 1870W Refer to Section 5 2 for further details on fuse ratings required 2 3 SpiraVac System Arrangement Spira pellet boiler Bulk pellet store Auger unit Flexible pellet tubes Vacuum unit Boiler pellet hopper ...

Page 7: ... the rear Refer to Figures 3 1 and 3 2 IMPORTANT Ensure that the cooling vents on the top and at the rear of the vacuum unit are not obstructed at any time The cyclone section of the vacuum unit is located below the enclosure located within the top part of the pellet hopper when fitted It is fitted with a counterbalanced trap door at the bottom This door is drawn closed by the vacuum generated whe...

Page 8: ...ger Unit The auger unit has been designed to be mounted directly onto the Grant bulk pellet store with the fixings supplied on the store using the holes already present around the rectangular outlet opening at the base of the store It can also be fitted to other bulk pellet stores by drilling the required holes using the auger mounting flange as a template refer to Section 4 1 The unit consists of...

Page 9: ...s provided with the kit Refer to Section 4 3 for details Any pellet tubes run against walls MUST be adequately supported at no more that 1 metre centres and at either sides of a bend in the tube using the 50mm metal pipe clips provided 3 4 Operating Sequences The vacuum unit has a VACUUM SYSTEM ON OFF switch on the control panel When this switch is set to ON the vacuum system operates in Automatic...

Page 10: ... either top up or fill the pellet hopper When the VACUUM SYSTEM ON OFF switch is first set to ON The vacuum system will operate repeatedly as described above until the hopper is filled with pellets up to the level of the trap door of the cyclone In this condition the trap door will be prevented from closing by the pellets This is intentional as further operation of the vacuum system is not require...

Page 11: ...our mode when the power is reconnected and the original time setting will be remembered the actual time it will operate to fill the hopper will now be incorrect i e delayed by the duration of the power interruption Example If the 24hour mode was originally set to operate at 6 00pm every day but a power cut lasting 1 hour occurred the 24hour mode will now operate at 7 00pm after the power is reconn...

Page 12: ...12 Figure 3 6 SpiraVac operation flow diagram ...

Page 13: ... the isolator on the mounting flange and the auger motor in auger unit 3 On the bottom section of the bulk pellet store unscrew and remove the eight M8 screws around the auger sleeve opening Remove and discard the flange and auger sleeve but keep the screws Refer to Figure 4 5 Ensure that the factory fitted neoprene gasket is still in place around the opening and not damaged Refer to Figure 4 6 Th...

Page 14: ... the electrical isolator is correctly positioned to the right of the hole Refer to Figure 4 7 IMPORTANT Ensure that the four fixing bolts are correctly fitted through the mounting flange from the back before fitting the flange to the bulk pellet store 6 Fasten the mounting flange to the bottom section of the pellet store using the eight M8 screws previously removed Refer to Figure 4 7 7 Check that...

Page 15: ... four nuts holding the square cover panel in place on the rear top panel of the hopper Remove the cover panel from the hopper Refer to Figure 4 11 5 Carefully place the vacuum unit top down on something to protect the paint finish Remove the four fixing screws from the vacuum unit Invert the top panel and place it over the cyclone of the vacuum unit Position the top panel so that the vacuum unit f...

Page 16: ...to the vacuum unit using duct tape or similar 10 Fit the pellet dam plate into the hopper with the bracket on the back of the plate facing toward the back of the hopper and the three fixing holes at the top Refer to Figure 4 15 Fix the pellet dam plate in place using three screws previously removed in the corresponding holes along the front edge of the hopper rear top panel Refer to Figure 4 16 NO...

Page 17: ...acuum unit on the pellet hopper to the Auger unit on the bulk pellet store IMPORTANT The connection marked VACUUM FLOW on the auger unit MUST be connected to the corresponding VACUUM FLOW connection on the vacuum unit Similarly the VACUUM RETURN connections on the auger and vacuum units must be connected together All connections must be made using the following procedure 1 Cut the two flexible tub...

Page 18: ...nit 6 Repeat this process using the second flexible tube to connect the VACUUM FLOW connection on the auger unit to the VACUUM FLOW connection on the vacuum unit If the vacuum unit operates but no pellets are delivered to the hopper from the store Switch the VACUUM SYSTEM ON OFF switch to OFF Isolate the electrical supply to the boiler and SpiraVac system Check that two flexible tubes between the ...

Page 19: ...ol system only Refer to Figure 5 6 for the wiring details with an S plan type heating control system The power supply cable to the hopper should be at least 1 5mm PVC Refer to the main Installation Instructions supplied with the boiler for further details on the wiring of the electrical system controls and the other electrical connections on the boiler to be made during installation Note The hoppe...

Page 20: ...re that the plug and socket are fully pushed together until the small catch clicks into place 5 4 Connection of Vacuum Unit to Auger Unit The 3 way plug and lead provides the 230V electrical supply from the vacuum unit to the remote auger unit A corresponding 3 way connector is supplied fitted to the plug for connection of the cable to the remote auger unit The auger unit is supplied with a factor...

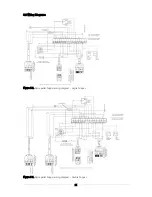
Page 21: ...21 5 5 Wiring Diagrams Figure 5 2 Spira pellet hopper wiring diagram single hopper Figure 5 3 Spira pellet hopper wiring diagram double hopper ...

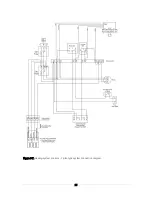
Page 22: ...22 Figure 5 4 Vacuum unit wiring diagram ...

Page 23: ...etween vacuum unit and auger unit Connect the 3 way socket provided with the vacuum unit to isolator on auger unit Refer to Section 5 4 Connect socket to the corresponding plug on flying lead from vacuum unit Refer to Figure 5 4 ...

Page 24: ...24 Figure 5 6 Heating system controls S plan type system connection diagram ...

Page 25: ...25 Figure 5 7 Heating system controls Y plan type system connection diagram ...

Page 26: ...h the electrical isolator on the auger unit to ON 7 Switch on the electrical supply to the hopper boiler at the fused isolator 8 Switch the VACUUM SYSTEM switch to ON The vacuum unit should now start and pellets will delivered to the pellet hopper from the bulk store Refer to the User Instructions in Section 8 of these Instructions for further details The first time the Grant SpiraVac system is sw...

Page 27: ...ilt in timer function will stop for the duration of the power interruption Whilst the SpiraVac system will automatically continue to operate in the 24 hour mode when the power is reconnected and the original time setting will be remembered the actual time it will operate to fill the hopper will now be incorrect i e delayed by the duration of the power interruption Example If the 24hour mode was or...

Page 28: ... 1 Remove the cover from the vacuum unit as follows Unscrew and remove the four upper outer screws at the rear of the vacuum unit Refer to Figure 7 1 IMPORTANT Do NOT remove the four screws at the bottom rear of the vacuum unit Slacken off the four screws two on each side at the bottom of the cover sides Refer to Figure 7 2 Carefully lift the cover up and off the vacuum unit taking care to disconn...

Page 29: ...ct the suction chamber through the glass panel Check for any signs of blockage that could interfere with the operation of the auger Refer to Figure 7 6 4 If necessary unscrew and remove the two nuts and remove the top cover from the suction chamber Check the seal on the underside of the cover When replacing the cover ensure that it is correctly fitted before tightening the nuts 7 3 Flexible Pellet...

Page 30: ... Here the pellets are collected in the cyclone unit beneath the vacuum unit within the pellet hopper After running for 75 seconds the vacuum motor stops The trap door at the base of the cyclone opens and the pellets stored within fall into the hopper This process will be repeated several times until the hopper is filled with pellets up to the level of the trap door of the cyclone In this condition...

Page 31: ...FF OFF No power to vacuum system ON ON OFF Vacuum system ready to operate when pellet level in hopper is at minimum ON ON ON Fault with vacuum system 8 4 Starting the system Switch the VACUUM SYSTEM switch to ON The vacuum system will operate until the hopper is filled with pellets up to the level of the trap door of the cyclone In this condition the trap door will be prevented from closing by the...

Page 32: ...de when the power is reconnected and the original time setting will be remembered the actual time it will operate to fill the hopper will now be incorrect i e delayed by the duration of the power interruption Example If the 24hour mode was originally set to operate at 6 00pm every day but a power cut lasting 1 hour occurred the 24hour will now operate at 7 00pm after the power is reconnected It wi...

Page 33: ...y external components not supplied by Grant Engineering UK Limited e g motorised valve etc This two year guarantee only applies if the boiler and SpiraVac is registered with Grant Engineering UK Limited within thirty days of installation4 and is serviced after twelve months3 In the first instance Contact your installer or commissioning engineer to ensure that the fault does not lie with the system...

Page 34: ...s fittings pumps and valves not supplied by Grant Engineering UK Limited Instances where the SpiraVac has been un installed and re installed in another location Installations where the SpiraVac is not installed with a Grant Engineering UK Limited wood pellet boiler Use of spare parts not authorised by Grant Engineering UK Limited Consumable items IMPORTANT Do not wait until your wood pellet supply...

Page 35: ...ng fault the product guarantee continues from the installation date of the original SpiraVAC and not from the installation date of the replacement4 The replacement of a SpiraVac under this guarantee does not include any consequential costs Foot notes 1 Your statutory rights entitle you to a one year guarantee period only 2 The UK mainland consists of England Scotland and Wales only Please note tha...

Page 36: ...36 GRANT ENGINEERING UK LTD Hopton House Hopton Industrial Estate Devizes Wiltshire SN10 2EU Telephone 01380 736920 Fax 01380 736991 Email info grantuk com Website www grantuk com ...

Reviews: