15
OPERATION / SETTINGS
Ensure the table saw is disconnected from power supply network before starting any adjustments. To ensure safe,
precise and efficient tile saw operation, proceed with all adjustment procedures as a whole.
After finishing all the setting and adjustment procedures ensure that all adjustment keys are collected. Check
that all threaded joining elements are properly tightened. When making adjustments ensure that all external parts
work properly and are in good condition. Any worn out or damaged part must be replaced by qualified personnel
before starting to use the table saw.
Plug of the power supply cord of the tile saw is equipped with residual current protection device. Check operation
of the residual current device before starting to use the tool.
● Put the plug into power supply socket, the power indicator (
27
) will switch on (
fig. O
).
Press
●
TEST
button (
29
) – the power indicator (
27
) will switch off.
Press
●
RESET
button (
28
) – the power indicator (
27
) will switch on again.
If the residual current device is faulty (it does not operate as described above) you must remove power cord plug
from the power supply socket and give the tool for repair to authorized service workshop.
SWITCHING ON / SWITCHING OFF
The mains voltage must match the voltage on the rating plate of the saw.
Switch on the tile saw only when the material that is to be cut is away from the cutting blade.
Switching on
– press the button
I
of the switch (
18
) (
fig. G
).
Switching off
– press the button
O
of the switch (
18
).
CUTTING
Water pump, power cord and water supply hose must be outside of the cutting area.
Cutting blade must rotate with maximum rotational speed before the cut is started. Wait until cooling water stream
reaches the cutting blade.
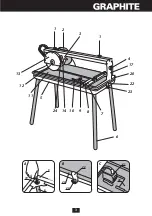
Base of the mitre gauge (
10
) is also the longitudinal fence.
Set 0
●
0
angle on the mitre gauge (
10
) and tighten the locking knob of the mitre gauge (
9
).
Use knurled head screws (
●
8
) to attach the mitre gauge (
10
) to the fence (
7
) (
fig. H
).
Use scale on the fence (
●
7
) to set appropriate dimension.
Press ceramic tile to the fence (
●
7
) and the base of the mitre gauge (
10
) (
fig. I
).
Press the ‘
●
I
’ button of the switch (
18
) and wait until water appears on the cutting blade (
12
).
Make a cut by moving the head (
●
3
) slowly and at uniform rate while holding the handle (
2
) with your hand. Use the tile
holding unit to secure ceramic tile against shifting. Be careful to avoid body injury.
Press the button “
●
O
” of the switch (
18
) to switch the tile saw off.
Always move the saw head far enough to complete the cut. Switch the saw off and wait until cutting blade comes
to a complete stop, only then you can remove cut off pieces.
CUTTING TO DEFINED WIDTH
When cutting lengthwise always use the mitre gauge as longitudinal fence and adjust it to appropriate dimension
of lengthwise cut.
LASER OPERATION
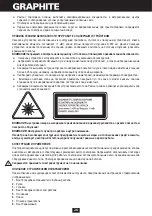
Laser beam allows for better control to set line of cut.
Laser generator that the saw is equipped with is used for precise cutting.
Press the laser switch button (
●
24
).
Laser generator starts to emit red line, which will be visible on the material.
●
Set the cutting point of the material accordingly to emitted line and make a cut.
●
Switch the laser off when cutting is finished.
●
Dust and dirt arising when making cuts may dim the laser beam, therefore it is necessary to clean the generator
from time to time. Never look directly at the source of the laser beam, never point the laser beam at any person.
Summary of Contents for 59G880
Page 3: ...3 1 1 7 10 14 5 9 8 11 12 13 2 3 17 20 22 23 6 24 4 19 6 5 A 23 20 22 B 20 21 C...
Page 4: ...4 1 D 15 E 16 F 18 G 9 8 10 7 H I K L 4 11 17 M 14 25 N 27 28 29 O...
Page 25: ...25 59G880 30 30...
Page 26: ...26 2 1 650 0 25 1 2 3 4 5 6 7 8...
Page 29: ...29 24 10 7 10 K 4 11 L 4 16 15 13 12 M 12 13 13...
Page 31: ...31 59G880 30 30...
Page 32: ...32 2 1 650 0 25...
Page 34: ...34 6 5 A 5 20 5 22 23 B 20 21 C 1 D 10 7 8 H 15 E 16 F 27 O Test 29 27 Reset 28 27 I 18 G O 18...
Page 35: ...35 10 10 0 9 8 10 7 H 7 7 10 I I 18 12 3 2 O 18 24 10 7 10 K 4 11 L 4...
Page 36: ...36 16 15 13 12 M 12 13 13 1 5 AAA 14 13 25 N 25...


