4-10
Function Settings and Operations
4.7
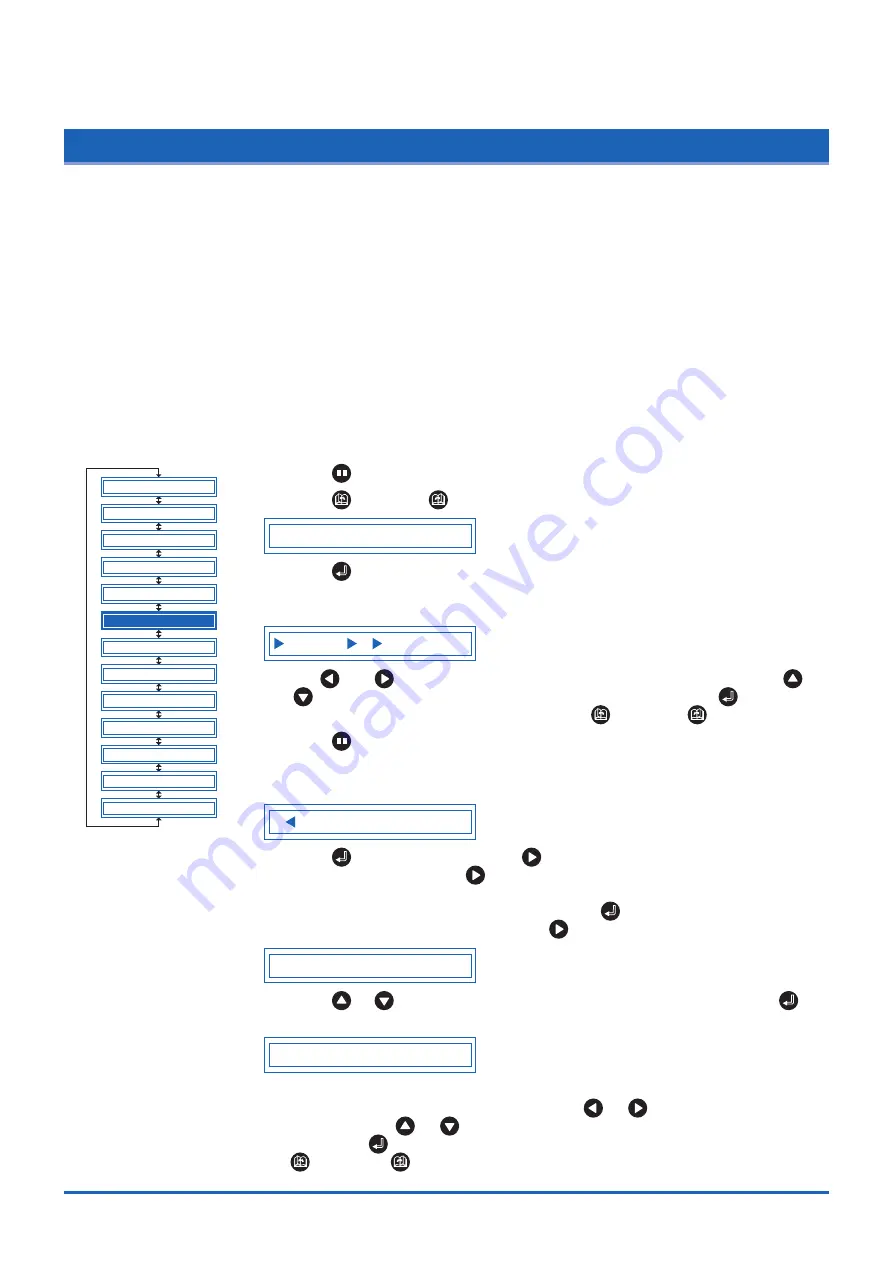
Setting TANGENTIAL Mode
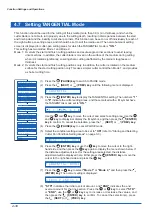
This function should be used for the cutting of thick media (more than 0.3 mm in thickness) and when the
cutter blade is not able to turn properly due to the cutting depth, resulting in discrepancies between the start
and finish point and the inability to cut sharp corners. This function can be set on or off individually for each of
the eight cutter-pen setting areas, and it should be set to suit the media used. The overcut-amount setting
screen is displayed for cutter-pen setting areas for which the TANGENTIAL mode is "ON."
This setting has two modes: Mode 1 and Mode 2.
Mode 1: Overcuts the start and finish cutting positions and acute-angle corner sections to avoid leaving
uncut sections. In addition, the cutter blade is moved on the surface of the medium during cutting
when it is rotated significantly, ensuring sharp cutting unaffected by the medium toughness or
thickness.
Mode 2: Overcuts the start and finish cutting positions only. In addition, the cutter is rotated on the medium
surface for the start cutting position only. This uses simpler cutter control than Mode 1, and provides
a shorter cutting time.
(1) Press the
(PAUSE) key to switch to PAUSE mode.
(2) Press the
(NEXT) or
(PREV.) key until the following menu is displayed.
T A N G E N T I A L
(3) Press the
(ENTER) key to display the TANGENTIAL setting. The numbers "1"
to "8" indicate the cutter setting areas, and those marked with a
s
symbol have
the TANGENTIAL mode set to "ON."
1 2 3 4 5 6 7 8
Use the
and
key to move the cursor and select a setting area. Use the
and
key to display/not display the
s
symbol, and then press the
(ENTER)
key to confirm. To cancel the selection, press the
(NEXT) or
(PREV.) key.
(4) Press the
(PAUSE) key to cancel PAUSE mode.
(5) Select the condition-setting area to be set to "ON" (refer to "Storing and Selecting
Cutter Pen Condition Setting Areas" on page 3-3).
5 1 5 U 0 2 0 3 0 1
(6) Press the
(ENTER) key or use the
key to move the cursor to the right-
hand side, and then press the
key again to display the menu shown below. If
the distance adjustment is set for the setting area selected, the distance
adjustment will be displayed here. Either press the
(ENTER) key or move the
cursor to the right-hand side and press the
key.
T A N G E N T I A L M O D E 1
(7) Press the
or
key to select "Mode 1" or "Mode 2," and then press the
(ENTER) key. The overcut setting is displayed.
S T R = 0 . 2 E N D = 0 . 2
(8) "STR" indicates the initial overcut amount, and "END" indicates the end
overcut amount for the line section. Press the
or
key to select "STR"
or "END", use the
or
key key to increase or decrease the values, and
then press the
(ENTER) key to confirm. To cancel the selection(s), press
the
(NEXT) or
(PREV.) key.
B L A D E W A R E S E T U P
C U T L I N E P A T .
I N I T . B
P E N U P S P E E D
I N I T I A L F E E D
A U T O P R E F E E D
A D V A N C E D F U N C .
S E T U P M E N U
T E S T
F E E D & C U T
C L E A R B U F F E R
P E N U P / D O W N
T A N G E N T I A L


