5-4
Setting and Using the Special Functions
5.2
Setting Special Functions A
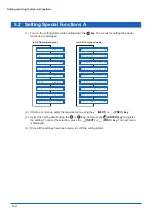
(1) Turn on the cutting plotter while holding down the
key. The menus for setting the special
functions are displayed.
“ : ” , “ : ” E N A B L E D
“ W ” P E N U P
P R I O R I T Y C O M D
U P M O D E D I S A B L E D
M E D I A E N A B L E D
H O M E E N A B L E D
B . W . S . D I S A B L E D
C R O S S C U T F O R C E 2 0
P A U S E K E Y M E N U
M O D E L 7 5 8 6
P R I O R I T Y C O M D
U P M O D E D I S A B L E D
M E D I A E N A B L E D
H O M E E N A B L E D
C I R C L E D E F A U L T
B . W . S . D I S A B L E D
C R O S S C U T F O R C E 2 0
P A U S E K E Y M E N U
In GP-GL command mode
In HP-GL command mode
(2) Scroll up or down to select the required menu using the
(NEXT) or
(PREV.) key.
(3) Select the setting details using the
or
key, and press the
(ENTER) key to register
the setting. To cancel the selection, press the
(NEXT) or
(PREV.) key. The next menu
is displayed.
(4) Once all the settings have been made, turn off the cutting plotter.


