13-11
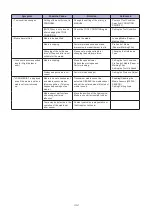
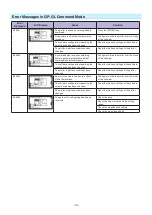
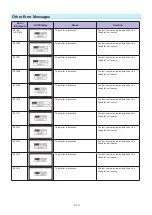
Error
Displayed
LCD Display
Cause
Solution
E01017
The plotter is defective.
Load on the motor was too large.
Move the object disturbing the operation,
and turn on the plotter after turning it off
once.
Do not use heavy media.
E01019
The plotter is defective.
Load on the motor was too large.
Move the object disturbing the operation,
and turn on the plotter after turning it off
once.
Do not use heavy media.
E01021
The plotter is defective.
Load on the motor was too large.
Move the object disturbing the operation,
and turn on the plotter after turning it off
once.
Do not use heavy media.
E01022
The plotter is defective.
There was a heavy load on the up and
down function of the tool carriage.
Please clear any obstruction in the up and
down function of the tool carriage and turn
the power back on.
If the error display continues to show,
please contact the store where you bought
the product or our Customer Center.
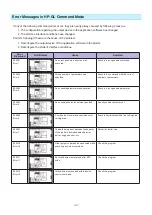
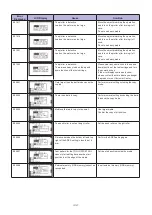
E05001
Data larger than the buffer size cannot be
copied.
Perform normal cutting not using the copy
mode.
E05002
There is no data to copy.
Perform normal cutting by sending the data,
then use the copy mode.
E05003
Media valid area to copy is too small.
Use larger media.
Confirm the copy start position.
E05004
The push roller is not on the grit roller.
Set the push roller on the grit roller.
E05006
Distance between the bottom left and top
right of the AREA setting is less than 10
mm.
Perform the AREA setting again.
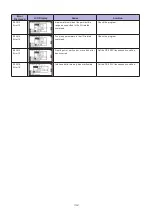
E05007
Test pattern for the TOOL OFFSET ADJ.
cannot start plotting because the start
position is at the edge of the media.
Set the start position inside the media.
E05008
External memory (USB memory) cannot be
recognized.
Insert external memory (USB memory).
Summary of Contents for CE7000-130AP
Page 1: ...USER S MANUAL MANUAL NO CE70AP UM 151 CE7000 130AP CUTTING PLOTTER...
Page 2: ......
Page 19: ...1 3 Dedicated accessories A stand with a basket is supplied...
Page 84: ......
Page 104: ......
Page 110: ......
Page 128: ......
Page 184: ......
Page 245: ...A 7 PAUSE MENU 2 Continued MENU screen AXIS SETTING 1 1 Default screen Continued 1 2...
Page 246: ...A 8 3 PAUSE MENU Continued MENU screen AREA PARAMETERS 1 1 Default screen Continued 1 2 3 4...
Page 250: ...A 12 PAUSE MENU Continued MENU screen TEST 1 2 TEST 2 2 Default screen Continued 2 3 1 1 4...
Page 251: ...A 13 PAUSE MENU MENU screen MEM SETTING 1 1 1 Default screen Continued Default screen Finish...
Page 254: ......
Page 258: ......
Page 260: ......

