3-10
Chapter 3 Cutting along Printed Data
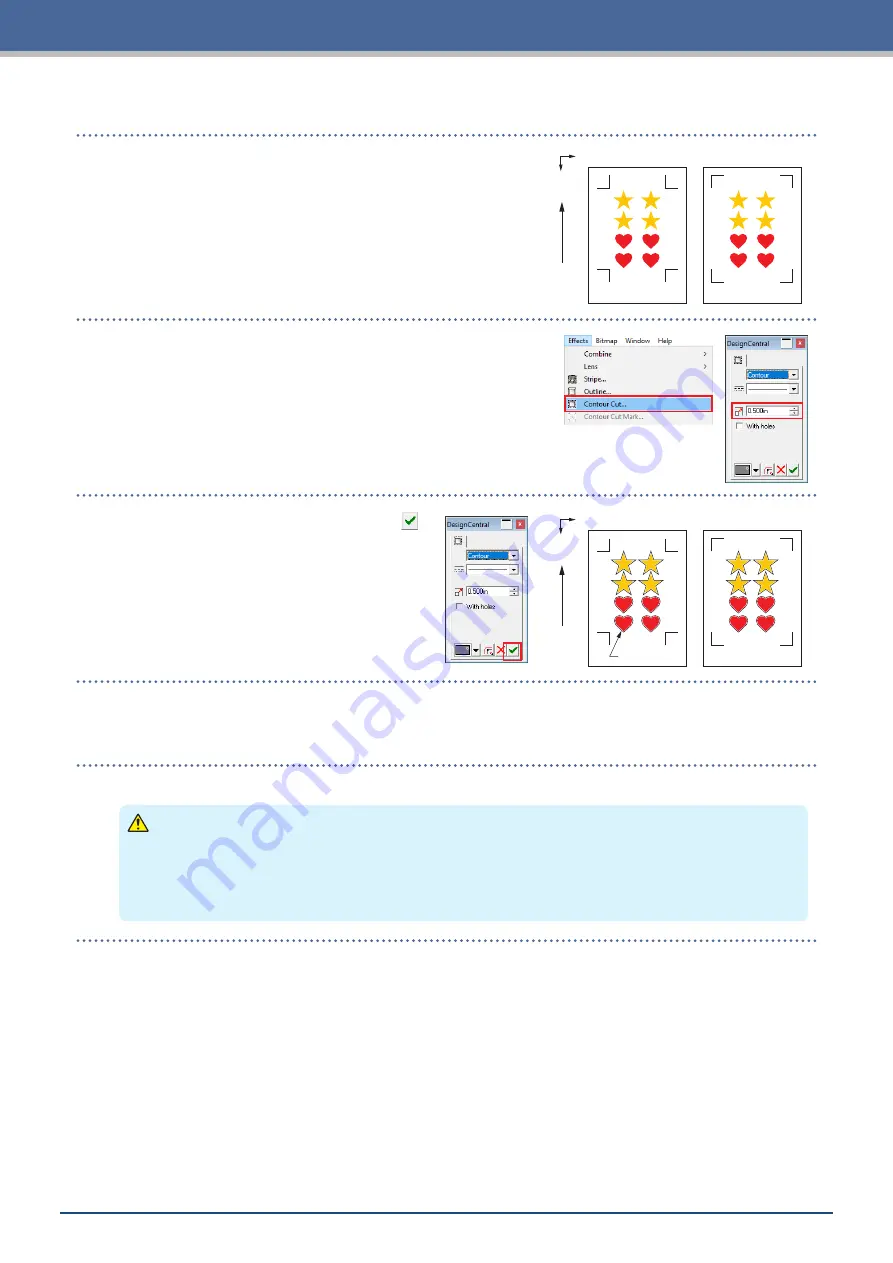
[2] Creating data for printing & cutting
X
Y
Registration Mark Type 1
Registration Mark Type 2
Media T
ransport Dir
ection
1.
Create data for printing & cutting.
2.
Select the printing data, and then select "Effects" – "Contour
Cut...".
On the "Design Central" screen, select the offset for the outline.
Cutting Data
Media T
ransport Dir
ection
X
Y
Registration Mark Type 1
Registration Mark Type 2
3.
On the "Design Central" screen, click the "
".
Cutting data will be created over the design.
[3] Printing the created data
1.
Print the created data.
CAUTION
Be careful to observe the following items as doing otherwise will lead to not being able to scan the
registration marks and perform the cutting.
•
Set the enlargement/reduction scale to 100%.
•
Set the printing position (center / bottom left, etc.) to "Do Not Change".
Summary of Contents for CELITE-50
Page 1: ...USER S MANUAL CE LITE 50 UM 151...
Page 2: ......
Page 10: ......
Page 22: ......
Page 78: ......
Page 101: ...5 23 Chapter 5 Detailed Settings 3 Select ON or OFF for WIDTH DETECTION...
Page 112: ......
Page 116: ...A 4 Appendix A 3 Appearance Drawing 164 784 227 173 400 Units mm Dimension error 5 mm...
Page 118: ...A 6 Appendix 3 PIECES Previous Page HOME SELECT FILE...
Page 119: ...A 7 Appendix TOOL ARMS MODE 1 MODE 2 MODE 3 CHECK MARK SCAN SENSOR OFFSET ADJ Next Page MENU...
Page 120: ...A 8 Appendix INTERFACE ADVANCE TEST Previous Page AREA MEDIA MENU...
Page 127: ......
Page 128: ......


