3-2
CHAPTER 3. CRAFT ROBO CONTROLLER
CH 2. CONNECTION AND PREPARATION
CH 2. CONNECTION AND PREPARATION
Appendix A. Standard Specifications
Appendix A. Standard Specifications
3.2
Installing the Craft ROBO Controller
This section describes how to install the software. Do not connect the Craft ROBO to your computer until
instructed to do so by an on-screen prompt.
Caution
• Do not connect the Craft ROBO to your computer until instructed to do so by an on-screen prompt.
• If the Craft ROBO Controller has already been installed, select "Control Panel"
→
"Add or Remove
Programs" and then uninstall the program before performing the setup operation.
Starting up the [Start] window
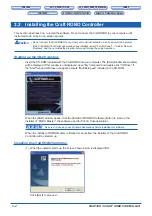
Insert the CD-ROM included with the Craft ROBO into your computer. The [Start] window shown below
will be displayed. If this window is not displayed, open "My Computer" and double-click "CD Drive". If
the "Start" window still does not appear, execute "MultiSetup.exe" included in the CD-ROM.
When the [Start] window opens, click the [Install Craft ROBO Software] button to start up the
installer of "ROBO Master", the software used for Print & Cut applications.
CHECKPOINT
Be sure to close any open Windows applications before installing this software.
When the installer of ROBO Master is finished or cancelled, the installer of the Craft ROBO
Controller will be started up.
Installing the Craft ROBO Controller
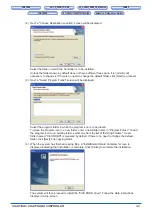
(1) When the installer starts up, the screen shown below is displayed first.
Click [Next] to proceed.


