background image

5


3

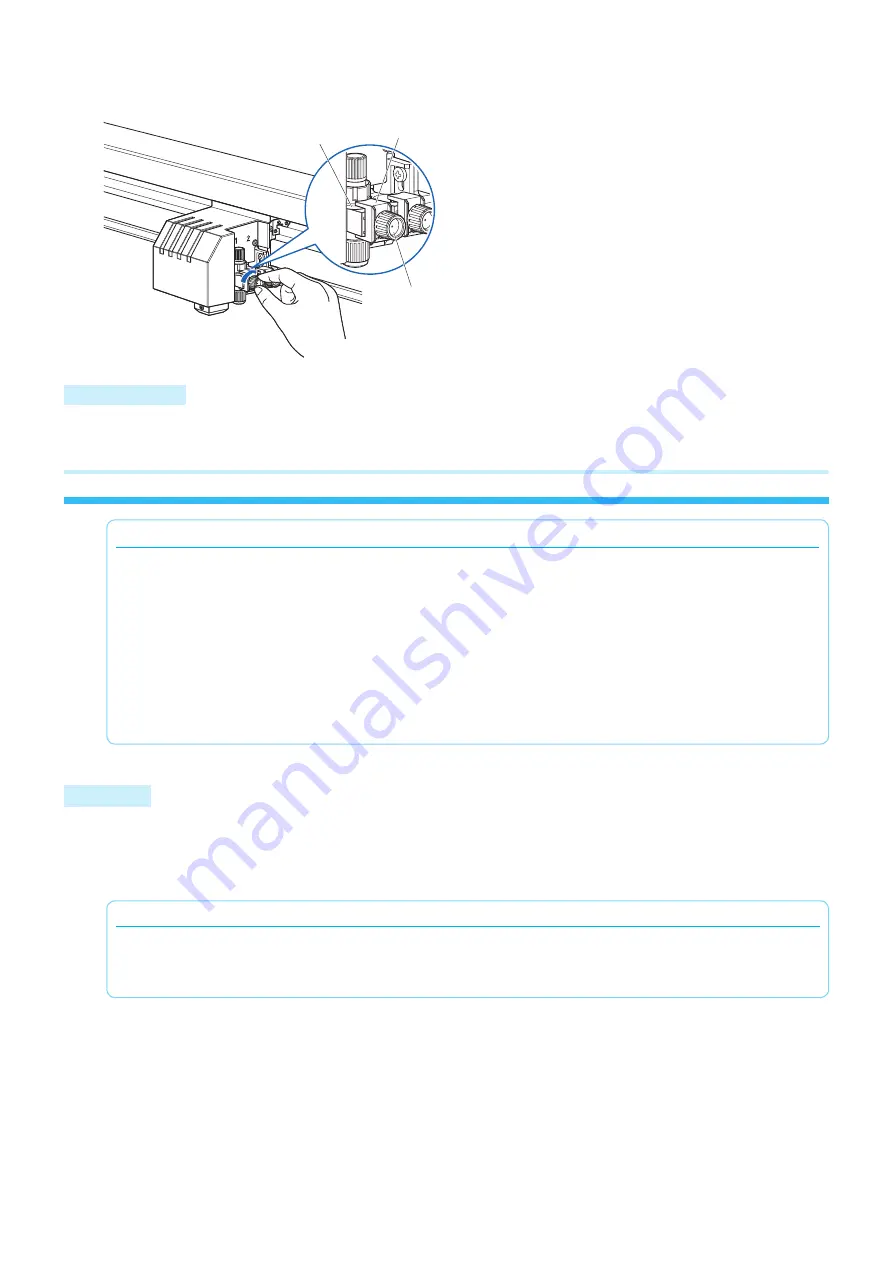
  ツールのツバ部分を覆うようにツール固定具をセットし、ネジを締めてください。

ツバ

ツール固定具

ネジ

ツールを取り外す

ツールを取り外す場合は、ネジを反時計回りに回転させて、ツールを取り外します。

2  メディアをセットする

補 足

● 本機は、静電吸着方式のライティングパネルです。
● 固定できないメディアがあります。使用前にテストしてからお使いください。
● 静電吸着方式は、帯電防止処理されているメディアは固定できません。
● メディアをセットした際にライティングパネルとメディアの間に空気が入った場合は、作図前に空気を追い出して確実に固定してください。
● 静電吸着のライティングパネルで、台紙の付いていないメディアをカットする場合は、ライティングパネルを傷つけないよう、ビニールマットなど

を敷いた上でカットしてください。傷ついたライティングパネルの交換は、保証期間内であっても有償となります。

● 静電吸着パネルで、完全に固定しきれないメディアをセットする場合は、4 辺をテープで固定するなど補強してください。
● 静電吸着パネルにスプレーのりやスプレーのり除去剤を使用しないでください。
● メディアを変更した場合は、トンボセンサ感度調整をすることをおすすめします。( 取扱説明書(PDF)の「センサレベルを調整する」参照 )

セット方法

(1) 

[CHART HOLD]キー(用紙固定キー)が OFF であることを確認します。

(2) メディアをライティングパネル上にセットします。
(3) 操作パネル横の[CHART HOLD]キー(用紙固定キー)を押します。
(4)[CHART HOLD]キー(用紙固定キー)のランプ(緑)が点灯し、静電吸着が機能していることを示します。

補 足

[CHART HOLD]キー(用紙固定キー)を再度押すとランプ(緑)が消灯し、静電吸着は解除されます。

使用環境によって、[CHART HOLD]キー(用紙固定キー)を押してメディアを固定できるまで時間がかかる場合があります。
静電吸着で固定したメディアは、しばらくの間静電気が帯電しライティングパネルから外しにくい場合がありますが、異常ではありません。

Summary of Contents for FCX4000 SERIES

Page 1: ...ile every effort has been made to provide complete and accurate information please contact your sales representative or nearest Graphtec vendor if you find any unclear or erroneous information or wish...

Page 2: ...set Cutter plunger PHP33 CB15N HS 1 pc Cutter blades CB15U 1 1 pc Water based fiber tip pen adapter PHP31 FIBER Plunger Height adjustment tool 1 set Water based fiber tip pen KF700 BK 1P 1 pc Cutter b...

Page 3: ...Software Setting up the Plotter main unit 1 Attaching a Tool The cutter blade can replaced depending on the material or thickness of the media P 04 2 Loading the Media Set up the media in the Plotter...

Page 4: ...mmediately after the cutting plotter is turned on or whenever the tool is moving For details see Attaching a Tool in the User s Manual It is explained here using cutter plunger as an example 1 Loosen...

Page 5: ...panel reinforce adhesion by using tape on all four sides When using the electrostatic writing panel do not use a spray glue and a spray glue remover directly on the writing panel When the media is ch...

Page 6: ...s from the menu after a setup 3 Press the ENTER key After the DISPLAY LANGUAGE is selected the LENGTH UNIT screen will appear 4 Press the 1 key METRIC or the 2 key INCH to select the length unit setti...

Page 7: ...peat cutting test and adjustment until optimal cut is achieved Adjustment of Offset How to check offset Check if the offset value is set correctly by following Not enough adjustment Increase the offse...

Page 8: ...622659111...

Page 9: ...FCX4000 SERIES CUTTING PLOTTER MANUAL NO FCX4000 UM 8M2 Web https www graphtec co jp site service jp customer productlist aspx Web 1 2 3 4 3 PDF 622659111...

Page 10: ...2 2 3 1 USB 1 1 PHP33 CB15N HS 1 CB15U 1 1 PHP31 FIBER 1 KF700 BK 1P 1 PM CT 001 1 1...

Page 11: ...site_download index html Cutting Master 5 Adobe Illustrator CorelDRAW Windows Macintosh 1 P 04 2 P 05 3 P 06 4 P 06 https www graphtec co jp site_download index html Windows Graphtec Studio 2 Windows...

Page 12: ...4 1 1 2...

Page 13: ...5 3 2 4 PDF 1 CHART HOLD OFF 2 3 CHART HOLD 4 CHART HOLD CHART HOLD CHART HOLD...

Page 14: ...6 3 PDF PDF 1 2 POSITION 3 ENTER 4 1 2 5 ENTER 4 1 2 COND TEST 1 4 PDF 3...

Page 15: ...7 1 4 1 1 POSITION 2 POSITION ENTER ENTER 1 1 3 4 3 1 POSITION 2 POSITION 3 1 1 1 3 4 ENTER 5 2 3 6 ENTER 5 PDF PDF PDF PDF...

Page 16: ...622659111...

Reviews: