background image

SK200-UM-251-9370 

5-11

5. DAILY MAINTENANCE

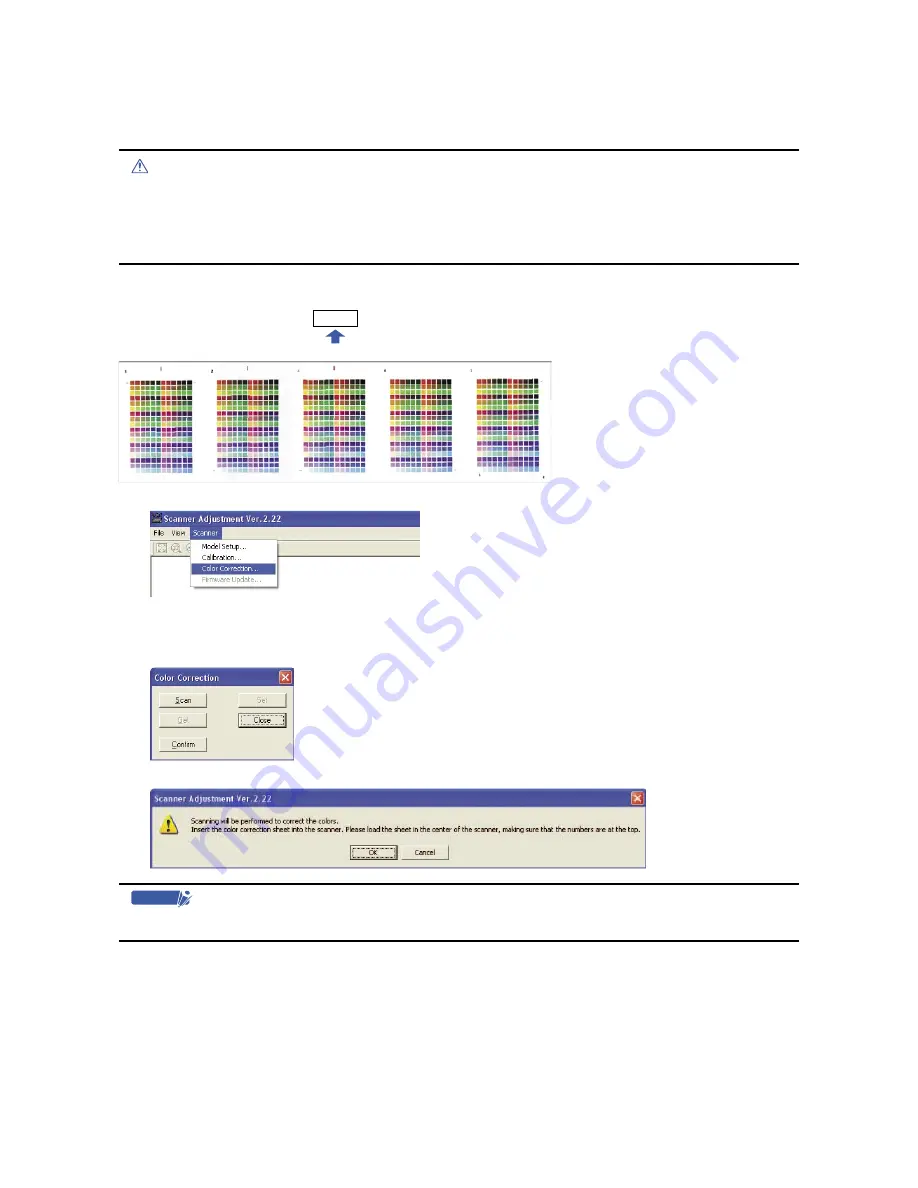
Color Correction

Perform color correction if there is any discrepancy in color in parts of the scanned image even after you 
have calibrated the scanner.

Caution

• Handle the color correction sheet with care so that it is does not get soiled, bent or scratched. A soiled, bent, or 

scratched sheet will not give good results.

• The color correction sheet is a consumable item. It cannot be used if it is bent or soiled.
• The color correction sheet is a paper product. Do not attempt to clean it with any type of liquid cleaner.

Color correction sheet

Insertion direction

Scanner

(1)  Display the Scanner menu.


Select Color Correction.

(2)  Click the Scan button.
(3)  The following screen is displayed. Click the [Scan] button.

 
(3)  The following prompt is displayed. Insert the color correction sheet into the scanner as instructed.


Checkpoint

Position the color correction sheet so that the red bar in the center of the sheet is centered in the scanner.

(4)  Click the [OK] button to start scanning.
 

The scanned data is displayed when scanning is complete. Colors may differ slightly for individual 
sensors, but this does not indicate a defect.

Summary of Contents for SK200-09

Page 1: ...SK200 UM251 03 9370 SERVICE MANUAL MANUAL NO SK200 UM 251 ...

Page 2: ...06 29 Block diagram for SK200 09 A added 13 2 02 5 07 06 29 Circuit diagrams for SK200 09 A added 13 28 to 13 52 02 6 08 03 04 Part number for the Left Side Cover Assembly added 12 1 03 7 08 03 04 Part number for the Right Cover Assembly added 12 1 03 8 08 03 04 Part number for the Front Guide Assembly added 12 1 03 9 08 03 04 Part number for the Front Cover Assembly added 12 1 03 10 08 03 04 Info...

Page 3: ... Installing the Driver Software for Windows 2000 4 3 4 4 Checking the Interface Connection for Windows 2000 4 6 5 DAILY MAINTENANCE 5 1 5 1 Opening and Closing the Top Cover 5 1 5 2 Cleaning the Feed Rollers 5 2 5 3 Cleaning the Gap Rollers 5 3 5 4 Cleaning the Image Sensors Contact glass plates 5 4 5 5 Cleaning the Media sensors 5 5 5 6 Removing a Jammed Document 5 6 5 7 Scanner Calibration 5 7 6...

Page 4: ... 30 8 22 CIS Power Board 8 31 8 23 Switching Power Supply Board 8 33 8 24 Feed Motor 8 34 9 ADJUSTMENTS USING THE SOFTWARE 9 1 9 1 Starting the Software 9 1 9 2 Preparations before Making Adjustments 9 4 9 3 Preparing a Test Chart 9 5 9 4 Making Adjustments 9 6 Scanner Calibration 9 6 1 Calibration white correction 9 6 2 Feed distance adjustment 9 8 3 Position adjustment 9 11 4 Color correction us...

Page 5: ...13 1 1 Block Diagram for SK200 09 13 1 13 1 2 Block Diagram for SK200 09 A 13 2 13 2 Circuit Diagrams 13 3 13 2 1 Data Controller Board for SK200 09 13 3 13 2 2 CIS Controller Board for SK200 09 13 18 13 2 3 Power Board for SK200 09 13 22 13 2 4 Control Panel Board CN5041 06A 13 26 13 2 5 USB Relay Board CN5041 07 13 27 13 2 6 Data Controller Board for SK200 09 A 13 28 13 2 7 Sub Data Controller B...

Page 6: ......

Page 7: ...ion Grayscale 256 shades Color 24 bit Threshold value Digital signal processor enables automatic setting of the threshold value monochrome scans only Color space sRGB compatible Sensor Total number of pixels 22 020 pixels Output Color 42 bits pixel Grayscale 14 bits pixel Light source LED RGB Interface USB 2 0 Output Image data Rated power supply 100 to 120 200 to 230 VAC 10 50 60 Hz Operating env...

Page 8: ...measured under the operating conditions described below Special test chart Mylar sheet 300 Guaranteed precision conditions Temperature 23 C 5 C Humidity 55 15 RH 4 Including data transfer time The following system was used to measure the scanning speeds CPU Pentium 4 3 2 GHz or better Memory 1 GB or more Interface USB 2 0 The scanning speeds may be slower depending on the PC system used 5 Only whe...

Page 9: ...SK200 UM 251 9370 1 3 1 OVERVIEW 1 2 External View External Dimensions Unit mm Dimensional accuracy 5 mm 1070 1097 322 160 When the scanner is mounted on the low stand 1190 405 445 ...

Page 10: ...SK200 UM 251 9370 1 4 1 OVERVIEW When the scanner is mounted on the high stand 1185 720 1100 ...

Page 11: ...curling guides These guides prevent the document from being caught up in the scanner during a scanning operation Control Panel 6 Power button Controls the on off status of the power supply to the scanner 7 POWER LED blue Unlit The scanner is turned off Lit Lights when the scanner is turned on and remains lit while it is operating normally Flashing Flashes when the scanner is in power saving mode 8...

Page 12: ...gh the scanning operation the document loaded status is canceled and the document is ejected to the rear of the scanner 11 STOP key Compulsorily stops scanning of the document If the ERROR LED flashes when the top cover is in the closed status press this key to suspend the scanning operation and check whether a paper jam has occurred Rear View 13 USB connector 14 Power inlet 12 Rear guides 12 Rear ...

Page 13: ...he document may be damaged upon contact with the power cable if it is scanned without the rear guides in place 1 Insert the ribs on the inside of one of the rear guides into the corresponding slots at the rear of the scanner and then push the guide downward 2 Repeat the procedure for the second guide Checkpoint Detach the rear guides when moving or packing the scanner Press lightly against each gu...

Page 14: ... when the anti curling guides are used If your document falls into one of the following categories either place the document inside the carrier sheet that is available as an option or have the operator manually guide the returned document so that it does not get caught up in the scanner Curled documents with a width that exceeds A2 size 420 mm Fragile documents with a width that exceeds A2 size 42...

Page 15: ...ONSR 3 CONNECTION AND PREPARATIONS 3 1 Connecting to the Power Supply Connect one end of the power cable provided to the scanner s power inlet and the other end to an AC power outlet of the rated supply voltage Power cable Power inlet AC power outlet ...

Page 16: ...is in the power on status the POWER button lights blue ON Turning the Power Off Press the POWER button on the scanner s control panel When the scanner is in the power off status the POWER button LED is extinguished OFF Checkpoint After the scanner has been turned off wait at least five seconds before turning it on again Notes on the power saving mode The scanner automatically switches to power savi...

Page 17: ...e document additional hard disk space is required Recommended environment CPU Pentium 4 2 GHz Memory 1 GB or more Disk space At least 30 GB USB 2 0 interface that comes standard with your computer Checkpoint Use with a system configuration below the recommended specifications will affect the scanning speed and prevent the scanner from operating to its specified capabilities Moreover colors may not be...

Page 18: ...tor USB cable Important Make sure that the USB cable is firmly inserted into the interface connectors The operation of the scanner cannot be guaranteed in the following cases t When the cable is connected to a USB hub or an add on USB board t When you are using a custom built computer or one that you have modified Do not perform any of the following actions t Remove or reinsert the cable while you a...

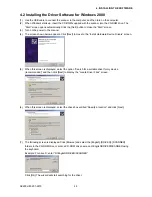
Page 19: ...Start screen 3 Turn on the power to the scanner 4 When Windows XP starts up the following screen appears if Service Pack 2 has not been installed the screen shown in 5 below appears Select the option No not this time and then click Next 5 If Service Pack 2 has not been installed the following screen appears Select the option Install from a list or a specific location Advanced and then click Next 6 ...

Page 20: ... explanation and make sure that you understand the contents To continue the installation click Continue Anyway 9 The screen shown below is displayed when the wizard has finished installing the driver Click the Finish button to close the Welcome to the Found New Hardware wizard 10 The Windows XP desktop appears and the scanner is recognized by the computer ...

Page 21: ...ears Click Next to move to the Install Hardware Device Drivers screen 5 When this screen is displayed select the option Search for a suitable driver for my device recommended and then click Next to display the Locate Driver Files screen 6 When this screen is displayed select the check box entitled Specify a location and click Next 7 The following screen is displayed Click Browse and select the Eng...

Page 22: ... The screen shown below is displayed Read the explanation and make sure that you understand the contents To continue the installation click Yes 10 The screen shown below is displayed when the wizard has finished installing the driver Click the Finish button 11 The Windows 2000 desktop appears and the scanner is recognized by the computer ...

Page 23: ... Connection for Windows XP 1 Launch the Control Panel using the Start menu on the Windows desktop 2 The screen shown below is displayed when you click on the Printers and Other Hardware icon 3 The screen shown below is displayed when you click on the Scanners and Cameras icon ...

Page 24: ...Checking the Interface Connection for Windows 2000 1 Launch the Control Panel using the Start menu on the Windows desktop 2 The screen shown below is displayed when you click on the Scanners and Cameras icon Check that Graphtec SK200 09 is displayed here ...

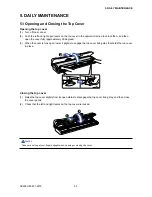
Page 25: ...e cover fully approximately 60 degrees 3 When the cover is fully open lower it slightly to engage the top cover fixing stay that holds the top cover in place 2 1 Closing the top cover 1 Raise the top cover slightly from its open status to disengage the top cover fixing stay and then close the cover gently 2 Check that the left and right levers on the top cover are locked 2 1 Caution Take care not to...

Page 26: ...soft cloth that has been moistened with water or a neutral detergent diluted with water and firmly wrung out Feed rollers 4 Wipe the feed rollers once again using a soft dry cloth to remove all the moisture 5 Close the top cover as described in Section 5 1 Opening and Closing the Top Cover Caution Take care not to get your fingers caught in the top cover Scanning may be affected if the document hol...

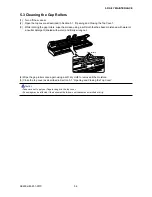
Page 27: ...soft cloth that has been moistened with water or a neutral detergent diluted with water and firmly wrung out Gap rollers 4 Wipe the gap rollers once again using a soft dry cloth to remove all the moisture 5 Close the top cover as described in Section 5 1 Opening and Closing the Top Cover Caution Take care not to get your fingers caught in the top cover Scanning may be affected if the document hold ...

Page 28: ...the top cover as described in Section 5 1 Opening and Closing the Top Cover Caution Take care not to get your fingers caught in the cover Do not use a commercial cleaner for office equipment a glass cleaner or chemical solvents such as solutions containing alcohol Moreover although the contact glass plates is not a maintenance part that requires periodic replacement it is a consumable part because i...

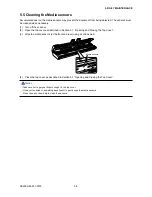
Page 29: ... the top cover as described in Section 5 1 Opening and Closing the Top Cover 3 Wipe the media sensors at the front and rear using a cotton swab Media sensors 4 Close the top cover as described in Section 5 1 Opening and Closing the Top Cover Caution Take care not to get your fingers caught in the top cover Use a cotton swab or something equally soft to gently wipe the media sensors Do not use any c...

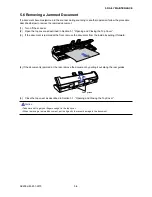
Page 30: ...tion 5 1 Opening and Closing the Top Cover 3 If the document is jammed at the front remove the document from the inside by pulling it forward 4 If the document is jammed at the rear remove the document by pulling it out along the rear guides Rear guides 5 Close the top cover as described in Section 5 1 Opening and Closing the Top Cover Caution Take care not to get your fingers caught in the top cov...

Page 31: ...usage environment Monitor 1024 x 768 pixels High Color or better resolution Checkpoint A low resolution monitor will make it difficult to discern any problem areas Launching the Scanner Adjustment Program from Scanning Arts SP 1 Connect the scanner to the computer turn on the scanner and then turn on the computer 2 Install the Scanning Arts SP software if it is not already installed 3 Click the Sta...

Page 32: ...scanner and then turn on the computer 2 Install the TWAIN driver if it is not already installed 3 Select Adjust Scanner Adjustment from the TWAIN driver s Settings tab The location of the Adjust depends on the application software 4 Click Scanner Adjustment to launch the Scanner Adjustment program 5 Select the desired adjustment item from the Scanner menu ...

Page 33: ...store it in its special storage box The calibration sheet is a consumable item It cannot be used if it is bent or soiled The calibration sheet is a paper product Do not attempt to clean it with any type of liquid cleaner Checkpoint A prompt instructing you to insert the calibration sheet in the scanner will be displayed in Step 3 At that time insert the calibration sheet as instructed with the not...

Page 34: ...ram 10 If any abnormal data is observed specify the problem areas as follows Select Calibration from the Scanner menu and then select Specified Part in the Calibration screen 11 The mouse arrow cursor changes to a cross cursor when moved over the data Click the left mouse button with the mouse positioned over the streak data The selected area is shown in blue Repeat this procedure for any additiona...

Page 35: ...sheet is a paper product Do not attempt to clean it with any type of liquid cleaner Color correction sheet Insertion direction Scanner 1 Display the Scanner menu Select Color Correction 2 Click the Scan button 3 The following screen is displayed Click the Scan button 3 The following prompt is displayed Insert the color correction sheet into the scanner as instructed Checkpoint Position the color c...

Page 36: ...ines then click Cursor lines red 1 2 3 4 5 6 Checkpoint The next reference point to be checked is displayed on the Status bar If you click in error click the Esc key to cancel the operation and return to the immediately previous step If you click on the wrong tile color correction will not be performed correctly and the colors of the image displayed after color correction will be incorrect 7 Click...

Page 37: ...12 Click the Fit icon to display the entire image and check whether there is any discrepancy in color If there is no discrepancy color correction is complete Click the Close button Checkpoint If there is still some color discrepancy after performing Color Correction Repeat the Color Correction procedure Perform the Calibration procedure and then repeat the Color Correction procedure If you perform...

Page 38: ......

Page 39: ...1241 Spring Drive Roller Pressure L1 L2 R1 R2 AP110 024 0 9 4 19 380111251 Spring Drive Roller Pressure L3 R3 AP110 025 1 0 2 20 380111201 Spring Drive Roller Pressure Center AP110 025 1 2 2 21 774060203 Pulley Assy 2 For feed roller 22 500052691 Motor KT60LM06 551 1 23 641300171 Motor Pulley Pulley 22Z 1 24 694450111 CIS Flexible Cable 50 mm FPC CS20A 3 25 694600320 CIS Flexible Cable 100 mm FPC4...

Page 40: ......

Page 41: ...feed distance Adjusting offset Aligning sensor images Record measured values between a and c b and d a and b c and d a and d and b and c Shim 0 2 mm Roller gap adjustment Between feed roller and contact glass plate Shim 0 3 mm Mylar sheet 300 Confirmation of the grip pressure Thickness 0 075 mm 7 2 Tools Tools Usage Remarks Screwdriver Allen wrench 2 mm to 4 mm Needle nose pliers Disassembly reass...

Page 42: ......

Page 43: ... four M4L8 binding head screws on the front side of the top cover M4L8 binding head screw Top cover 2 Remove the four M4L8 binding head screws on the rear side of the top cover M4L8 binding head screw Top cover 3 Detach the top cover from the scanner unit in the upward direction Reattaching the top cover 1 Reattach the top cover in the reverse order in which it was detached ...

Page 44: ...o M4L8 TP screws on the left side of the scanner unit 3 Detach the left side cover Note There is a positioning pillar inside the left side cover Do not twist the cover when removing the cover Otherwise you will break the positioning pillar M4L8 TP screw Left side cover Reattaching the left side cover 1 Reattach the left side cover in the reverse order in which it was detached ...

Page 45: ...sitioning pillar inside the right side cover Do not twist the cover when removing the cover Otherwise you will break the positioning pillar M4L8 TP screw Right side cover 2 Disconnect the control panel cable from the control panel board Right side cover Positioning pillar Control panel board Control panel cable 3 Detach the right side cover Reattaching the right side cover 1 Reattach the right sid...

Page 46: ...ver Detaching the front cover 1 Remove the three M4L8 thin flat head screws holding the front cover M4L8 thin flat head screw Front cover 2 Pull out the front cover from the scanner unit Reattaching the front cover 1 Reattach the front cover in the reverse order in which it was detached ...

Page 47: ... binding head screws holding the front guide assembly from each side Front guide assembly M3L6 binding head screw M3L6 binding head screw 3 Detach the front guide assembly from the scanner unit Reattaching the front guide assembly 1 Reattach the front guide assembly in the reverse order in which it was detached Checkpoint When reattaching the front guide assembly make sure that the front guide ass...

Page 48: ...Detach the top cover see Section 8 1 2 Remove the three M3L4 binding head screws from the access holes of the shield cover as shown in the photographs below Shield cover M3L4 binding head screw 3 Detach the shield cover Reattaching the rear cover 1 Reattach the shield cover in the reverse order in which it was detached ...

Page 49: ...de covers see Sections 8 1 and 8 3 2 Remove the two M3L8 self tapping screws holding the control panel bracket Control panel bracket M3L8 self tapping screw Right side cover 4 Disconnect the control panel cable from the control panel board Reattaching the control panel board 1 Reattach the control panel board in the reverse order in which it was detached ...

Page 50: ...overs see Sections 8 1 and 8 2 2 Loosen the two M4L6 binding head screws holding the feed belt tension bracket 3 Detach the feed drive belt from the feed pulley M4L6 binding head screw Feed drive belt Reattaching the feed drive belt 1 Reattach the feed drive belt by reversing the sequence of steps in which it was detached 2 Adjust the belt tension see Section 8 9 ...

Page 51: ...holding the feed drive belt tension bracket 2 Loop the wire around the feed pulleys as shown in the photograph below 2 kgf M4L6 binding head screw Feed drive belt tension pulley Feed pulley Wire Push pull gauge 3 Use the push pull gauge to pull the feed drive belt tension pulleys with a 2 kg force as shown above 4 Tighten the two M4L6 binding head screws that hold the feed drive belt tension brack...

Page 52: ...8 1 and 8 2 2 Detach the feed drive belt see Section 8 8 3 Loosen the two M4L8 pan head screws with washer holding the motor 4 Detach the motor drive belt from the pulleys M4L8 pan head screw with washer Motor drive belt Reattaching the motor drive belt 1 Reattach the motor drive belt by reversing the sequence of steps in which it was detached 2 Adjust the belt tension see Section 8 11 ...

Page 53: ...wo M4L8 pan head screws with washer holding the motor 2 Loop the wire around the motor pulley as shown in the photograph below 3 kgf M4L8 pan head screw with washer Motor drive belt pulley Wire Push pull gauge Motor drive belt 3 Use the push pull gauge to pull the motor pulley with a 3 kg force as shown above 4 Tighten the two M4L8 pan head screws with washer that hold the motor ...

Page 54: ...6 2 Disconnect the five CIS flexible cables from the CIS boards CIS flexible cable CIS board 3 Remove the ten M3L6 binding head screws holding the data control board and power board M3L6 binding head screw Center CIS board M2L6 binding head screw Data control board Power board 4 Remove the five M3L4 binding head screws holding the board base chassis M3L4 binding head screw Board base chassis ...

Page 55: ...the board base chassis Note There are CIS flexible cables connected to the CIS unit under the board base chassis Therefore do not lift up the board base chassis forcibly 6 Lay the board base chassis down at the rear of the main unit as shown below Reattaching the board base chassis 1 Reattach the board base chassis by reversing the sequence of steps in which it was detached ...

Page 56: ...right CIS sensor unit assembly Front center CIS sensor unit assembly Checkpoint When detaching the spring stopper brackets mark the location of each spring stopper bracket Do not swap the location of each spring stopper when installing the spring stoppers Especially when detaching the rear left CIS sensor unit assembly Center CIS sensor unit assembly 3 Remove the four M3L6 binding head screws hold...

Page 57: ...r unit assembly M3L6 binding head screw M3L6 binding head screw Front CIS sensor unit assemblies 3 Remove the two M3L6 binding head screws holding the spring stopper bracket Spring stopper bracket M3L6 binding head screw M3L6 binding head screw Front left CIS sensor unit assembly Front right CIS sensor unit assembly 4 Remove the two M3L4 binding head screws and the two height adjustment screws hol...

Page 58: ...ensor of the same rank when replacing a CIS sensor The CIS sensor rank is indicated on the CIS sensor unit and the bottom of the scanner chassis 3 Perform the CIS sensor unit height adjustment see Section 8 18 and the software adjustment How to find out the CIS sensor rank There is the CIS sensor rank label on the bottom chassis as shown in a picture below so prepare same rank of the CIS sensor bef...

Page 59: ...ctions 8 1 and 8 6 2 Disconnect the cable that is connected to the cover sensor 3 Remove the M4L16 binding head screw holding the cover sensor M4L16 binding head screw Cover sensor Cover sensor cable 4 Detach the cover sensor from the board base assembly Reattaching the cover sensor 1 Reattach the cover sensor by reversing the sequence of steps in which it was detached ...

Page 60: ...e Section 8 12 3 Disconnect the cable that is connected to the front or rear media sensor Rear media sensor M3L12 binding head screw Front media sensor Media sensor cable 4 Remove the M3L12 binding head screws holding the front or rear media sensor 5 Detach the media sensor from the board base assembly Reattaching the cover sensors 1 Reattach the media sensors by reversing the sequence of steps in...

Page 61: ...inding head screw holding the flap stay and then disconnect the flap stay from the main unit M4L16 binding head screw Flap stay 3 Remove the four M4L6 binding head screws holding the right and left damper brackets Damper M4L6 binding head screw Damper M4L6 binding head screw M4L6 binding head screw Damper Slide the damper to the inside 4 Slide the left and right dampers to the inside to disconnect t...

Page 62: ...0 8 DISASSEMBLING AND ADJUSTING THE MECHANICAL PARTS 5 Remove the M3L6 binding head screw holding the cable clamp M3L6 binding head screw Cable clamp 6 Lay the top assembly down as shown in the photograph below Top assembly ...

Page 63: ...assembly see Section 8 5 3 Remove the six M3L6 binding head screws holding the rear media guide M3L6 binding head screw Rear media guide 4 Detach the rear media guide 5 Detach the feed drive belt see Section 8 8 6 Remove the two M3L12 binding head screws holding the feed pulleys Feed pulley M3L12 binding head screw M3L12 binding head screw 7 Detach the feed pulleys from the feed rollers ...

Page 64: ...roller bearings M4L16 TP screw Shaft link plate E ring 9 Remove the two M4L16TP screws holding the two right side shaft link plates 10 Detach the bearings collars and right side shaft link plates from the main unit 11 Remove the two M4L16TP screws holding the two right side shaft link plates M4L16 TP screw Shaft link plate ...

Page 65: ...on and then detach the center media guide from the main unit Center media guide 14 Detach the four left and right side springs AP100 024 0 9 the two front center springs AP100 025 1 0 and the two spring rear center springs AP100 020 1 2 from the pressure arm Black spring Front center pressure spring AP100 025 1 0 Left right pressure spring AP100 024 0 9 Pressure arm Rear center pressure spring AP1...

Page 66: ...t Slide the feed roller to the left side and then lift up the right side of the feed roller to detach it Front feed roller Rear feed roller Reattaching the feed rollers 1 Reattach the feed rollers by reversing the sequence of steps in which they were detached 2 There are three kinds of springs do not install them in the wrong positions AP100 024 0 9 AP100 025 1 0 AP100 020 1 2 ...

Page 67: ...the gap 0 2 mm shim or 0 3 mm shim Insert the shims in the areas indicated by the red circles to adjust the gap between the CIS sensor and the feed roller 5 Loosen the two M3L4 binding screws holding the CIS sensor unit assembly M3L4 binding head screw Height adjustment screw Position lock screw 6 Adjust the gap using the height adjustment screw 7 Tighten the two M3L4 binding screws holding the CI...

Page 68: ...ssembly CIS sensor pressure bracket CIS sensor unit Reattaching the contact glass plate assembly 1 Reattach the contact glass plate in the reverse order in which it was detached 2 Make sure that the CIS unit surface lies flat against the inside of the contact glass plate assembly when you reattach the contact glass plate assembly 3 Perform the CIS sensor height adjustment see section 8 18 and the s...

Page 69: ...he former setting values from the data controller board Detaching the data controller board for the SK200 09 Old 1 Detach the top cover and the shield cover see Sections 8 1 and 8 6 Data controller board 2 Disconnect all the connectors on the data controller board and remove the four M3L6 binding head screws holding the data controller board M3L6 binding head screw 3 Detach the data controller boa...

Page 70: ...the two M2L6 binding head screws and M3L6 binding head screws holding the sub data controller board M2L6 binding head screw Sub data controller board M3L6 binding head screw 3 Detach the sub dara controller board from the data controller board 4 Disconnect all the connectors on the data controller board and remove the three M3L6 binding head screws and the stud holding the sub data controller boar...

Page 71: ... adjustment to obtain the former setting values from the data controller board See Preparations before Making Adjustments in Section 9 2 How to find out type of the data controller board There are two kinds of the data controller boards which is used to SK200 09 or SK200 09 A So prepare corresponded data controller board before replacing the data controller board The model name label is showing the...

Page 72: ...ng the CIS boards 1 Reattach each CIS board in the reverse order in which it was detached 2 When you have replaced the CIS boards perform calibration using the software adjustment How to find out type of the CIS boards There are two kinds of the CIS boards which is used to SK200 09 or SK200 09 A So prepare corresponded CIS boards before replacing the CIS boards The model name label is showing the t...

Page 73: ...ing the CIS power board 1 Detach the top cover and the shield cover see Sections 8 1 and 8 6 CIS power board 2 Disconnect all the connectors on the CIS power board and remove the six M3L6 binding head screws holding the CIS power board M3L6 binding head screw 3 Detach the CIS power board from the unit ...

Page 74: ...etween the VR1 side of R17 and GND 4 If the output voltage is not 5 3V 0 02V adjust the voltage using VR1 on the CIS power board VR1 Top terminal of R17 Disconnect the cable from J2 Disconnect the cables from J10 to J15 GND How to find out type of the CIS power boards There are two kinds of the CIS power boards which is used to SK200 09 or SK200 09 A So prepare corresponded CIS power boards before ...

Page 75: ...y see Section 8 5 2 Remove the four M3L6 binding head screws holding the switching power supply board M3L6 binding head screw 4 Disconnect all the connectors on the switching power supply board 5 Detach the switching power supply board from the unit Reattaching the switching power supply board 1 Reattach the switching power supply board in the reverse order in which it was detached ...

Page 76: ...ws with washer holding the feed motor M4L8 pan head screw with washer Motor drive belt 3 Disconnect the cable from the feed motor Feed motor cable Motor mount M4L8 binding head screw 4 Remove the two M4L8 binding head screws holding the motor mount Reattaching the feed motor 1 Reattach the feed motor in the reverse order in which it was detached 2 Adjust the motor drive belt tension see Section 8 ...

Page 77: ...tware Ensure that OPS112 Scanning Master 21 Ver 6 40 or later is installed 1 Connect the scanner to the PC using a USB cable and turn it on connect the AC cable to the scanner power inlet 2 Start Windows OS 3 Create a Shortcut for Scanning Master 21 4 Open the Scanning Master 21 Shortcut Properties dialog box ...

Page 78: ...e Target file name Add manufacture here Space 6 Run the Scanning Master 21 OPS112 from the shortcut icon 7 Select About from the Help menu 8 Click the scanner icon while pressing and holding down the Ctrl key Next click the OK button while pressing and holding down the Shift key Icon ...

Page 79: ...370 9 3 9 ADJUSTMENTS USING THE SOFTWARE 9 Select Adjust Scanner from the Tools menu 10 Select Yes 11 When you click the OK button in the following window the Scanner Adjustment window will appear with an Adjust menu ...

Page 80: ...the previously noted feed distance adjustment and position adjustment values However for image sensor unit replacement all settings must be adjusted eliminating the need to record the previous values Adjustment Procedure 1 Start Scanning Master 21 See p 9 1 2 Select Adjust Feed Distance from the Adjust menu 3 Click the Current Value button and note the value shown in the Feed Adjustment Value box ...

Page 81: ... normal office environments normal temperatures and humidity levels you should only need to measure each distance once Make sure that each distance is measured with the utmost accuracy Tip 2 Make sure that all staff members using this test chart select the same measurement points This chart has been designed with the assumption that the point shown below is used for measurement Tip 3 If user specifi...

Page 82: ...le surface Any dust or dirt on those surfaces may affect the calibration results and resulting image quality Check that the calibration sheet is free of any dust or dirt 1 Calibration white correction 1 Connect the scanner to the computer Turn on the scanner connect the AC cable to the scanner power inlet then turn on the PC 2 Start Scanning Master 21 See p 9 1 3 Remove the white calibration sheet...

Page 83: ...rmal calibration is complete Click the Close button and exit calibration mode 9 If any abnormal data is observed specify the problem areas as follows Select Specified Part in Calibration 10 The mouse arrow cursor changes to a cross cursor when moved over the data Click the left mouse button with the mouse positioned over the streak data The selected area is shown in blue Repeat this procedure for a...

Page 84: ...the distances between the C010 and the C090 points in the SK200 Test Chart with a glass scale 2 Run the software See p 9 1 3 Select Adjust Feed Distance from the Adjust menu 4 The following dialog box will appear Correctly position the SK200 test chart on the scanner and click the Scan button ...

Page 85: ...ogether with the scanned image Measures the distance based on the scanned image When actual and theoretical values appear in their respective boxes you can click the Calculate button to calculate the feed The calculated feed will appear in this box Click this button to specify the correction value for the scanner Click this button to display the value stored in the scanner Click this button to dis...

Page 86: ...ars in the Theoretical box Click the Calculate button 10 The correction value appears in the Feed box Click the Set button to allow the scanner to store the correction value 11 Place the test chart on the scanner again and click the Scan button 12 Repeat Steps 4 through 9 to perform the following calculations based on the figures displayed in the dialog box Theoretical value Actual value Actual val...

Page 87: ...djust Position from the Adjust menu 3 The following dialog box will appear Correctly position the offset target chart on the scanner and click the Scan button Use the cursor or keys to enter a value to adjust level differences between the image sensors Use the cursor or keys to enter the position of the origin Not used 0 0 0 1600 1600 1200 1200 1200 1200 ...

Page 88: ...alog box will appear Click the Scan button Scan conditions Document Info Paper Size User Size Width 1066 Length 200 Resolution 600 dpi Document Type Black and White Scan Settings Output Bilevel 5 A dialog box appears together with the Scanner Adjustment window as shown below ...

Page 89: ...s within the top center circle as shown below it does not require offset adjustment 8 If the starting point of the scanning is outside of the top center circle click the Origin box and then input 0 0 9 Click the Check button then click the Set button The following dialog box will appear Click the OK button 10 Scan the offset target chart again 11 Zoom in to the top center circle using the zoom but...

Page 90: ...e crosshairs cursor appears in the Scanner Adjustment window click on the center of the top center circle with the crosshairs cursor 14 Click the Check button then click the Set button The following dialog box will appear Click the OK button 15 Scan the offset target chart again Confirm that the starting point of the scanning is within the top center circle as shown below ...

Page 91: ...rs cursor will appear First click a position on the left hand portion then click the position of the right hand portion that corresponds to the position you selected first 3 Click the Check button first then click the Set button Follow the on screen instruction to place the adjustment chart on the scanner again 4 Repeat these steps until the left hand portion is properly aligned with the right hand ...

Page 92: ...ge currently being displayed is always set to 0 0 The coordinates increase as you move across and down from this point 3 4 X Overlap These boxes show the numbers of pixels by which sensor 1 and 2 2 and 3 3 and 4 4 and 5 images overlap For more overlap increase these numbers Reduce these numbers if some portions of images are missing due to excessive overlap to enable accurate fine adjustments Handy...

Page 93: ...ect you may conclude that the sensor physical position is incorrect You can use the correction value 579 to adjust the feed so that there is no misalignment in the Y direction This makes it possible to determine the feed although this is not completely accurate You may use this technique for users who do not demand high accuracy 7 9 11 Starting Line The distances numbers of pixels from the documen...

Page 94: ...sheet is centered in the scanner but with the printed side down 5 Click the OK button to start scanning The scanned data is displayed when scanning is complete Colors may differ slightly for individual sensors but this does not indicate a defect 6 When the data is displayed click the Get button 7 Click in the center of the color tile indicated by the numbers 1 to 6 in ascending order For numbers 1...

Page 95: ...rrection results click the Confirm button 10 The following message is displayed Insert the color correction sheet in the scanner as instructed Position the color correction sheet so that the red bar in the center of the sheet is centered in the scanner but with the printed side down 11 Click the OK button to start scanning After scanning has been completed an enlarged view of the color corrected da...

Page 96: ...mpatibility OPS112 Scanning Master 21 Ver 6 40 or later USB interface cable 2 Procedure 1 Use the USB cable to connect the SK200 and PC 2 Turn on the power for your PC 3 Run the Scanning Master 21 OPS112 in the adjustment mode see Section 9 1 4 When OPS112 starts follow the steps given below to download the firmware 5 Select Update Firmware from the Scan menu to display the Download dialog box 6 In...

Page 97: ...orrect scanner model Other Replace the main control board The document is not transported properly Check for foreign objects in the document scanning section Open the center cover and remove foreign objects Confirm that the roller rotates when you press a control key Check for anomalies around the control boards Confirm that the feed motor is running Check for anomalies around the motor Confirm th...

Page 98: ...ets are appropriate Align the sensor joints The image quality is poor Check whether any of the contact glass plates is dirty Use purified water or alcohol to clean the contact glass plate s Do not use chemical solvents Confirm that the image resolution is appropriate Select an appropriate resolution The PC does not detect the scanner Confirm that the scanner has been turned on Turn on the scanner ...

Page 99: ...D CONSUMABLES 11 OPTION AND CONSUMABLES 11 1 Optional Item Code Item Name ST0064 High stand 11 2 Consumables Code Item Name IS0907 Carrier Sheet A0 IS0908 Carrier Sheet A1 IS0917 Calibration Sheet 42 inches EM CP Cleaning paper 50 sheets ...

Page 100: ......

Page 101: ...er COV MD 1 2 794200721 Left Side Cover Assembly 1 3 794200719 Right Cover Assembly 1 4 794200720 Front Guide Assembly 1 5 794200722 Front Cover Assembly 1 6 641700130 Anti curling Guide 2 7 641700110 Guide Holder Plate 1 8 363023201 Rubber Foot TK2320 4 9 641701000 Rear Guide 2 10 301504001 Flap Stay 1 Outer Casing 1 3 2 4 5 6 8 9 7 10 ...

Page 102: ...195011 Front Guide Pulley 2 2 361204001 Front Guide Edge Cover 4 3 641300382 Felt L100 Felt 100 2 4 641700202 Front Guide 1 5 641700231 Left Media Guide 1 6 641700241 Right Media Guide 1 7 641700251 Wire Front Guide 2 8 641700261 Spring Front Guide 2 9 649202740 Felt S Felt S 6 Front Guide 1 3 2 4 5 6 8 9 7 ...

Page 103: ...No Part name Description Q ty Remarks 1 640615030 Left Side Cover 1 2 640615020 Right Side Cover 1 3 641700790 Holder Left 1 4 641700780 Holder Right 1 5 641700070 Key Top Power 1 6 641700760 Key Top E S 1 7 774061267 Control Panel Board 1 Side Cover 1 3 2 4 5 6 7 ...

Page 104: ...94050713 CIS Controller Board SVC_CIS_A5 CIS Controller Board for SK200 09 A 5 SK200 09 A 4 774061500 Main Board Data Controller Board for SK200 09 1 SK200 09 794050710 Main Board SVC_SK_Main_A5 Data Controller Board for SK200 09 A 1 SK200 09 A 5 649201850 Shield Cover 1 6 500052659 Media Sensor PS117ND1 2 7 500052694 Cover Sensor LG217L 3 1 8 562500006 Power Supply Unit BWC24SX U E E 1 9 77406020...

Page 105: ...Reinforcing Plate 1 7 649201830 Twin Link Plate 4 8 311012820 Bearing MF128ZZMC3PS2S 8 9 774060202 Tension Bracket 1 10 310010620 Bearing MR106ZZMC3PS2S 4 11 649200140 Pulley Stud 1 12 649200180 Pulley 22 1 13 774060203 Feed Roller Pulley 2 14 378012591 Feed Roller Drive Belt 60S2M250 1 15 378014221 Motor Drive Belt 60S2M284 1 16 649201110 Feed Roller Washer 4 17 649202780 Cover Lock Stud 2 18 649...

Page 106: ...Cover Bracket 1 7 774061153 Pressure Arm Assy 7 8 774060302 Right Pressure Arm Assy 1 9 649201820 Feed Roller Holder 4 10 380111241 Spring AP110 024 0 9 Left and Right Side Spring 4 11 380111251 Spring AP110 025 1 0 Front Center Spring 2 12 380111201 Spring AP110 020 1 2 Rear Center Spring 2 13 649200202 Pressure Arm 7 14 649200221 Pressure Arm Base 7 15 649200210 Pressure Arm Shaft 7 16 309011003...

Page 107: ...y Rank H 2 774061972 CIS Sensor Rear Unit Assy Rank C 2 774061973 CIS Sensor Rear Unit Assy Rank D 774061976 CIS Sensor Rear Unit Assy Rank G 774061977 CIS Sensor Rear Unit Assy Rank H 3 649202561 Spring Holder Plate 6 4 649202771 Spring Holder Plate L 2 5 305704003 Left Damper FYN N1 L303 1 6 305704002 Right Damper FYN N1 R303 1 7 649200812 Right Damper Holder 1 8 649200823 Left Damper Holder 1 9...

Page 108: ...0210 CIS Base Right Side Frame 1 4 774060211 CIS Base Left Side Frame 1 5 774061154 Outer Pinch Roller Assy 2 6 649202750 Rear Pinch Roller Frame 1 7 649202350 Front Pinch Roller Frame 1 8 649202570 Pinch Roller Bracket 8 9 649202660 Pinch Roller Shaft 8 10 649201154 Pinch Roller GAP Roller 29 8 11 649202580 Pinch Roller Pivot Shaft 8 Upper Section 2 1 3 2 5 8 9 7 6 4 11 10 ...

Page 109: ...e Assy Select the same rank of sensor that is used in your scanner 1 774061953 CIS Sensor Front Unit Assy Rank D 774061956 CIS Sensor Front Unit Assy Rank G 774061957 CIS Sensor Front Unit Assy Rank H 2 774061940 Contact Glass plate Front Assy 1 3 694450111 FPC Cable CS20 1 Short 50 mm 694600320 FPC Cable 460032 Long 100 mm 4 500051529 Core E04FA270218080 1 Front CIS Sensor Unit Assembly 2 1 3 4 ...

Page 110: ...the Contact Glass plate Assy Select the same rank of sensor that is used in your scanner 1 774061973 CIS Sensor Rear Unit Assy Rank D 774061976 CIS Sensor Rear Unit Assy Rank G 774061977 CIS Sensor Rear Unit Assy Rank H 2 774061941 Contact Glass Plate Rear Assy 1 3 694450111 FPC Cable CS20 1 Short 50 mm 4 500051529 Core E04FA270218080 1 Rear CIS Sensor Unit Assembly 2 1 3 4 ...

Page 111: ...06 ACL2 29M 1 2 649202980 SP200W CDM01M CD ROM 1 SP200W 649203010 SK200 CDM01M CD ROM SK200 09 3 649202210 Calibration Sheet Assembly 36 Shade Assy RMD 1 4 641700131 Anti curling Guide GUIDE F W 2 Front 5 641701001 Rear Guide GUIDE PAPER 2 Rear 6 641700501 Cleaning Kit 1 7 649202800 SP Setup Manual 1 SP200W 8 649202810 SP Quick Manual 1 SP200W 9 649202820 JW Quick Manual 1 SP200W 10 649202830 SK Q...

Page 112: ......

Page 113: ...GND OS2 GND OS1 GND VCC TR M GND RS GND LEDCA LEDB LEDR LEDG GND 5V GND 12V 15 14 13 12 11 10 9 8 7 6 5 4 3 1 2 15 14 13 12 11 10 9 8 7 6 5 4 3 1 2 GND OS2 GND OS1 GND VCC TR M GND RS GND LEDCA LEDB LEDR LEDG GND OS2 GND OS1 GND VCC TR M GND RS GND LEDCA LEDB LEDR LEDG 15 14 13 12 11 10 9 8 7 6 5 4 3 1 2 15 14 13 12 11 10 9 8 7 6 5 4 3 1 2 GND OS2 GND OS1 GND VCC TR M GND RS GND LEDCA LEDB LEDR LE...

Page 114: ...EDG GND OS2 GND OS1 GND VCC TR M GND RS GND LEDCA LEDB LEDR LEDG 15 14 13 12 11 10 9 8 7 6 5 4 3 1 2 CIS CONTROLLER BOARD CIS CONTROLLER BOARD CIS CONTROLLER BOARD CIS CONTROLLER BOARD CIS CONTROLLER BOARD DATA CONTROLLER BOARD CIS SENSOR CIS SENSOR CIS SENSOR CIS SENSOR CIS SENSOR GND 6 5 4 3 2 1 0 MTR_RESET MTR_PULSE GND 6 5 4 3 2 1 0 MTR_RESET MTR_PULSE 10 9 8 7 6 5 4 3 1 2 J3 J1 J2 J2 J1 J3 J3...

Page 115: ... MOT_INT USB_INT EXIF_INT SYSCLK0 DRAK 1 0 IFTC CASU CKE ERROR_LED2 ERROR_LED PD1 CKE1 CKE0 RAS3L RAS3U SDRAM_CS3 SDRAM_CS2 WE 3 0 SDRAM A 25 0 D 31 0 CASL SYSCLK4 RD_WR POWERDOWN CASU PD3 PD2 ERROR_LED2 ERROR_LED POW_LED SCAN_SW MOTOR 6 0 IO FRONT_SEN COVER_SEN STOP_SW RV_SW FW_SW PEPAR_LED REAR_SEN MOTOR_PULSE MOTOR_RESET SUSPOWER_LED USB2 A 25 0 USB_WE DMABUS 15 0 USB_RD USB_CS USB_DACK USBRESE...

Page 116: ...SK200 UM 251 9370 13 4 13 BLOCK DIAGRAM AND CIRCUIT DIAGRAMS Data Controller Board CN4091 06 2 15 ...

Page 117: ...SK200 UM 251 9370 13 5 13 BLOCK DIAGRAM AND CIRCUIT DIAGRAMS Data Controller Board CN4091 06 3 15 ...

Page 118: ...SK200 UM 251 9370 13 6 13 BLOCK DIAGRAM AND CIRCUIT DIAGRAMS Data Controller Board CN4091 06 4 15 ...

Page 119: ...SK200 UM 251 9370 13 7 13 BLOCK DIAGRAM AND CIRCUIT DIAGRAMS Data Controller Board CN4091 06 5 15 ...

Page 120: ...SK200 UM 251 9370 13 8 13 BLOCK DIAGRAM AND CIRCUIT DIAGRAMS Data Controller Board CN4091 06 6 15 ...

Page 121: ...SK200 UM 251 9370 13 9 13 BLOCK DIAGRAM AND CIRCUIT DIAGRAMS Data Controller Board CN4091 06 7 15 ...

Page 122: ...SK200 UM 251 9370 13 10 13 BLOCK DIAGRAM AND CIRCUIT DIAGRAMS Data Controller Board CN4091 06 8 15 ...

Page 123: ...SK200 UM 251 9370 13 11 13 BLOCK DIAGRAM AND CIRCUIT DIAGRAMS Data Controller Board CN4091 06 9 15 ...

Page 124: ...SK200 UM 251 9370 13 12 13 BLOCK DIAGRAM AND CIRCUIT DIAGRAMS Data Controller Board CN4091 06 10 15 ...

Page 125: ...SK200 UM 251 9370 13 13 13 BLOCK DIAGRAM AND CIRCUIT DIAGRAMS Data Controller Board CN4091 06 11 15 ...

Page 126: ...SK200 UM 251 9370 13 14 13 BLOCK DIAGRAM AND CIRCUIT DIAGRAMS Data Controller Board CN4091 06 12 15 ...

Page 127: ...SK200 UM 251 9370 13 15 13 BLOCK DIAGRAM AND CIRCUIT DIAGRAMS Data Controller Board CN4091 06 13 15 ...

Page 128: ...SK200 UM 251 9370 13 16 13 BLOCK DIAGRAM AND CIRCUIT DIAGRAMS Data Controller Board CN4091 06 14 15 ...

Page 129: ...SK200 UM 251 9370 13 17 13 BLOCK DIAGRAM AND CIRCUIT DIAGRAMS Data Controller Board CN4091 06 15 15 ...

Page 130: ...SK200 UM 251 9370 13 18 13 BLOCK DIAGRAM AND CIRCUIT DIAGRAMS 13 2 2 CIS Controller Board for SK200 09 CIS Controller Board CN4091 08 1 4 ...

Page 131: ...SK200 UM 251 9370 13 19 13 BLOCK DIAGRAM AND CIRCUIT DIAGRAMS CIS Controller Board CN4091 08 2 4 ...

Page 132: ...SK200 UM 251 9370 13 20 13 BLOCK DIAGRAM AND CIRCUIT DIAGRAMS CIS Controller Board CN4091 08 3 4 ...

Page 133: ...SK200 UM 251 9370 13 21 13 BLOCK DIAGRAM AND CIRCUIT DIAGRAMS CIS Controller Board CN4091 08 4 4 ...

Page 134: ...SK200 UM 251 9370 13 22 13 BLOCK DIAGRAM AND CIRCUIT DIAGRAMS 13 2 3 Power Board for SK200 09 Power Board CN4091 07 1 4 ...

Page 135: ...SK200 UM 251 9370 13 23 13 BLOCK DIAGRAM AND CIRCUIT DIAGRAMS Power Board CN4091 07 2 4 ...

Page 136: ...SK200 UM 251 9370 13 24 13 BLOCK DIAGRAM AND CIRCUIT DIAGRAMS Power Board CN4091 07 3 4 ...

Page 137: ...SK200 UM 251 9370 13 25 13 BLOCK DIAGRAM AND CIRCUIT DIAGRAMS Power Board CN4091 07 4 4 ...

Page 138: ...SK200 UM 251 9370 13 26 13 BLOCK DIAGRAM AND CIRCUIT DIAGRAMS 13 2 4 Control Panel Board CN5041 06A ...

Page 139: ...SK200 UM 251 9370 13 27 13 BLOCK DIAGRAM AND CIRCUIT DIAGRAMS 13 2 5 USB Relay Board CN5041 07 ...

Page 140: ...SK200 UM 251 9370 13 28 13 BLOCK DIAGRAM AND CIRCUIT DIAGRAMS 13 2 6 Data Controller Board for SK200 09 A Data Controller Board CN4091 16A 1 16 ...

Page 141: ...SK200 UM 251 9370 13 29 13 BLOCK DIAGRAM AND CIRCUIT DIAGRAMS Data Controller Board CN4091 16A 2 16 ...

Page 142: ...SK200 UM 251 9370 13 30 13 BLOCK DIAGRAM AND CIRCUIT DIAGRAMS Data Controller Board CN4091 16A 3 16 ...

Page 143: ...SK200 UM 251 9370 13 31 13 BLOCK DIAGRAM AND CIRCUIT DIAGRAMS Data Controller Board CN4091 16A 4 16 ...

Page 144: ...SK200 UM 251 9370 13 32 13 BLOCK DIAGRAM AND CIRCUIT DIAGRAMS Data Controller Board CN4091 16A 5 16 ...

Page 145: ...SK200 UM 251 9370 13 33 13 BLOCK DIAGRAM AND CIRCUIT DIAGRAMS Data Controller Board CN4091 16A 6 16 ...

Page 146: ...SK200 UM 251 9370 13 34 13 BLOCK DIAGRAM AND CIRCUIT DIAGRAMS Data Controller Board CN4091 16A 7 16 ...

Page 147: ...SK200 UM 251 9370 13 35 13 BLOCK DIAGRAM AND CIRCUIT DIAGRAMS Data Controller Board CN4091 16A 8 16 ...

Page 148: ...SK200 UM 251 9370 13 36 13 BLOCK DIAGRAM AND CIRCUIT DIAGRAMS Data Controller Board CN4091 16A 9 16 ...

Page 149: ...SK200 UM 251 9370 13 37 13 BLOCK DIAGRAM AND CIRCUIT DIAGRAMS Data Controller Board CN4091 16A 10 16 ...

Page 150: ...SK200 UM 251 9370 13 38 13 BLOCK DIAGRAM AND CIRCUIT DIAGRAMS Data Controller Board CN4091 16A 11 16 ...

Page 151: ...SK200 UM 251 9370 13 39 13 BLOCK DIAGRAM AND CIRCUIT DIAGRAMS Data Controller Board CN4091 16A 12 16 ...

Page 152: ...SK200 UM 251 9370 13 40 13 BLOCK DIAGRAM AND CIRCUIT DIAGRAMS Data Controller Board CN4091 16A 13 16 ...

Page 153: ...SK200 UM 251 9370 13 41 13 BLOCK DIAGRAM AND CIRCUIT DIAGRAMS Data Controller Board CN4091 16A 14 16 ...

Page 154: ...SK200 UM 251 9370 13 42 13 BLOCK DIAGRAM AND CIRCUIT DIAGRAMS Data Controller Board CN4091 16A 15 16 ...

Page 155: ...SK200 UM 251 9370 13 43 13 BLOCK DIAGRAM AND CIRCUIT DIAGRAMS Data Controller Board CN4091 16A 16 16 ...

Page 156: ...EAR T_FRON UA1 D7 D6 D5 D4 D3 D2 D1 D0 0 1 2A1 1Y4 2A2 1Y3 2A3 1Y2 2A4 1Y1 2 0E VCC UA5 UA6 UA7 A4 A3 A2 A5 A6 A7 A1 UA4 UA3 UA2 UA1 GND 2Y1 1A4 2Y2 1A3 2Y3 1A2 2Y4 1A1 1 0E IC405 TC74VCX244FT 1 2 3 4 5 6 7 8 9 10 20 19 18 17 16 15 14 13 12 11 B8 B7 B6 B5 B4 B3 B2 B1 0E VCC GND A8 A7 A6 A5 A4 A3 A2 A1 DIR IC403 TC74VCX245FT 1 2 3 4 5 6 7 8 9 10 20 19 18 17 16 15 14 13 12 11 B8 B7 B6 B5 B4 B3 B2 B1...

Page 157: ...SK200 UM 251 9370 13 45 13 BLOCK DIAGRAM AND CIRCUIT DIAGRAMS 13 2 8 CIS Controller Board for SK200 09 A CIS Controller Board CN5091 18 1 4 ...

Page 158: ...SK200 UM 251 9370 13 46 13 BLOCK DIAGRAM AND CIRCUIT DIAGRAMS CIS Controller Board CN5091 18 2 4 ...

Page 159: ...SK200 UM 251 9370 13 47 13 BLOCK DIAGRAM AND CIRCUIT DIAGRAMS CIS Controller Board CN5091 18 3 4 ...

Page 160: ...SK200 UM 251 9370 13 48 13 BLOCK DIAGRAM AND CIRCUIT DIAGRAMS CIS Controller Board CN5091 18 4 4 ...

Page 161: ...SK200 UM 251 9370 13 49 13 BLOCK DIAGRAM AND CIRCUIT DIAGRAMS 13 2 9 Power Board for SK200 09 A Power Board CN4091 17A 1 4 ...

Page 162: ...SK200 UM 251 9370 13 50 13 BLOCK DIAGRAM AND CIRCUIT DIAGRAMS Power Board CN4091 17A 2 4 ...

Page 163: ...SK200 UM 251 9370 13 51 13 BLOCK DIAGRAM AND CIRCUIT DIAGRAMS Power Board CN4091 17A 3 4 ...

Page 164: ...SK200 UM 251 9370 13 52 13 BLOCK DIAGRAM AND CIRCUIT DIAGRAMS Power Board CN4091 17A 4 4 ...

Reviews: