background image

25

Sirius Compact Routers

Installation and User Manual

green on the Home page. See 

Salvos Configuration

, on page 28 to learn how to configure 

salvos.
Performing a salvo is a two stage process. First you arm the salvo, and then you take the 

salvo.

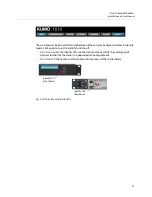
1 Go to the Sirius router Home screen and select the router you wish to control with the 

drop down menu.

2 Press the desired configured Salvo button. The 

TAKE SALVO

 button on the right will be 

colored red.

3 Press the 

TAKE SALVO

 button. All sources configured in that salvo will be routed to 

their destinations.

+

Note


+ ☞

Note


Salvos do not change locked Destinations.

Router Configuration

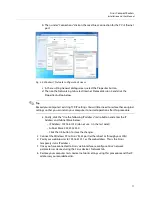
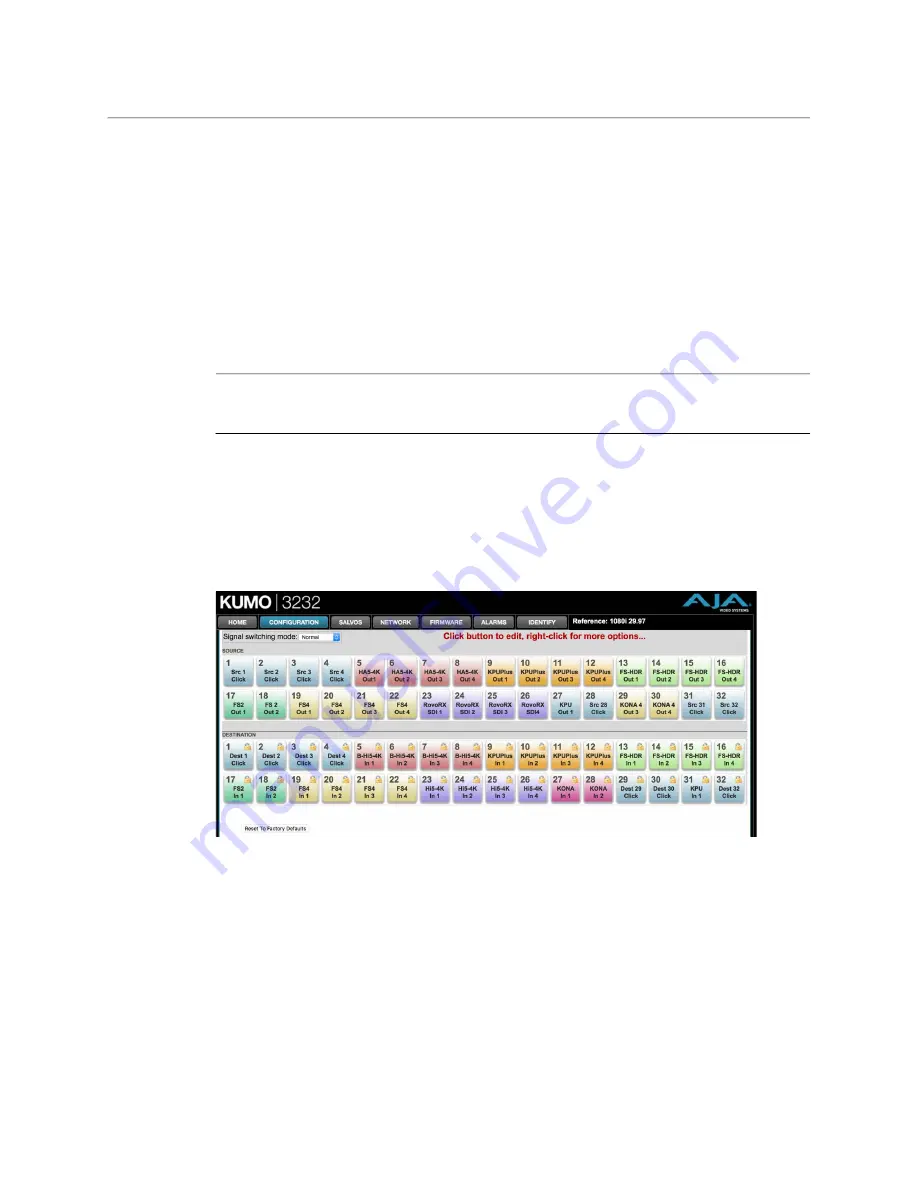
From the Configuration screen you can select the operating mode (Normal, Dual, Quad), 

change the Source and Destination names and the colors of the buttons, and Lock and Hide 

Destination buttons.

Fig. 3-3: Sirius Web Interface, I/O Configuration Screen

Mode Selection

Click on the Signal switching mode drop down list to select Normal, Dual, or Quad 

operating mode. When Dual or Quad mode is selected, the number of Source and 

Destination buttons will be reduced to match that configuration.

Summary of Contents for SIRIUS SCR 1616-12G

Page 1: ...www grassvalley com SIRIUS COMPACT ROUTERS 12G SDI Compact Video Routers Control Panels Installation and Operation Manual 13 02070 010 2022 03 28 ...

Page 2: ...ii Notices ...

Page 3: ...nge without notice Terms and Conditions Please read the following terms and conditions carefully By using Sirius Compact Routers documentation you agree to the following terms and conditions Grass Valley hereby grants permission and license to owners of Sirius Compact to use their product manuals for their own internal business use Manuals for Grass Valley products may not be reproduced or transmi...

Page 4: ... any other equipment connections Identifies an external protective grounding terminal which may be connected to earth ground as a supplement to an internal grounding terminal Indicates that static sensitive components are present which may be damaged by electrostatic discharge Use anti static procedures equipment and surfaces during servicing Indicates that the equipment has more than one power su...

Page 5: ...ning the equipment Do not use liquid or aerosol cleaners use only a damp cloth Dangerous voltages may exist at several points in this equipment To avoid injury do not touch exposed connections and components while power is on High leakage current may be present Earth connection of product is essential before connecting power Prior to servicing remove jewelry such as rings watches and other metalli...

Page 6: ...This unit may have more than one power supply cord Disconnect all power supply cords before servicing to avoid electric shock Follow static precautions at all times when handling this equipment Servicing should be done in a static free environment To reduce the risk of electric shock plug each power supply cord into separate branch circuits employing separate service grounds Electrostatic Discharg...

Page 7: ...es opérateurs et le personnel de service Des avertissements ou mises en garde spécifiques figurent dans le manuel dans les sections où ils s appliquent Prenez le temps de bien lire les consignes et assurez vous de les respecter en particulier celles qui sont destinées à prévenir les décharges électriques ou les blessures Signification des symboles utilisés Signale la présence d une tension élevée ...

Page 8: ...tous les cordons d alimentation avant toute opération d entretien afin de prévenir les chocs électriques La marque UL certifie que l appareil visé a été testé par Underwriters Laboratory UL et reconnu conforme aux exigences applicables en matière de sécurité électrique en vigueur au Canada et aux États Unis La marque C CSA US certifie que l appareil visé a été testé par l Association canadienne de...

Page 9: ...ent à la masse est indispensable avant la mise sous tension Après tout travail d entretien ou de réparation faites effectuer des contrôles de sécurité par le personnel technique qualifié Mises en garde Les mises en garde signalent des conditions ou des pratiques susceptibles d endommager l équipement Veuillez vous familiariser avec les mises en garde ci dessous L appareil est conçu pour être insta...

Page 10: ...icité statique de votre corps en touchant une surface métallique non peinte du châssis Pour plus de sécurité vérifiez périodiquement la valeur de résistance du bracelet antistatique Elle doit se situer entre 1 et 10 mégohms Si vous devez mettre une carte de côté assurez vous de la ranger dans un sac protecteur antistatique Les cartes qui sont reliées à un châssis ou boîtier métallique mis à la ter...

Page 11: ...nmental and social involvement WEEE RoHS REACH etc please contact us at environment grassvalley com Lithium Batteries Battery Warning Your Grass Valley equipment usually comes with at least one button battery located on the main printed circuit board The batteries are used for backup and should not need to be replaced during the lifetime of the equipment Battery Disposal Before disposing of your G...

Page 12: ...r does not exceed 0 dBm 1mW under normal operating conditions Unused optical outputs should be covered to prevent direct exposure to the laser beam Even though the power of these lasers is low the beam should be treated with caution and common sense because it is intense and concentrated Laser radiation can cause irreversible and permanent damage of eyesight Please read the following guidelines ca...

Page 13: ...Business Equipment UL1419 4th Edition Standard for Safety Professional Video and Audio equipment UL file number E193966 EMC Standards This unit conforms to the following standards EN55032 2015 Class A Electromagnetic Compatibility of multimedia equipment Emission requirements EN61000 3 2 2014 Class A Electromagnetic Compatibility Limits for harmonic current emissions EN61000 3 3 2013 Electromagnet...

Page 14: ...articularly serial digital video connections shall be made with high quality double screened coaxial cables such as Belden 8281 or BBC type PSF1 2M Belden 1694A for 3Gbps and Belden 4794A for 12Gbps D TYPE CONNECTORS D type connectors shall have metal shells making good RF contact with the cable screen Connectors having dimples which improve the contact between the plug and socket shells are recom...

Page 15: ...ctors 2 Power Loss Recovery 3 RJ 45 Ethernet Connector 3 ID and Reset 3 REF BNC Connector 3 Video Inputs and Outputs 3 Normal Mode 3 Dual and Quad Modes 4 RS 422 Connector 4 Sirius Control Panel Connections 4 Sirius Control and Monitoring 4 Default Network Settings 4 In This Manual 5 2 Installation 7 Overview 7 What Is In The Box 7 Sirius Chassis Installation 8 Space Requirements 8 Cooling Require...

Page 16: ...guration 19 Static IP Configuration 19 Select Sirius to Control from Web Page 19 Assign Sirius SCP1 and SCP2 to Control Sirius Routers 20 Locating a Specific Sirius Device on the Network 20 Identify Button 20 3 Router Web Browser User Interface 23 Overview 23 Navigation Bar 23 Sirius Home Screen Device Selection 23 Web Browser Control Surface Operation 24 Performing a Take 24 Taking a Salvo 24 Rou...

Page 17: ... Buttons RTR 1 4 40 Shift Reset Buttons 40 SALVO Buttons SCP2 Only 40 Control Panel Web Browser Interface 41 Home Screen 41 Configuration Screen 41 Buttons Screen 42 Disabling Control Panel Buttons 42 Network Screen 43 User Authentication 44 Identify Sirius Device 44 5 eMini Setup 45 Overview 45 Acquiring eMini Setup 45 AJA Documentation 45 Installing eMini Setup 46 PC Installation 46 Mac Installa...

Page 18: ...4 Table of Contents Sirius SCP1 Tech Specs 56 GVG Native Protocol Support 57 NP Commands Supported 57 RS 422 Control Specifications Routers 58 Serial Interface 58 Contact Us 59 ...

Page 19: ...nputs and thirty two outputs SCR 6464 12G supports single connector 12G SDI sixty four SDI inputs and sixty four outputs Because of their compact sizes Sirius SDI routers are ideal for space sensitive applications such as mobile sports trucks edit suites corporate video installations or live theatrical A V rigs Sirius Features The Sirius routers offer the following features for ease of use in a br...

Page 20: ...g on the characteristics of the SDI receiver s to react to the switch for example a monitor glitch or roll It is also possible that switching anomalies can appear on just one or more outputs in the same group in the Dual and Quad modes and in salvos This effect occurs regardless of the relative timing of the SDI signals being switched or any reference input connected to the router Sirius Router Co...

Page 21: ...r a WAN This also allows control over the network using GVG Native Protocol ID and Reset The ID Identification LED lights when you use the web interface to identify the Sirius unit you are controlling The Reset button pinhole below the LED allows a safeboot reset of the unit as explained in Safeboot Reset on page 34 REF BNC Connector The REF BNC connector is the looping input for synchronizing the...

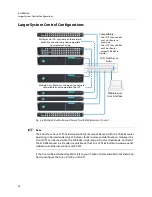
Page 22: ...net Optional SCP1 32 buttons and SCP2 64 buttons hardware control panels each unit able to control up to four Sirius routers Note Note The 32 buttons Sirius SCP1 hardware control panel can be used with a Sirius SCR 6464 router operating in Normal mode but can only control the first 32 Inputs and Outputs The Sirius SCP1 can be used to fully control an SCR 6464 that is operating in Dual or Quad mode...

Page 23: ...allation connections and networking configuration options Chapter 3 Web Browser User Interface provides complete instructions for controlling and monitoring the Sirius router from a computer Chapter 4 Sirius Remote Control Panel details the configuration and operation of the optional Sirius Control Panel Appendix A Specifications lists technical specifications for the product Contact Information ...

Page 24: ...6 Introduction In This Manual ...

Page 25: ...required switches and hubs 3 Connect the Sirius to power connecting the power cord to mains AC 4 If necessary configure device network settings for operation in your facility 5 Cable the system SDI video source and destination equipment and reference signals 6 If operating with Dual Link or Quad Link signals select the appropriate Sirius operating mode WARNING Do not defeat the safety purpose of t...

Page 26: ...ted Power Requirements Input Voltage 110 240VAC 50 60Hz Optional redundant power supply Caution Sirius is designed to take advantage of its chassis to aid in cooling It is common and expected for the densely populated chassis to have a warm front panel in normal active operating conditions WARNING Do not open the chassis There are no user serviceable parts inside Opening the chassis will void the ...

Page 27: ...r in Normal mode 64 sources and destinations can be fully controlled with the newer Sirius SCP2 The original 32 button Sirius SCP1 hardware control panel can fully control an SCR 6464 router operating in Dual or Quad mode A 32 button Sirius SCP1 can control first 32 Inputs and Outputs of an SCR 6464 router operating in Normal mode Sirius devices are compatible with both Cat 5 straight through and ...

Page 28: ...ons 10 and earlier have Bonjour functionality built in which can be used to auto detect and connect to an Ethernet device like a Sirius router Note Note Apple removed Bonjour support from Safari versions 11 and higher To find a Sirius router using Bonjour on a supported version of Safari 1 Ensure the Sirius to be controlled is powered up and connected via Ethernet directly to a Mac or via LAN 2 St...

Page 29: ...be changed manually See eMini Setup on page 45 for additional information Sirius Temporary Static IP Address Sirius devices also offer a factory default static IP address allowing a direct and fail safe way to connect via a computer connected to Sirius either directly or via a LAN connection The computer you use will need to be set to a static IP address that is compatible with the Sirius temporar...

Page 30: ... flash alternately Note Note If a Sirius webpage on a computer is open when that Sirius device is reset the information displayed on the webpage is not updated automatically Fig 2 2 Sirius Router and Sirius Control Panel Default Static IP Setting Note Note Be sure to record your computer s existing TCP IP settings before the next step so that you can return the computer to normal operation after t...

Page 31: ...s on a LAN Sirius uses TCP IP network communications and Ethernet connections a 10 100 1000 Ethernet port for crosspoint control status monitoring and software updates Sirius devices have an internal HTTP web server that works with a standard web browser on a Mac or PC An Ethernet cable can also be used to connect an optional Sirius CP control panel directly to a Sirius router for operation withou...

Page 32: ...r UI Setup and Control Methods Regardless of direct connection or LAN connection Sirius are controlled over a network by connecting to Sirius internal web server with a standard web browser on a Mac or PC To do this you first need to establish a network connection between the computer and the Sirius to be controlled There are various methods supported for doing this depending on the operating syst...

Page 33: ...t time Sirius restarts Any changes in the Network configuration will be saved upon restart 1 Set the Sirius to its factory default IP address See Sirius Temporary Static IP Address on page 11 for this procedure 2 Configure your computer to communicate on the 192 168 101 X subnet as shown below Note Note First record existing TCP IP settings so that you can return your computer to normal operation ...

Page 34: ...Play This method was covered earlier in this chapter See Windows PC Configuration using UPnP on page 10 Windows Browser Type in Sirius Static IP Address Sirius offers a factory default static IP address The default static IP address is temporary and is intended only to allow an initial connection Once you have connected using the static IP you can then enter a desired network configuration using S...

Page 35: ...ormal operation after this procedure e Finally click the Use the following IP address radio button and enter the IP Address and Subnet Mask below IP Address 192 168 101 X do not use 1 in the last octet Subnet Mask 255 255 255 0 Click the OK button to store the changes 3 Connect the Windows PC to Sirius RJ 45 port either direct or through your LAN 4 Point your web browser to 192 168 101 1 as the we...

Page 36: ...64 router in all modes is available via the Sirius SCP2 64 buttons hardware panel web browser Ethernet control and RS 422 If the Sirius will be attached to a WAN talk to your IT administrator and obtain the details on how to configure the Sirius DHCP or static IP LAN Switches or Hubs Multiple Sirius CPs anywhere on the network each CP can control up to four compatible Sirius routers at a time Mult...

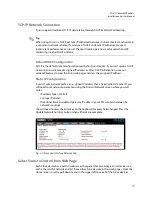
Page 37: ...the Sirius web page and view the assigned IP address Static IP Configuration If your IT administrator prefers an assigned IP address that is fixed called a Static IP you will need to set network parameters using the Sirius UI Network screen where you will enter IP address type Static IP a unique IP address the Subnet Mask and default gateway IP address your LAN s router that does the network s rou...

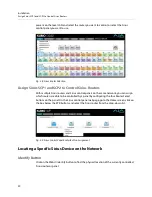
Page 38: ... on the same network you can assign which routers are able to be controlled by a panel by configuring the four Router Select buttons on the panel On the Sirius control panel webpage go to the Home screen click on the box below the RTR button and select the Sirius router from the drop down list Fig 2 9 Sirius Control Panel Router Button Assignment Locating a Specific Sirius Device on the Network Id...

Page 39: ...k again to turn the Identify function off On a Sirius router the Identify LEDs on the front and back will flash enabling quick physical location of the router in a populated rack of equipment On a Sirius CP the Source and Destination button rows will flash alternately Fig 2 10 Sirius Router Identify LEDs Identify LED Front Panel Identify LED Rear Panel ...

Page 40: ...22 Installation Identify Button ...

Page 41: ...urces and destinations and mode selection Salvos salvo configuration Network IP settings for LAN WAN operation and enabling authentication Firmware update menu for Sirius software from AJA Alarms log of service failures and allows alarms to be suppressed Identify toggles activation of Identify LEDs for easy location of Sirius devices Fig 3 1 Sirius Navigation Bar Click any of the first six tabs to...

Page 42: ...s that you do not want to control from this screen see Hide on page 27 Performing a Take 1 Go to the Sirius router Home screen and select the router you wish to control with the drop down menu 2 Press the desired Destination button It will illuminate 3 Press the desired Source button That source will be routed to that destination and the Source button will illuminate Note Note Sources for locked D...

Page 43: ...ress the TAKE SALVO button All sources configured in that salvo will be routed to their destinations Note Note Salvos do not change locked Destinations Router Configuration From the Configuration screen you can select the operating mode Normal Dual Quad change the Source and Destination names and the colors of the buttons and Lock and Hide Destination buttons Fig 3 3 Sirius Web Interface I O Confi...

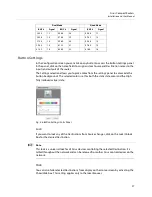
Page 44: ...d modes adjacent BNCs are used for each routed signal Dual Mode Quad Mode BNC Signal BNC Signal BNC Signal 1 2 1 33 34 17 1 4 1 3 4 2 35 36 18 5 8 2 5 6 3 37 38 19 9 12 3 7 8 4 39 40 20 13 16 4 9 10 5 41 42 21 17 20 5 11 12 6 43 44 22 21 24 6 13 14 7 45 46 23 25 28 7 15 16 8 47 48 24 29 32 8 17 18 9 49 50 25 33 36 9 19 20 10 51 52 26 37 40 10 21 22 11 53 54 27 41 44 11 ...

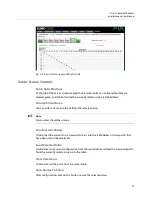
Page 45: ...6 Button Settings Color Panel Lock If you want to lock any of the Destinations from Source changes click on the Lock Unlock box for the desired Destination Note Note This lock is a universal lock for all Sirius devices controlling the selected Destination It is tallied throughout the network and can be released from other Sirius control devices on the network Hide You can also hide selected Destin...

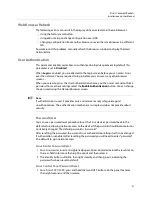
Page 46: ...to multiple destinations Crosspoints not included in a salvo remain unchanged When you first select the Salvo screen the eight Salvo buttons are shown Buttons with currently configured salvos are colored green Enable Exit Page Warning The Enable Exit Page Warning checkbox enables or disables the display of a warning message if you leave the Salvo configuration screen without saving Fig 3 7 Initial...

Page 47: ...ame into this field for the selected salvo Note Note Salvo names should be unique Load Current Routes Click to load the current Sirius crosspoint status into the table below All crosspoints that have been set will be displayed Load Selected Salvo Click to clear any current configuration from the router table and load the crosspoint paths from the currently selected salvo into the table Clear Selec...

Page 48: ...Source column header creates a one to one diagonal salvo in the router table Clicking on any Source number applies that same source to all the Destinations 5 Click the Save Routes To Salvo button to save the current router table to that salvo Network Setup The Network screen provides access to standard TCP IP setup fields and allows you to click on the System Name field to change it The MAC addres...

Page 49: ...ing the Network browser screen Note Note If authentication is used it provides only a minimum security safeguard against unauthorized use The authentication mechanism is simple and does not provide robust security Password Reset You can use a password reset procedure to set the Sirius device s password back to the default value allowing network access to the device if the password should become lo...

Page 50: ...pdate web page by clicking the link at the bottom of the Firmware screen or using the following link https www aja com family kumo support Click on any of the Sirius products to go to its support tab Current firmware version number is reported here under the pull down menu and the device s serial number is listed at the bottom of the screen Fig 3 10 Sirius Web Interface Firmware Upload Screen Unpa...

Page 51: ...he Sirius web page is visible click on the FIRMWARE tab 3 Then click on the Browse button to locate the Sirius firmware image file on your PC or Mac Fig 3 11 Sirius Firmware Screen Browse for Firmware 4 When you have selected a valid Sirius image file click Open and then OK The file you select will upload to the Sirius and be tested for validity Incomplete corrupted or non Sirius software files ar...

Page 52: ... upgrade was successful If the old version appears click Retry If there is a power outage or glitch during the software download the Sirius will boot the older software version and the upgrade process can then be re started by the user This happens because the Sirius has been designed with a safety feature where an internal safe copy of the previous software is retained in the event the updating p...

Page 53: ...b see below Alarms include Power Supply displays error if a redundant power supply is off line Reference displays error if no valid video reference signal is found Over Temperature displays error if Sirius exceeds normal operating temperature Fig 3 14 Sirius Web Interface Alarms Screen If you do not want any of the above conditions to report an error click the boxed text to access the drop down me...

Page 54: ...36 Router Web Browser User Interface Locating a Specific Sirius See Locating a Specific Sirius Device on the Network on page 20 for more information ...

Page 55: ... Sirius SCP2 able to control up to 64 Note Note The 32 button Sirius SCP1 hardware Control Panel cannot be used with an SCR 6464 router operating in Normal mode only 32 buttons for 64 sources and destinations However the Sirius SCP1 can be used when the Sirius SCR 6464 is operating in Dual or Quad mode Control of the SCR 6464 router in all modes is available via the Sirius SCP2 64 button hardware ...

Page 56: ...figure salvos Performing a salvo is a two stage process First you arm the salvo and then you take the salvo 1 Press the desired Salvo button The button will blink for five seconds 2 Press that blinking Salvo button again to take that salvo After five seconds the Salvo button will no longer be armed and will stop blinking To take that salvo you will need to press the Salvo button again to rearm tha...

Page 57: ... names Grass Valley has provided a template for printing custom lens chips we suggest using 29 lb vellum for button designations The template is available at https www aja com support kumo lens_chip zip Panel Function Buttons Each Sirius Control Panel provides Panel Lock prevents Source or Destination changes from this panel Destination Lock prevents any Source change for a Destination Router Dele...

Page 58: ...outer fails the control panel s delegation button for that router will be colored pink When communications is restored the delegation button returns to its normal color Shift Reset Buttons The SHIFT SRC and SHIFT DEST buttons serve multiple functions They allow you to select shifted sources and destinations 17 32 and they also perform the same reset functions as the reset slot Resets should be don...

Page 59: ...are tabs same as Sirius router network settings see Network Setup on page 30 and UPnP Host on page 32 Alarms Power Supply and Over Temperature refer to Sirius Alarms on page 35 Identify button to identify the physical location of a particular control panel Home Screen Use the Home page to assign a router to each of the router delegation buttons Each button has a pull down menu that lists the activ...

Page 60: ...en if using a different tab in the same browser the information displayed on that original webpage will not be updated automatically and so will display stale data Buttons Screen The Buttons screen lets you enable or disable the Source Destination and Salvo buttons on a Sirius hardware control panel Disabling Control Panel Buttons The v4 1 and higher Sirius firmware includes a button disabling fea...

Page 61: ... been disabled will go blank and the tally lights of the disabled physical buttons on the Sirius CP will go off Network Screen The Network screen provides access to standard TCP IP setup fields and allows you to click on the System Name field to change it The MAC address is a fixed machine address composed of manufacturer identification and product serial numbers You can choose DHCP or Static IP w...

Page 62: ...bles or disables an authentication login requirement See User Authentication on page 31 for more information Identify Sirius Device Click on the Web UI Identify button to find the physical location of the currently controlled Sirius router or panel See Locating a Specific Sirius Device on the Network on page 20 for more information ...

Page 63: ... to that computer s USB port 3 Launch the eMini Setup application 4 Go to the Network tab where the IP address settings are displayed You can use the existing DHCP assigned IP address or it can be changed manually Acquiring eMini Setup AJA s eMini Setup application is available for download from the AJA website To download the latest eMini Setup package which includes the eMini Setup application a...

Page 64: ...up on page 45 2 Open the AJA_eMini Setup_win zip file 3 Double click on the AJA_eMini Setup msi file 4 The Setup Wizard will guide you through the installation Fig 5 1 eMini Setup PC Wizard 5 Click Next to begin Answer the questions in the subsequent dialogs including device software installation if displayed When finished an AJA eMini Setup shortcut will be installed on the desktop and you will b...

Page 65: ...nstallation To install the application on a Mac Note Note Mac computers must be Intel based G5 G4 and earlier models will not work with eMini Setup 1 Download the application from the AJA website See Acquiring eMini Setup on page 45 2 Unzip the file 3 Double click on the AJA eMini Setup dmg file 4 Answer the prompt and a utility program will be launched Fig 5 3 eMini Setup Mac Installer ...

Page 66: ...To run eMini Setup on a PC double click on the AJA eMini Setup icon on your desktop or open the AJA folder in the program list and click on the AJA eMini Setup application located inside the eMini Setup folder Mac Startup To run eMini Setup on a Mac open the Applications folder and locate the AJA eMini Setup application Double click the application to launch it Operating eMini Setup The eMini Setu...

Page 67: ...i Setup application is connected and communicating with an AJA device File Menu The File drop down menu on the eMini Setup application bar has a Revert to Factory Settings menu item that allows you to change the settings back to the AJA device s factory defaults Edit Menu The Edit drop down menu has standard Cut Copy and Paste functions for editing text Help Menu The Help drop down menu has a link...

Page 68: ...ration changes IP Address Type Choose from DHCP or Static IP Address IP Address The current IP Address is displayed A different IP address can be entered Subnet Mask The current Subnet Mask is displayed A different subnet mask can be entered Gateway The current Gateway address is displayed A different gateway address can be entered MAC Address This is the permanent MAC address of the Control LAN E...

Page 69: ... give your AJA device a unique name This can be useful if you have several attached to a Mac PC via USB so you can distinguish between them easily This is also the name that shows up in Zeroconf Bonjour uPnP and the Other KUMOs dropdown on the Web UI Home screen Type This is the factory set model name of the AJA device Authentication If Authentication has been Enabled on the web browser Access tab...

Page 70: ...52 eMini Setup Info Tab Screen ...

Page 71: ... remote control USB Interface 1x Mini USB for IP configuration using eMini Setup Earlier model devices lacking a USB port cannot be configured via USB Serial Interface 1x DB 9 Female RS 422 Basic support for Grass Valley Native Protocol See RS 422 Control Specifications Routers on page 58 for pinouts Environment Safe Operating Temperature 0 to 40 C 32 to 104 F Safe Storage Temperature Power OFF 40...

Page 72: ...er 100 240 VAC 50 60 Hz universal input Video Formats 270 Mb s 1 5 Gb s 3 Gb s 6 Gb s 12 Gb s SDI 270 Mb s DVB ASI Format agnostic 270 Mb s 12 Gb s Video Input Digital 12G SDI Inputs 32x 12G SDI BNC SMPTE 259 292 424 2081 2082 Video Output Digital 12G SDI Outputs 32x 12G SDI BNC SMPTE 259 292 424 2081 2082 Noninverting Cable Equalization Belden 1694A 12 Gb s up to 50m 6 Gb s up to 100m 3 Gb s up t...

Page 73: ...Select All other rates are passed through and not reclocked Control Panel Compatibility SCP1 1RU X Y Ethernet control panel SCP2 2RU X Y Ethernet control panel Size w x d x h 4 RU 17 4 x 1 55 x 7 00 441 96 x 39 37 x 177 8 mm Weight 9 2 lbs 4 2 kg Power 10 14 VDC regulated 13W typ 17W max power supply required included with purchase AC Adapter 100 240 VAC 50 60 Hz universal input User Interface 80 ...

Page 74: ...ncludes factory installed lens chip set High and Low button tally indication configurable brightness Controls up to four Sirius routers Panel Lock feature Destination Lock feature Router Support SCR 1616 12G SCR 3232 12G Network Interface 1x RJ 45 10 100 1000 Ethernet Embedded web server for remote control USB Interface 1x Mini USB for IP configuration using eMini Setup Earlier model devices lacki...

Page 75: ...eartbeat BK N Gets system name BK T Gets software title BK t Gets protocol software BK R Gets software version BK d Gets device name BK F Gets source destination or salvo name changes BK E Sets or returns status of Level 4 Echo Queries QN S Gets all srcs by name QN IS Gets all srcs name index QN D Gets all dests names QN ID Gets all dests name indx QN L Gets levels hard coded as Kumo_Lev0 QD destn...

Page 76: ...us Routers support RS 422 control Sirius Control Panels do not support RS 422 control Serial Interface 1x DB 9 Female RS 422 Grass Valley Native Protocol 9 pin D connector pinout is as follows Baud Rate 38400 Parity None Stop Bit 1 Data Bits 8 1 GND 2 TX 3 RX 4 GND 5 No Connection 6 GND 7 TX 8 RX 9 GND Shell GND ...

Page 77: ...in a local phone number for the support center nearest you please consult the Contact Us section of Grass Valley s website www grassvalley com An on line form for e mail contact is also available from the website Corporate Head Office Grass Valley 3499 Douglas B Floreani St Laurent Quebec H4S 2C6 Canada Telephone 1 514 333 1772 Fax 1 514 333 9828 www grassvalley com ...

Reviews: