148
Zodiak Installation and Service Manual
Section 4 — Maintenance
M/E Module Heat Sink Installation
All Zodiak systems running software version 2.1 and later need heat sinks
installed on the M/E modules in slots 2 and 3. These heat sinks were
included in the software version 2.1 release FMN kit (part number 075-
0693-00). Newer Zodiak systems, and 2.5 to 3 M/E upgrade kits will have
these heat sinks already installed. However, you should check to make sure
all Zodiak M/E modules have these heat sinks installed, especially if you
are running software versions higher than 2.1.
Identify ICs
Verify that your system has the correct heat sinks installed by doing the fol-
lowing:
1.
Remove the Dual M/E module from slot 2 in the frame. The module
can be removed and reinserted with power on.
2.
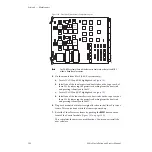
Locate the four large PLCC-socketed ICs labeled U12, U13, U45, and
U46 on the component side of the module. Self-adhesive heat sinks
should be installed on the top of each IC. See
3.
Locate the four smaller PLCC-socketed ICs labeled U54, U55, U66, and
U67 to the right of the larger ICs above. Self-adhesive heat sinks should
be installed on the top of each of these ICs. See
4.
For a 3-M/E system, remove the M/E module in slot 3 of the frame and
verify that heat sinks are installed on ICs labeled U13, U46, U55, and
U67.
5.
If heat sinks are properly installed, return the modules to the frame.
6.
If heat sinks are needed, contact Customer Service for FMN 075-0693-
00.
Heat Sink Installation
CAUTION
Failure to install the correct heat sinks required for software version 2.1 and
later can result in overheating and damage to the M/E modules in your
system.
1.
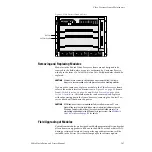
Locate the Dual M/E modules in Slot 2 of the Zodiak Video Processor
frame in both 2.5-M/E and 3-M/E systems and Slot 3 in 3-M/E systems
(
2.
Remove them from the frame. The modules can be removed with the
frame powered up.

