202
Zodiak Installation and Service Manual
Section 5 — Troubleshooting and Diagnostics
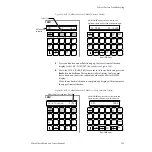
Figure 146. Joystick X Axis Calibration Displays
11.
Move the joystick to its top and bottom vertical limits to set the Y axis.
The Master E-MEM display will change to show the Y axis values.
12.
Press the
8
button under
Sho
to access the Z axis calibration routine.
Rotate the joystick clockwise and counter-clockwise to set the range.
13.
After adjusting the Z axis, press the
Run
button under
Press
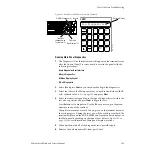
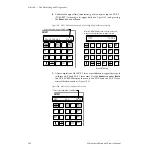
to view the
Center display (
) that reports the center value for each axis—
x, y, and z in the Master E-MEM display.
Figure 147. Center Values for Each Joystick Axis Displayed
Undo
Learn
Lock
Bank
1
2
3
4
5
6
7
8
9
0
Run
Seq
Bank
0
Effects
Dis
Bank
1
Tran
Rate
Enter
E-MEM
8125_01_19_r1
Undo
Learn
Lock
Bank
1
2
3
4
5
6
7
8
9
Stop
Next
KF
Seq
Bank
0
Effects
Dis
Bank
1
Tran
Rate
Hold
Input
Reverse
Rewind
Run
Master E-MEM Display
Jx 8000_8200
Mv2All Sho Press
Master E-MEM display shows approximate center
values then actual range as you move the joystick
Select Sho to move to the
next calibration routine
Trim
Enter
+/-
0
Undo
Learn
Lock
Bank
1
2
3
4
5
6
7
8
9
0
Run
Seq
Bank
0
Effects
Dis
Bank
1
Tran
Rate
Enter
E-MEM
8125_01_20_r1
Undo
Learn
Lock
Bank
1
2
3
4
5
6
7
8
9
Stop
Next
KF
Seq
Bank
0
Effects
Dis
Bank
1
Tran
Rate
Hold
Input
Reverse
Rewind
Run
Master E-MEM Display
Center Press
x 8200 y 8000 z 8500
Trim
Enter
+/-
0
Master E-MEM display shows approximate current
center values for each joystick axis
Select Press

