Gyro System
SRVS G490T
SRVS gyro system, Order No. 5137
5
5. The gyro in use
Installing the gyro system
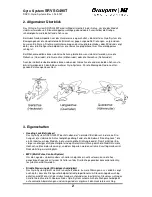
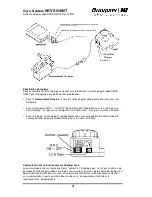
Install the sensor unit in the appropriate orientation relative to the axis of the model which you
wish to stabilise, as shown in the sketch. It is important to minimise vibration transfer to the gyro.
Ensure that the case is exactly perpendicular to the desired axis in the model. We recommend
that you mount it using the double-sided foam tape supplied. Press the tape firmly to the bottom
of the gyro case, then press it onto the platform in the helicopter mechanics designed to house
the gyro. The surface must be clean and grease-free.
Note: do not wrap the sensor in thick foam, and do not use several layers of soft double-sided
tape. The sensor element is suspended inside the sensor housing and protected internally from
vibration; additional vibration damping is not necessary, and may have an adverse effect on the
performance of the system.
Using the gyro system in a helicopter
1. The first step is to complete all the electrical connections between the gyro and the receiving
system. The second is to set the servo travel for the tail rotor to 100% on both sides of
neutral. This is done at the transmitter.
2. Set the servo travel centre offset to zero.
3. Set the tail rotor trim lever to centre; if you have an mc-24 erase the tail rotor trim memory.
4. Temporarily switch off the static torque compensation mixer to ensure that the servo is really
at centre. If your transmitter features a dynamic torque compensation mixer, it must be
disabled (switched off) permanently.
5. Be sure to disable the mixer which suppresses the effect of the gyro system in response to a
tail rotor control command ("gyro control", "gyro suppression").
6. Set the gyro system to "normal" mode from the transmitter using the appropriate auxiliary
channel.
7. Switch on the transmitter first, then the receiving system, and wait at least three seconds so
that the gyro system can carry out its self-calibration procedure.
8. Operate the tail rotor stick on the transmitter and check that the tail rotor responds in the
correct direction.
9. Check that the tail rotor servo output arm is at right-angles (90°) to the tail rotor control
pushrod. You may have to unscrew the servo output arm, rotate it on the splines and secure
it again.
10. The next step is to check the direction in which the gyro system’s corrective action occurs.
This is done by rotating the helicopter slightly around its vertical axis, and observing the re-
sponse of the tail rotor servo produced by the gyro. The tail rotor travel must be in the direc-
tion which counteracts the model’s rotation. If the direction of the gyro’s corrective action is
incorrect, reverse it using the appropriate switch (marked "Reverse") on the gyro system.
11. You can now check the "high" and "low" gyro gain settings. Move the appropriate transmitter
control (switch or proportional control) alternately to minimum and maximum gain, and check
that the gyro’s response actually changes accordingly (larger or smaller servo travel when
you yaw the model to and fro).
Please note that it can be dangerous for an inexperienced helicopter pilot to fly a


