


22
WATER CONTROL IMPORTANCE : It’s impor tant to do this controls to insure a water quality and the bather secur ity, to prevent infection,
i n t ox i c a t i o n p r o bl e m s, … d u e t o a b a d s t a t e o f wa t e r.
PROBLEMS
CAUSES
SOLUTIONS
Cloudy water
Filters deficiencyPH too high
Put back some clean water in the pool, add into the dispenser
a
Organic residues excess
flocculant in tablets. Realise a chlorine treatment
Green water
Seaweeds and mildew formation
Brush carefully the bottom and the steel walls of the pool
Analyse the pH and adjust it Realise a chlorine treatment
Brown water
Iron or manganese presence
Analyse the pH and adjust it Realise a chlorine treatment
Add an algicid and a flocculant
Skin and eyes Irritation. Bad smells
Unbalanced pH. Organic residues excess
Replace the pool water
PROBLEMAS
CAUSAS
SOLUCIONES
Agua Turbia
Falta de filtración. pH alto
Reponga con agua limpia la piscina. Añada floculante en pastillas
Exceso de residuos orgánicos.
en dosificador. Realice una Cloración de choque.
Agua Verde
Formación de algas o verdín.
Cepillar suavemente el fondo y las paredes de la piscina.
Analice el pH y ajústelo. Realice una Cloración de choque.
Agua Marrón
Presencia de Hierro ó Manganeso.
Analice el pH y ajústelo. Realice una Cloración de choque..
Añada algicida y floculante líquido.
Irritación de ojos y piel. Malos olores.
pH desajustado. Exceso de residuos orgánicos
Sustituya el agua de la piscina.
IMPORTANCIA DE LOS CONTROLES DEL AGUA:Es importante hacer estos controles para asegurar la calidad del agua y la seguridad de los bañistas,para
prevenir problemas de infecciones, intoxicaciones, etc. producidas por un agua en mal estado.
GB
E
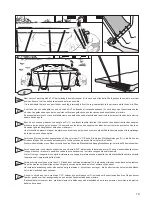
MAINTENANCE AND USE :
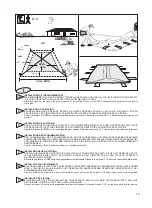
- Check every pool screws, the corrosion points possible and check the liner is clean before filling the pool.
- The pool water level has always to be hold in a minimum of 15 cm from the pool superior edge. Do not leave the pool without any water.
- Clean regularly the P.V.C liner and the water level mark with non-abrasive products. Regularly clean the fold joining the bottom to the side of the liner, as it is an area where dirt accumulates.
If you do by accident a small hole in the liner, you can repair it thanks to our rubber patches AR202 and V12.
- Do not jump or walk on the superior edge of the pool.
- You have to use the ladder exclusively to go in or to go out of the pool. (Remove it after use)
- The isothermic covers (for the summer) protect your pool from insects, dust, leaves, … and avoid to loose the water temperature. Do always set it in order the bubbles are in contact with the water.
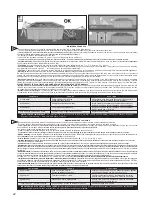
- Chimical measures : Please read carefully the chemical product manufacturer instructions. WARNING: Keep chemical products in a clean, dry and out of children place. Important :
Every products used have to be compatible with the P.V.C liner.
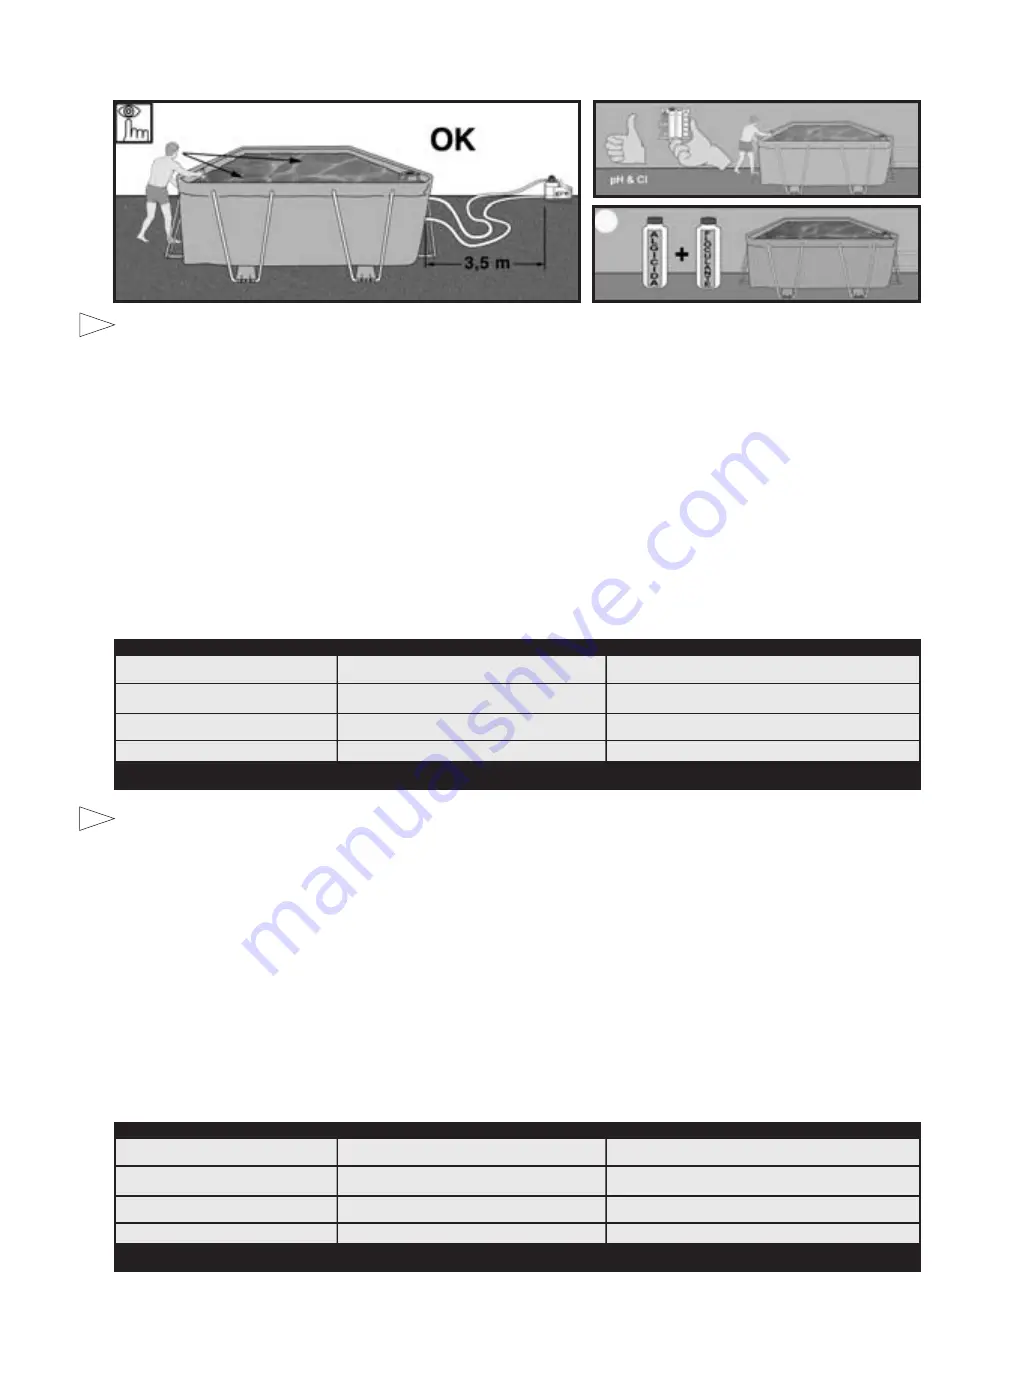
- First filling : Analyse the water pH and chlorine (Cl) and adjust them to the optimal levels : pH : 7,2 – 7,6 ; Chlorine : 0.5 – 2 ppm.
- Chlorine treatments : Consist in increasing the chlorine level until approximatively 20ppm to eliminate germs and seaweeds. This process has to be done only when the
pool water comes from rivers or ponds, … or if it stayed a long time without any treatments.
- Checking : Check at least once a week the chlorine levels (Use a chlorine and pH analyser). In the same way, we advise to add an algicid to prevent seaweeds appearance.
- Warning : Never have a swim before the chlorine level stabilization. Make sure the pool water level is correct.
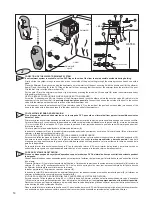
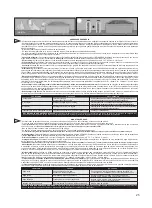
Do always use a floating dispenser for the chemical product (tablets) dissolution. The chemical product measuring out has to be done in accordance with : Your pool water
volume, the bathe frequency, the climatic conditions, the water temperature and the location. Do always move the water and wait for the chemical product dissolution before
adding another one. Wait approximatively 12 hours between any pH, chlorine or algicid adjustment using the filter system.
- Mechanical measures :Check the filter, the skimmer, the valves and the pipes are well connected to the pool. Switch on the filter system once a day in to insure a complete
water volume renewal and never do it when somebody is in the pool (see filter manual). Do consider high water temperature will involved more time for the filtering. Theoretic
filtering time = Water volume / Filter system discharge (generally 8h/day with water temperature of 21
°
C), (Ideal : 2h in the morning – 4h around midday – 2h in the afternoon).
PLEASE RESPECT THE CONTINUOUS WORKING PERIOD INDICATED IN THE FILTER MANUALS
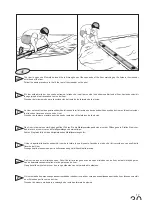
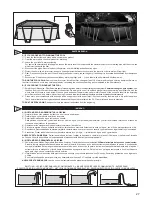
- Bottom cleaner for exhaustion (manual or automatic) : Only for pools with skimmer. Connect an hose extremity to the brush head and immerse it into the water to make
it fill in. Connect the other pipe extremity to the exhaustion adapter (TA) and place it above the skimmer basket. Switch on the filter in the FILTER position and begin to clean
the bottom. Pay special attention to areas with folds where dirt accumulates.
- Bottom cleaner Ventury style : Connect a garden hose to the bottom cleaner join and introduce it into the pool. Open the tap until a normal pressure to make the water flow
out against the bottom of the pool, producing in that way an ascendant stream which leave the dirt into the filter (bag) which is adjust on the bottom cleaner.
MANTENIMIENTO DE LA PISCINA
- Revisar toda la tornillería de la piscina, los posibles puntos de corrosión y comprobar que el liner está limpio antes del llenado de la piscina.
- El nivel de agua de la piscina debe mantenerse siempre como mínimo a 15 cm del borde superior de la misma. Nunca deje la piscina sin agua.
- Limpie regularmente el Liner P.V.C.y la línea del nivel de agua con productos no abrasivos. Limpiar periódicamente el pliegue de unión del fondo con el lateral del liner ya que es una zona
de acumulación de suciedad. Si Ud. por accidente hace un pequeño agujero en el liner, puede repararlo con nuestros parches AR202.
- No tirarse ni andar sobre el borde superior de la piscina.
- Utilizar la escalera exclusivamente para entrar y/o salir de la piscina.( Retírela de la piscina despues del uso).
- Las cubiertas de verano ( isotérmicas ) protegen su piscina de insectos, polvo, hojas, etc. y evitan la pérdida de temperatura del agua. Colóquela siempre con las burbujas en contacto con el agua.
- Medios Químicos: Lea con atención las instrucciones del fabricante del producto químico. ATENCION: Guarde los productos químicos en un lugar limpio, seco y fuera del alcance de los
niños. Importante: Todos los productos utilizados deben ser compatibles con el liner de P.V.C.
- Primer llenado: Analizar el pH y Cloro (Cl) del agua y ajustarlos a los niveles óptimos: pH: 7,2 - 7,6 ; Cloro: 0,5 - 2 ppm.
- Cloración de choque: Consiste en aumentar el nivel de cloro hasta 20 ppm aprox. para eliminar las bacterias y algas. Sólo la realizaremos cuando el agua de la piscina provenga de ríos, estanques,....
o lleve mucho tiempo sin tratamiento.
- Controles: Revisar, al menos una vez a la semana, los niveles de pH y Cloro. ( Utilice un analizador de Cloro y pH ). Así mismo, deberá añadir Algicida para prevenir la formación de algas.
- Advertencias: Nunca bañarse hasta que se estabilice el nivel de cloro. Vigilar el correcto nivel de agua de la piscina.Utilizar siempre un Dosificador flotante para la disolución del producto químico
(pastillas ). La dosificación de los productos químicos se hace en función de:
El volúmen de agua de su piscina,la frecuencia del baño, las condiciones climáticas, temperatura del agua y ubicación.Siempre
remover el agua y esperar a la disolución de un producto químico antes de añadir otro.Espere más o menos 12 h. entre cada ajuste de pH, de Cloro, o deantialgas haciendo funcionar el sistema
de filtración.
- Medios Mecánicos: Comprobar que la depuradora, skimmer, válvulas y mangueras estén correctamente conectadas a la piscina. Ponga a funcionar el sistemade filtración una vez al día para asegurar
un renovamiento completo del volúmen de agua y siempre cuando no se esté utilizando la piscina para el baño. ( ver manual de la depuradora ). Tenga en cuenta que a mayor temperatura del agua
necesitará más tiempo de filtración. Tiempo filtración teórico = Volúmen de agua / Caudal del sistema de filtración ( generalmente 8 h/día con la temperatura
del agua a 21ºC ), ( Ideal: 2 h. por la mañana- 4 h. a medio dia - 2 h. por la tarde ).Respete los periodos en continuo indicados en los manuales de las depuradoras
- Limpia fondos por Aspiración ( manual o automático ): Sólo para piscinas con skimmer.
Conectar un extremo de la manguera del limpia fondos a la barredera y sumergirlo en el agua para
que se llene la manguera. Conectar el otro extremo de la manguera a la Tapa de Aspiración (TA) y situarlo encima del cesto del skimmer. Poner en marcha la depuradora en posición FILTER y
comenzar a limpiar el fondo. Especial atención a zonas con pliegues donde se acumule la suciedad.
- Limpia fondos tipo Ventury: Acoplar una manguera de jardín al cabezal del limpia fondos e introducirlo dentro de la piscina. Abrir el grifo a una presión normal para que el agua fluya contra el fondo
de la piscina, produciendo una corriente ascendente que deposita la suciedad enel filtro que incorpora el limpia fondos.


