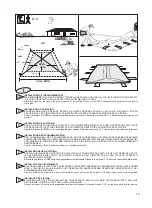
background image

27

EMPTYING - VACIADO SISTEMA VASOS COMUNICANTES - VIDANGE PRINCIPE VASES COMMUNICANTS - ENTLEERUNG

SCARICO PRINCIPIO VASI COMUNICANTI -  HET LEGEN COMMUNICERENDE VATEN - ESVAZIAMENTO PRINCIPIO VASOS COMUNICANTES

E

GB

INVIERNO

A) SI OPTAMOS POR NO DESMONTAR LA PISCINA
1º- Limpiar el fondo y las paredes del liner con un producto no abrasivo.
2º- Tratar el agua con producto químico de invernaje.
3º- Dejar la piscina llena de agua, teniendo en cuenta:

Para piscinas con skimmer y válvula de retorno  nivel de agua, 5 cm por debajo del skimmer y cerrar la válvula de retorno con el tapón de
rosca que se adjunta con la depuradora.

4º- Desconectar las mangueras. No desmontar el skimmer ni las válvulas.
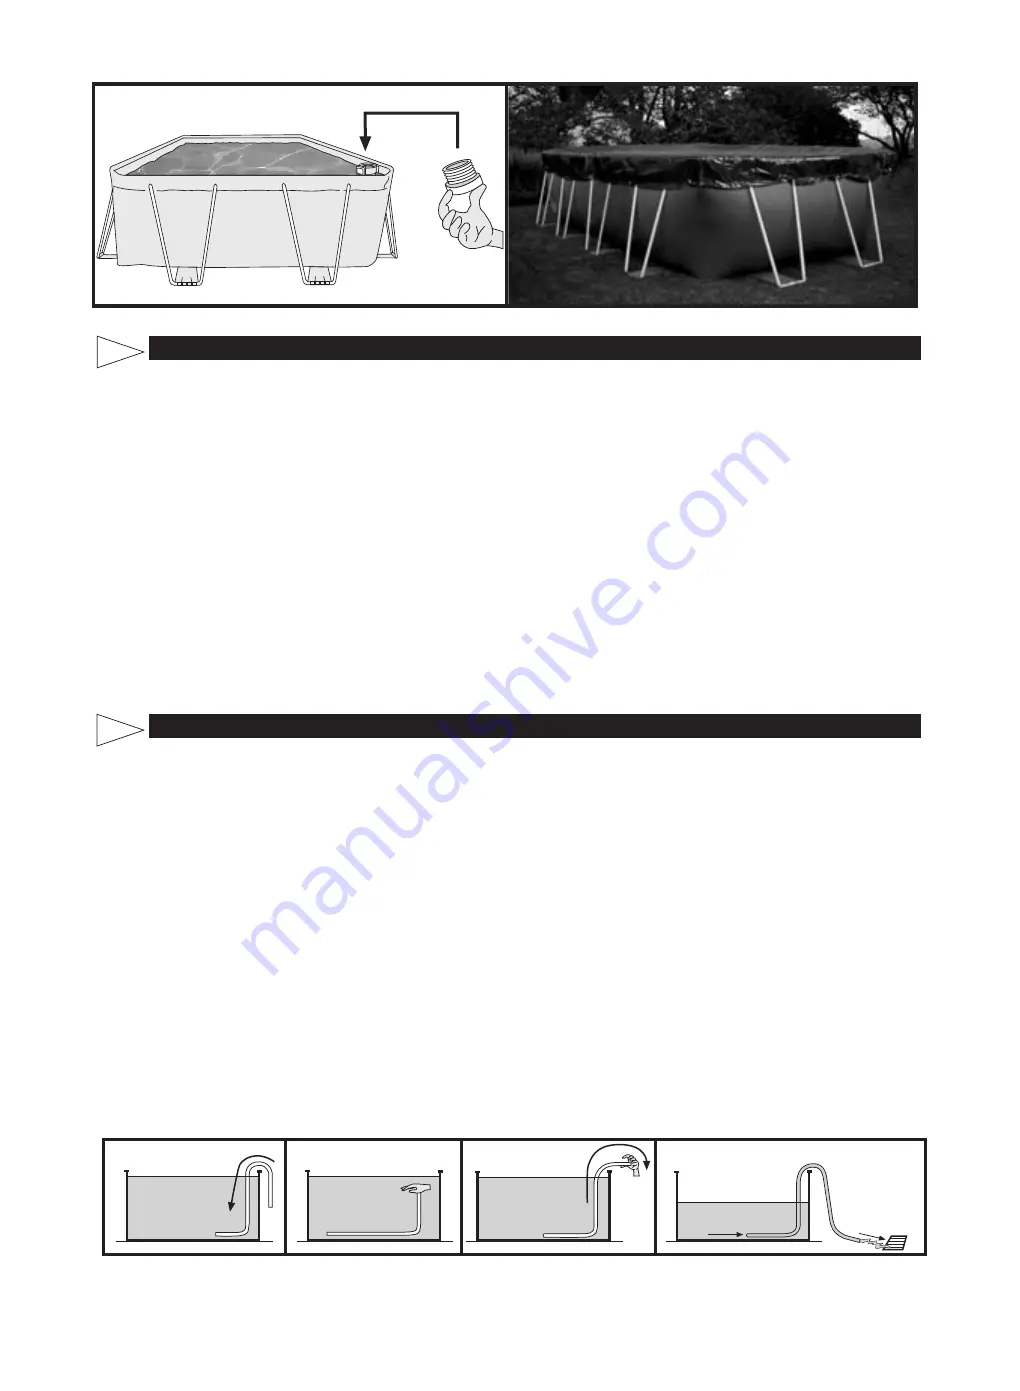
5º- Proteger la piscina con una cubierta de invierno, colocando un elemento flotante entre ésta y el agua., con el fin de protegerla contra el frío.
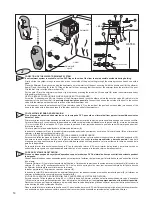
6º- Depuradora  Desconectarla de la piscina. Limpiarla, vaciar la arena o sacar el cartucho, secarla y guardarla en un lugar cubierto y sin humedad.
7º- Accesorios  Quitar todos los accesorios (escalera, alarma, foco, pértiga,...), limpiarlos con agua  dulce y guardarlos.

NUEVA PUESTA EN MARCHA  Quitar la cubierta de invierno, instalar la depuradora, cambiar al  menos 1/3 del agua y realizar una Cloración
de Choque. Poner la depuradora en funcionamiento al menos durante 8 horas ininterrumpidamente.

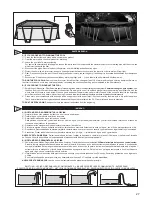
B) SI OPTAMOS POR DESMONTAR LA PISCINA
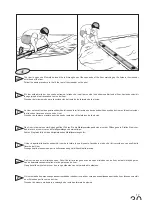
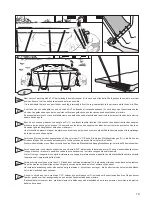
1º- Vaciar la piscina. Medios  Depuradora, Bomba de Achique o Principio de vasos comunicantes. Utilizar el principio de los vasos comunicantes:

Para ello tome la manguera dela depuradora con menor diámetro. Ate un peso a uno de sus extremos y sumérjalo en la piscina . A continuación
sumerja la totalidad de la manguera hasta evacuar el aire de su interior. Con la palma de la mano tapone herméticamente bajo el agua el
extremo libre de la manguera y llévelo hasta donde desee desaguar la piscina . Retire la mano y el agua comenzará a fluir. No utilice ésta
agua para riego, ya que contendrá producto químico.

2º- Limpiar todos los componentes de la piscina con una esponja y un producto jabonoso con PH neutro. Secarlos y guardarlos en un lugar seco

y limpio.
Es normal que después de varios montajes y desmontajes el liner de PVC se dilate y pierda elasticidad.

NUEVA PUESTA EN MARCHA  Leer de nuevo las Instrucciones de este manual desde el principio.

WINTER-SEASON

A) IF YOU CHOOSE NOT TO DISMOUNT THE POOL
1

°

- Clean the liner bottom and sides with a non-abrasive product

2

°

- Treat the water with a chemical product for wintering

3

°

- Leave the pool full of water considering :

For pools with skimmer and refulling pipe, reduce the water level 5 cm underneath the skimmer and close the refulling pipe with the screw tap


which is included with the filter

4

°

- Disconnect the pipes. Do not dismount the skimmer and the refulling and exhaustion pipes

5

°

- Protect the pool with a winter cover, and put a floating element between the cover and the water, in order to protect it from frost

6

°

- Filter : Disconnect it from the pool. Clean it, empty the sand or remove the cartridge, dry it and keep it in a covered and sheltered from dampness

place

7

°

- Accessories : Remove every accessories (ladder, alarm, spotlight, pole …), rinse them with soft water and tidy them away

TO RUN THE POOL AGAIN  Remove the winter cover, install the filter, change at least 1/3 of water and realize a chlorine treatment. Switch on
the filter for at least 8 hours in an uninterrupted way, respecting the continuous working period indicated in the filter manuals.

B) IF YOU CHOOSE TO DISMOUNT THE POOL
1

°

- Empty the pool. Measures : Filter, Automatic pump for handling clean water or communicating vessels system. Communicating vessels system. Use

the hose from your filter with the smallest cross-section. Fix a weight to one of its end and plunge it into the swimming pool. After this, sink the
whole hose, until there is no air inside. With one hand, and under the water stop up hermeticly the end of the hose and take it to the emptying
point. Remove hand, and water will start running. Do not use this water for watering the plants, because it contains chemical products

2

°

- Clean every pool constituents with a sponge and a soap product with a neutral pH. Dry them and tidy them away in a dry and clean place.

That’s normal that after having installed and dismounted the pool several times, the P.V.C liner dilate and loose its elasticity.

TO RUN THE POOL AGAIN Read another time this manual instructions from the beginning

Summary of Contents for J.E.T. POOL TOP

Page 1: ...cumento sin previo aviso Nous nous r servons le droit de modifier totalement oru en partie les caracteristiques de nos articles ou le contenu de ce document sans pr avis Wir behalten uns das recht vor...

Page 2: ...I C I O S T E C N I C O S E N E S PA A COBERTURA NOMBRE TFNO COBERTURA NOMBRE TFNO LERIDA VELECTRO S L 973 21 02 45 LUGO LUCALOR 982 21 90 01 LUGO VAL TIN CALOR 982 41 14 13 MADRID SAT MADRID 91 323...

Page 3: ...D IS IN DANGER ATENCION SIN VIGILANCIA SU NI O EST EN PELIGRO ATTENTION SANS SURVEILLANCE LES ENFANTS SONT EN DANGER ACHTUNG OHNE AUFSICHT BEFINDET SICH IHR KIND IN GEFAHR ATTENZIONE NON VIGILATA PERI...

Page 4: ...a y constantemente Escoja a un responsable para la seguridad y aumente la vigilancia cuando son muchos ba istas en la piscina Disponga de un equipo de flotaci n para los que no saben nadar Ense e a su...

Page 5: ...chiuso Copertura di protezione manuale o automatica correttamente montata e fissata Rilevatore elettronico di caduta in piscina allarme Telefono accessibile nelle vicinanze della piscina portatile o n...

Page 6: ...P R E PA R A C I O N D E L T E R R E N O P R PA R AT I O N D U T E R R A I N V O R B E R E I T U N G D E S B O D E N S P R E PA R A Z I O N E D E L T E R R E N O B E R E I D I N G VA N H E T T E R R...

Page 7: ...amilie ausgelegt Der Boden muss fest und vollkommen waagerecht sein Beachten Sie 1000 l wasser 1 m3 1000 Kg Hier einige Empfehlungen zur Wahl des optimalen Standortes Ihres Schwimmbades W hlen Sie f r...

Page 8: ...ieten sich Ihnen zwei Optionen 1 Die Vorbereitung einer Betonplatte aus Zement usw in den notwendigen Abmessungen f r das Schwimmbad 2 Aufstellung direkt auf dem Boden Boden mit Hilfe von Holzpflocks...

Page 9: ...iscine soit parfaitement install e sur le terrain choisi et cela vitera des probl mes Comment niveler l aide d une longue r gle de ma on aluminium ou bois et d un niveau niveler le terrain en formant...

Page 10: ...Poolbodenschutzabdeckung MPR zu belegen Finition Sur le terrain propre et nivel r partir une fine couche max 1 cm de sable tamis L arroser et le compacter avec un rouleau de jardin V rifier qu il soi...

Page 11: ...installation et d utilisation Bestandteile vor dem Aufbau des Schwimmbeckens berpr fen und einordnen Wenn Sie einen KIT erworben haben bauen sie jetzt die Leiter und Filteranlage ein Beachten Sie die...

Page 12: ...F G H L M 780 x 400 660 x 280 530 x 280 4 10 4 18 18 72 18 36 1 1 4 6 4 14 14 56 14 28 1 1 4 4 4 12 12 48 12 24 1 1 YR 530 A C A C A B B C A B B C YR 660 A C A C A B B B C A B B B C YR 780 A B C A B...

Page 13: ...10 16 32 11 Refs KITYR 2 h 2 2 h 2 h 2 2 530 x 280 cm AR1400 COMPONENTS COMPONENTES ELEMENTS BESTANDTEILE COMPONENTI ONDERDELEN COMPONENTES AR1350 SKIMMER A E D L C C H F G 660 x 280 cm 780 x 400 cm...

Page 14: ...e m p o Nonostante cio sotto d e t e r m i n a t e condizioni climatiche e d uso le caratte ristiche del liner possono variare leggermente Belangrijk De liner welke gebruikt wordt bij de vervaardiging...

Page 15: ...LLTE MINDESTENS VON ZWEI ERWACHSENEN PERSONEN AUSGEF HRT WERDEN F R DEN AUFBAU SOLLTE EINE KONSTANTE WETTERLAGE GEW HLT WERDEN OHNE WIND VERWENDEN SIE VORSICHTSHALBER HANDSCHUHE SIE SIND ZUM MONTIEREN...

Page 16: ...r the skimmer frame 6 Put the gate 3 into the skimmer mouth and clip it in place by pressing the two ends Fit the basket 8 inside the skimmer and finally fit the skimmer body cover 2 USE THE INTAKE CO...

Page 17: ...de liner bevindt af te snijden om eventuele ongelukken tijdens het baden te voorkomen Snijd eerst met behulp van een mesje en via de gleuf van elk van hen de twee gele doorlaatkleppen door die aan de...

Page 18: ...il tout en v rifiant que les extr mites ainsi form es soient arrondies Selon la r f rence ou la mesure de votre piscine suivez les graphiques de la page num ro 10 Begin met de langste dwarsstaven van...

Page 19: ...er Enden ge ffnet F hren Sie die Metalquerstangen durch einer der ffnungen ein Stellen Sie sicher dab die L cher vom Liner und Metallquerstangen bereinstimen Fahren Sie gleichfalls mit den brigbleiben...

Page 20: ...Eisenring H und zum Schlub noch einen D bel F ein Fahren Sie fort gleichfalls mit dem Fub E Endlich verbinden Sie fest beiden F be Stellen Sie sicher dab die fest eingef gt sind F gen Sie die F e in d...

Page 21: ...Streife Die kleinen Metallquerstangen G in die Seiten der Streifen einf gen F be mussen auf senkrechte Position stehen spannen Sie v llig fest die Streifen Weiter wird empfohlen einen D se vorzuziehen...

Page 22: ...age Modell F llen Sie das Becken weiter bis um Mitte des Skimmers HINWEIS geringf gige tropfenbildung an den poolseitenteilen entsteht als nat rliche folge von ausd nstungen des herstellungsmaterials...

Page 23: ...PA R T E 5 MAINTENANCE AND USE GB MANTENIMIENTO Y USO ENTRETIENT ET UTILISATION WARTUNG UND GEBRAUCH MANUTENZIONE E USO ONDERHOUD EN GEBRAUCH MANUTEN O E UTILIZA O E F D I NL P INSTRUCTIONS 21...

Page 24: ...afternoon PLEASE RESPECT THE CONTINUOUS WORKING PERIOD INDICATED IN THE FILTER MANUALS Bottom cleaner for exhaustion manual or automatic Only for pools with skimmer Connect an hose extremity to the b...

Page 25: ...bit du syst me de filtration g n ralement 8h jour avec la temp rature de l eau 21 C Id al 2h le matin 4h la mi journ e 2h l apr s midi Bien respecter les p riodes de fonctionnement en continu indiqu e...

Page 26: ...urto Consiste nell aumentare l indice di cloro sino a 20 ppm circa allo scopo di eliminare i batteri e le alghe Si realizzer solo quando l acqua della piscina proviene da fiumi stagni o dopo un lungo...

Page 27: ...t filtratiesysteem eenmaal per dag in werking om van een volledige verversing van het watervolume verzekerd te zijn en doe dit altijd wanneer het zwembad niet voor het bad in gebruik is zie de handlei...

Page 28: ...26 PA R T E 6 WINTERING GB INVIERNO HIVERNAGE WINTER INVERNO WINTER INVERNO E F D I NL P INSTRUCTIONS...

Page 29: ...normal que despu s de varios montajes y desmontajes el liner de PVC se dilate y pierda elasticidad NUEVA PUESTA EN MARCHA Leer de nuevo las Instrucciones de este manual desde el principio WINTER SEASO...

Page 30: ...montages le liner en PVC se dilate et perde de l lasticit REMISE EN MARCHE Lisez de nouveau les instructions contenues dans ce manuel depuis de d but BERWINTERUNG A WENN DAS POOL NICHT ABGEBAUTWERDEN...

Page 31: ...wijderen trap alarm spot stok met zoet water schoonmaken en opbergen NIEUWE INWERKINGSTELLING Het winterovertrek verwijderen de zuiveringsinstallatie aanbrengen minstens 1 3 van het water verwisselen...

Page 32: ...PA R T E 7 ACCESSORIES GB ACCESORIOS ACCESSOIRES ZUBEH R ACCESSORI ACCESSOIRES ACESS RIOS E F D I NL P INSTRUCTIONS 30...

Page 33: ...AR1400 AR1350 AR1300 SKIMMER 31 AR1160 AR1150...

Page 34: ...MPR TPR 32 CYR CIYR AR1165 AR1100...

Page 35: ...kaart en de kassabon bewaren Voor welke klacht dan ook dient men ons het nummer van het garantiebewijs te melden ZEER BELANGRIJK Lees en volg zorgvuldig de instructies voor de montage en het gebruik v...

Page 36: ...die Verantwortlichkeit f r Besch digungen die durch eine falsche Vorbereitung des Gel ndes verursacht werden Beide F lle sind u er Garantie Bei Reklamationen wird die Vorlage des Kaufbelegs zur Pflic...

Reviews: