49
DO
Use spanner to tighten all gas fittings.
Check gas hose and line connection for
damage, cuts or cracks each time before
using the appliance.
Always leak test with soapy water.
Check main burners regularly for insect nests
such as spiders, ants, etc. Nests are
dangerous and need to be fully removed
before use.
Use the appliance in well ventilated areas.
Cool the appliance before replacing any lid or
cover.
Accessible parts maybe very hot. Always
keep children away from the appliance.
Have the gas cylinder filled by an authorized
Propane supplier.
Always wear protective gloves when
handling hot components.
Close the gas cylinder valve after each use.
Clean the grease tray regularly.
Keep the appliance away from combustible
material, gasoline, flame liquids or vapours.
“Burning off” the barbecue after every use
(for approx 15 minutes) will keep excessive
food residue to a minimum.
DO NOT
Lean over appliance when lighting.
Leave cooking food unattended.
Store combustible material, gasoline or
flammable liquids or vapors within vicinity
of barbecue.
Use appliance with the cover on
Use plastic or glass utensils on the
barbecue.
Use the appliance in strong winds.
Dismantle control valves.
Test for gas leaks with a naked flame.
Store spare gas cylinders in the cabinet.
Lay the gas cylinder down (always keep
upright).
Use appliance indoor.
Modify the constructions of the appliance
or the size of any burner, injector orifice or
any other components.
Move the appliance during use.
Obstruct any ventilation of the appliance.
Allow the flexible gas supply hose or any
electrical cord to come in contact with any
heated surface of the appliance.
Use charcoal or any other solid fuel in this
appliance.
Disconnect any gas fittings while the
appliance is in use.
Use a rusty or dented gas cylinder with a
damaged gas valve.
Summary of Contents for GR-3B31NA
Page 1: ......
Page 2: ......
Page 15: ...15 5 Monter l accolade de porte 10 au chariot avec des vis 24 6 Monter les portes 11 et 12...
Page 17: ...17 9 Fixer le panneau avant gauche 13 l tag re gauche 14 l aide de vis 24 C t gauche C t droit...
Page 18: ...18 10 Montage de la jauge de temp rature 11 Placer les dompteurs de flammes 17...
Page 19: ...19 12 Placer les grilles 18 13 Placer la grille de r chauffement 19...
Page 42: ...42 5 Assemble the door brace 10 to the trolley with screws 24 6 Assemble the doors...
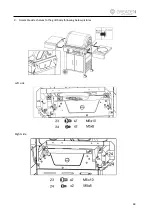
Page 44: ...44 9 Assemble side shelves to the grill body following belowpictures Left side Right side...
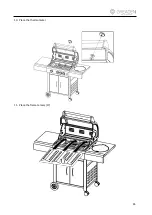
Page 45: ...45 10 Place the thermometer 11 Place the flame tamers 17...
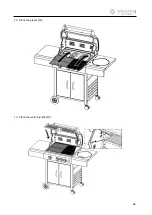
Page 46: ...46 12 Place the grates 18 13 Place the warming rack 19...
Page 59: ......


