50
CONNECTING THE GAS CYLINDER TO THE APPLIANCE
This appliance is only suitable for use with low-pressure butane, propane or LPG mixture
gas and fitted with the appropriate low-pressure regulator via a flexible hose. The barbecue is set to
operate:
*
28mbar regulator with butane gas
*
37mbar regulator with propane gas
*
30mbar or a 50mbar regulator with LPG mixture
Please consult your LPG dealer for information regarding a suitable regulator for the gas cylinder.
REGULATOR AND HOSE
Use only regulator and hose approved for LP Gas at the above pressures.
The life expectancy of the regulator is estimated as
2 years
.
It is recommended that the regulator is changed within
2 years
of the date of manufacture.
The use of wrong regulator or hose is
unsafe
;
always check that you have the correct items
before operating the barbecue.
The hose used must conform to the relevant standard for the country of use. The length of the hose must
be 0.7 meters (minimum) and 1.5 meters (maximum). Worn or damaged hose must be replaced. Ensure
that the hose is not obstructed, kinked,
or in contact with any part of the barbecue other than at its
connection
. It is recommended that the hose is changed within 1 year of the date of manufacture.
STORAGE OF APPLIANCE
Storage of an appliance indoors is only permissible if the cylinder is disconnected and removed from the
appliance. When the appliance is not to be used for a period of time it should be stored in its original
packaging and stored in a dry dust free environment.
GAS CYLINDER
The gas cylinder should not be dropped or handled roughly! If the appliance is not in use, the cylinder
must be disconnected. Replace the protective cap on the cylinder after disconnecting the cylinder from
the appliance.
Cylinders must be stored outdoors in an upright position and out of the reach of children. The cylinder
must never be stored where temperatures can reach over 50
C. Do not store the cylinder near flames,
pilot lights or other sources of ignition.
DO NOT SMOKE while using.
Summary of Contents for GR-3B31NA
Page 1: ......
Page 2: ......
Page 15: ...15 5 Monter l accolade de porte 10 au chariot avec des vis 24 6 Monter les portes 11 et 12...
Page 17: ...17 9 Fixer le panneau avant gauche 13 l tag re gauche 14 l aide de vis 24 C t gauche C t droit...
Page 18: ...18 10 Montage de la jauge de temp rature 11 Placer les dompteurs de flammes 17...
Page 19: ...19 12 Placer les grilles 18 13 Placer la grille de r chauffement 19...
Page 42: ...42 5 Assemble the door brace 10 to the trolley with screws 24 6 Assemble the doors...
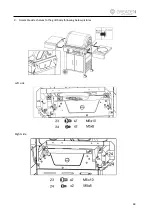
Page 44: ...44 9 Assemble side shelves to the grill body following belowpictures Left side Right side...
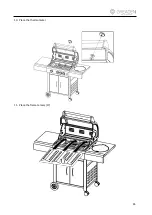
Page 45: ...45 10 Place the thermometer 11 Place the flame tamers 17...
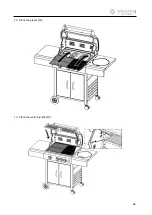
Page 46: ...46 12 Place the grates 18 13 Place the warming rack 19...
Page 59: ......


