52
TO CHECK FOR LEAKS
Make 2-3 fluid ounces of leak detecting solution by mixing one part washing up liquid with 3 parts water.
Ensure the control valve is “OFF”.
Connect the regulator to the cylinder and ON/OFF valve to the burner, ensure the connections are secure
then turn ON the gas.
Brush the soapy solution on to the hose and all joints. If bubbles appear you have a leak, which must be
rectified before use.
Retest after fixing the fault. Turn OFF the gas at the cylinder after testing.
If leakage is detected and cannot be rectified, DO not attempt to cure leakage but consult your gas dealer.
LIGHTING YOUR BARBECUE
This barbecue is designed for use outdoors, away from any flammable materials. It is important that there
are
no overhead obstructions
and that there is a minimum distance of 1 m from the side or rear of the
appliance. It is important that the ventilation openings of the appliance are not obstructed. The barbecue
must be used on a level, stable, non-flammable surface. The appliance should be protected from direct
draughts and shall be positioned or protected against direct penetration by any trickling water (e.g. rain).
Parts sealed by the manufacturer or his agent must not be altered by the user. No modifications should be
made to any part of this barbecue and repairs and maintenance should only be carried out by a registered
service engineer.
Summary of Contents for GR-3B31NA
Page 1: ......
Page 2: ......
Page 15: ...15 5 Monter l accolade de porte 10 au chariot avec des vis 24 6 Monter les portes 11 et 12...
Page 17: ...17 9 Fixer le panneau avant gauche 13 l tag re gauche 14 l aide de vis 24 C t gauche C t droit...
Page 18: ...18 10 Montage de la jauge de temp rature 11 Placer les dompteurs de flammes 17...
Page 19: ...19 12 Placer les grilles 18 13 Placer la grille de r chauffement 19...
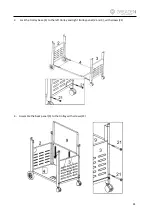
Page 42: ...42 5 Assemble the door brace 10 to the trolley with screws 24 6 Assemble the doors...
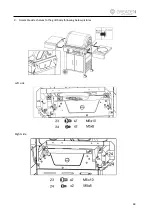
Page 44: ...44 9 Assemble side shelves to the grill body following belowpictures Left side Right side...
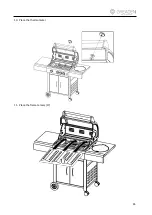
Page 45: ...45 10 Place the thermometer 11 Place the flame tamers 17...
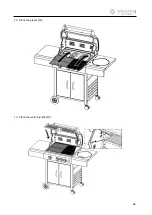
Page 46: ...46 12 Place the grates 18 13 Place the warming rack 19...
Page 59: ......


