54
LIGHTING INSTRUCTIONS :
1.
Read instruction before lighting.
2.
Open the lid and make sure all the knobs are on the OFF position.
3.
Connect the regulator to the gas bottle. Turn the gas supply “ON” at the cylinder. Check with
the
use of soapy water for any gas leakage between the bottle and the regulator.
4.
Push down and turn the knob anticlockwise to HIGH position (a clicking sound is heard). The
burner can now be lit. If the burner does not light, repeat this process.
5.
Adjust the heat by turning the knob to the High/Low position.
6.
To light up other burners, repeat the same process for the adjacent burner and continue in
sequence until all the burners are lit.
7.
To turner the barbecue OFF turn the cylinder valve or regulator switch to the “OFF” position
and
then turn all of the co
ntrol knobs on the appliance clockwise to the “OFF” position.
If any burner fails to ignite, turn the control knob off (clockwise) and also turn the cylinder valve off. Wait
five minutes before attempting to relight with ignition sequence.
Before cooking for the first time, operate the barbecue for about 15 minutes with the lid closed and the
gas turned on high. This will “heat clean” the internal parts and dissipate odour from the painted finish.
(the color of cooking area may change slightly. This is normal and it is nature of material).
Clean your barbecue after each USE.
DO NOT
use abrasive or flammable cleaners, as it will damage the
parts of the product and may start a fire. Clean in warm soapy water.
Summary of Contents for GR-3B31NA
Page 1: ......
Page 2: ......
Page 15: ...15 5 Monter l accolade de porte 10 au chariot avec des vis 24 6 Monter les portes 11 et 12...
Page 17: ...17 9 Fixer le panneau avant gauche 13 l tag re gauche 14 l aide de vis 24 C t gauche C t droit...
Page 18: ...18 10 Montage de la jauge de temp rature 11 Placer les dompteurs de flammes 17...
Page 19: ...19 12 Placer les grilles 18 13 Placer la grille de r chauffement 19...
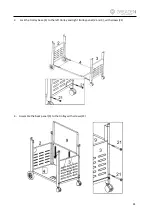
Page 42: ...42 5 Assemble the door brace 10 to the trolley with screws 24 6 Assemble the doors...
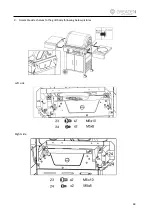
Page 44: ...44 9 Assemble side shelves to the grill body following belowpictures Left side Right side...
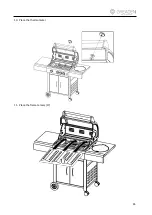
Page 45: ...45 10 Place the thermometer 11 Place the flame tamers 17...
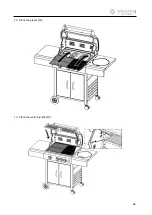
Page 46: ...46 12 Place the grates 18 13 Place the warming rack 19...
Page 59: ......


