55
ABNORMAL OPERATION
Any of the following are considered to be abnormal operation and may require servicing:
-
Yellow tipping of the burner flame.
-
Sooting up of grill plates.
-
Burners not igniting properly.
-
Burners failing to remain alight.
-
Burners extinguished by trolley doors.
-
Gas valves, which are difficult to turn.
CLEANING AND CARE
This appliance should be checked and serviced by an authorized service person every year to ensure the
appliance remains in a safe operation condition.
All cleaning and maintenance should be carried out when the barbecue is cool and with the
fuel supply turned
OFF
at the gas cylinder. DO NOT remove the drip tray until the BBQ has
cooled.
GENERAL GRILL CLEANING
DO NOT
mistake brown or black accumulation of grease and smoke for paint. Interiors of gas grills are
not painted at the factory (and should NEVER be painted). Apply a strong solution of detergent and water
or use a grill cleaner or scrubbing brush on the insides of grill lid and bottom. Rinse and allow to
completely air dry. DO NOT apply a caustic grill / oven cleaner to painted surfaces.
Plastic parts: wash with warm soapy water and wipe dry.
DO NOT
use abrasive cleaners, degreasers or a concentrated grill cleaner on plastic parts. Damage to
and failure of parts can result.
Porcelain surfaces: because of glass-like composition, most residue can be wiped away with backing soda
/ water solution or specially formulated cleaner. Use nonabrasive sourcing powder for stubborn stains.
Painted surfaces: wash with mild detergent or nonabrasive cleaner and warm soapy water. Wipe dry with
a soft nonabrasive cloth.
•
Stainless steel surfaces: to maintain your grill’s high quality appearance, wash with mild detergent
and
Summary of Contents for GR-3C41A
Page 1: ......
Page 2: ...31...
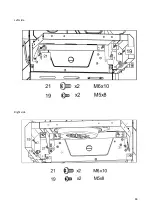
Page 15: ...44 Left side Right side...
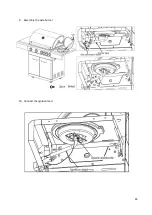
Page 16: ...45 9 Assembly the side burner 10 Connect the ignition lead...
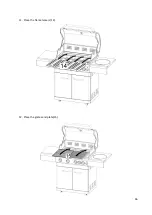
Page 17: ...46 11 Place the flame tamers 14 12 Place the grates and plate 15...
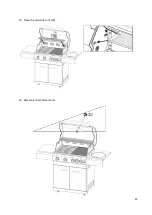
Page 18: ...47 13 Place the warming rack 16 14 Assembly the thermometer...
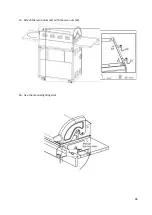
Page 19: ...48 15 Attach the two hooks 22 with the two nuts 23 16 Use the manual lighting stick...
Page 30: ......

