background image

33 


(CADERO) 

*Do not move the appliance during use 

GREADEN 

their mixture 

or their mixture 

or their mixture 

Main burner 

Injector 

Side burner 
Infrared rear 
burner 

0,95 mm 
0,89 mm 

0,95 mm 
0,89 mm 

0,95mm 

0,89 mm 

0,84 mm 
0,79 mm 


TECHNICAL INFORMATIONS 


*For outdoor use only 

*Read the instructions before using the appliance 

*WARNING: accessible parts may be very hot. Keep young children 

0063/17 

away


*This appliance must be kept away from flammable materials during 
use 

Code d’identification :0063CL7042


*Turn off the gas supply at the gas cylinder after use 


*Do not modify the appliance 


Appliance Name 

Outdoor Use Gas Grill 

Serial No. 

Model No. 

CBD-410BC /GR-3C41A 


Appliance Category 


I3+(28-30/37) 


I3B/P (30) 

I3B/P (37) 


I3B/P (50) 

Type of gas 

Butane 

Propane 

Butane, Propane or   Butane, Propane 

Butane, Propane 

Gas Pressure 

28-30mbar 

37mbar 

30mbar 

37 mbar 

50mbar 


Total Heat Input (Hs) 

17,8 KW 

17,8 kW 

20,1 kW 

18 kW 

gas consumption 

1294 g/h 

1294 g/h 

1462g/h 

1309 g/h 


(* Injector size marked clearly on the burner valve) 

IMPORTANT: 

Read the following instructions carefully and be sure your barbecue is properly installed, assembled and 
cared for. Failure to follow these instructions may result in serious bodily injury and/or property damage. 

If you have any questions concerning assembly or operation, consult your dealer or LPG Gas Company. 

Never store a spare cylinder under the barbecue shelves or inside the trolley housing. Any LPG cylinder not 
attached to the BBQ for use should be stored outdoors and well away from the appliance. 

Summary of Contents for GR-3C41A

Page 1: ......

Page 2: ...31...

Page 3: ...THE MANUAL CAREFULLY BEFORE ASSEMBLING AND OPERATING THE APPLIANCE ACCESSIBLE PARTS MAY BE VERY HOT PLEASE KEEP YOUNG CHILDREN AWAY PLEASE RETAIN THE MANUAL FOR FUTURE REFERENCE PLEASE REMOVE ANY TRA...

Page 4: ...Appliance Category I3 28 30 37 I3B P 30 I3B P 37 I3B P 50 Type of gas Butane Propane Butane Propane or Butane Propane Butane Propane Gas Pressure 28 30mbar 37mbar 30mbar 37 mbar 50mbar Total Heat Inpu...

Page 5: ...are more than 7kgs need to be placed outside the trolley duringuse The maximum loading weight for the side tables is 20pounds 9kgs Please do notplace anything more than 20 pounds 9kgs on the side tab...

Page 6: ...n whenlit Have a match or barbecue lighter ready before the propane is turned on If the barbecue does not ignite turn the control valves off then wait five minutes before trying again KEEP THE LIGHTER...

Page 7: ...refilled 5 When transporting a propane tank make sure it remains in an upright position Milk cartons work well for this as they are just the right size to hug the tank securely The best place for the...

Page 8: ...ISCONNECTION THE GAS BOTTLE ALWAYS CARRY OUT A LEAK TEST PLEASE SEE LEAK TEST DETAILS IN USER MANUAL PLEASE MAKE SURE THAT THE SIDE BURNER IS CONNECTED AND TIGHTENED BEFORE USING THE BBQ FAILURE TO CO...

Page 9: ...esulting in small brown specs on the surface If scouring is required to remove stubborn cooking residues use a soft nylon pad non abrasive DO NOT USE ABRASIVE CLEANING COMPOUNDS use cream type If the...

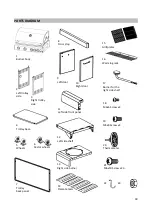
Page 10: ...op 9 Left door 10 Right door 11 Left side front panel 15 Grill plates 16 Warming rack 17 Burner for the right side shelf 18 M4x6 Screw x2 19 M5x8 Screw x4 5 Wheels 6 Castor wheels 12 Left side shelf 1...

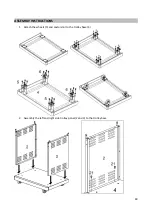
Page 11: ...40 ASSEMBLY INSTRUCTIONS 1 Attach the wheels 5 and castors 6 to the trolley base 4 2 Assembly the left and right side trolley panel 2 and 3 to the trolleybase...

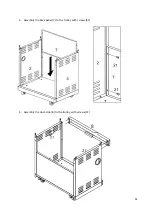
Page 12: ...41 3 Assembly the back panel 7 to the trolley with screws 21 4 Assembly the door stop 8 to the trolley with screws 21...

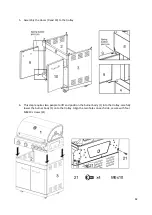
Page 13: ...and 10 to the trolley 6 This step requires two people to lift and position the burner body 1 into the trolley carefully lower the burner body 1 onto the trolley Align the two holes on each side secure...

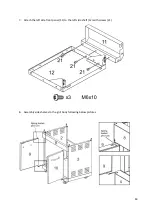
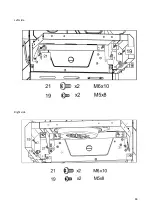
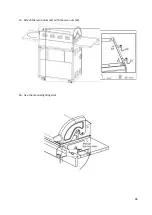
Page 14: ...43 7 Attach the left side front panel 11 to the left side shelf 12 with screws 21 8 Assembly side shelves to the grill body following below pictures...

Page 15: ...44 Left side Right side...

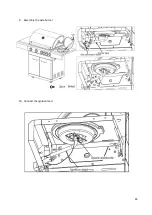
Page 16: ...45 9 Assembly the side burner 10 Connect the ignition lead...

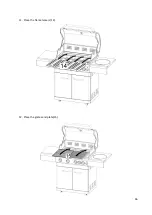
Page 17: ...46 11 Place the flame tamers 14 12 Place the grates and plate 15...

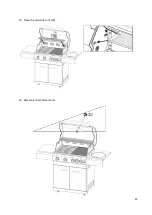
Page 18: ...47 13 Place the warming rack 16 14 Assembly the thermometer...

Page 19: ...48 15 Attach the two hooks 22 with the two nuts 23 16 Use the manual lighting stick...

Page 20: ...ery use for approx 15 minutes will keep excessive food residue to a minimum DO NOT Lean over appliance when lighting Leave cooking food unattended Store combustible material gasoline or flammable liqu...

Page 21: ...is changed within 2 years of the date of manufacture The use of wrong regulator or hose is unsafe always check that you have the correct items before operating the barbecue The hose used must conform...

Page 22: ...cylinder regulator burner and burner parts Spiders and insects can nest within and clog the burner tubes A clogged burner can lead to a fire beneath the appliance Clean burner holes with a heavy duty...

Page 23: ...r gas dealer LIGHTING YOUR BARBECUE This barbecue is designed for use outdoors away from any flammable materials It is important that there are no overhead obstructions and that there is a minimum dis...

Page 24: ...ft clearance to objects that can catch fire or sources of ignition such as pilot lights on water heaters live electrical appliances etc Apartment dwellers Check with management to learn the requiremen...

Page 25: ...he burners are lit o To turner the barbecue OFF turn the cylinder valve or regulator switch to the OFF position and then turn all of the control knobs on the appliance clockwise to the OFF position If...

Page 26: ...nd smoke for paint Interiors of gas grills are not painted at the factory and should NEVER be painted Apply a strong solution of detergent and water or use a grill cleaner or scrubbing brush on the in...

Page 27: ...t each burner up and away from valveopenings INSECTS FACT sometimes spiders and other insects climb into the grill tubes attached to the burners The spiders spin webs build nests and lay eggs The webs...

Page 28: ...ach burner tube and burner several times C Wear eye protection use an air hose to force air into the burner tube and out the air ports Check each port to make sure air comes out each hole 5 Wire brush...

Page 29: ...lean thoroughly with strong hot soapy water solution Rinse with water and allow to completely dry NEVER USE OVEN CLEANER Interior of Barbecue bottom Remove residue using brush scraper and or cleaning...

Page 30: ......

Reviews: