Section 2: Operating Instructions
NTS2507, NTS2509, & NTS2511 s/n+ 2019+ NTS Seeder 313-900M
7/1/19
22
Hook-up Pull-Type Seeder
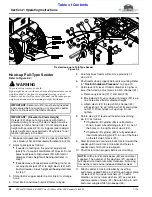
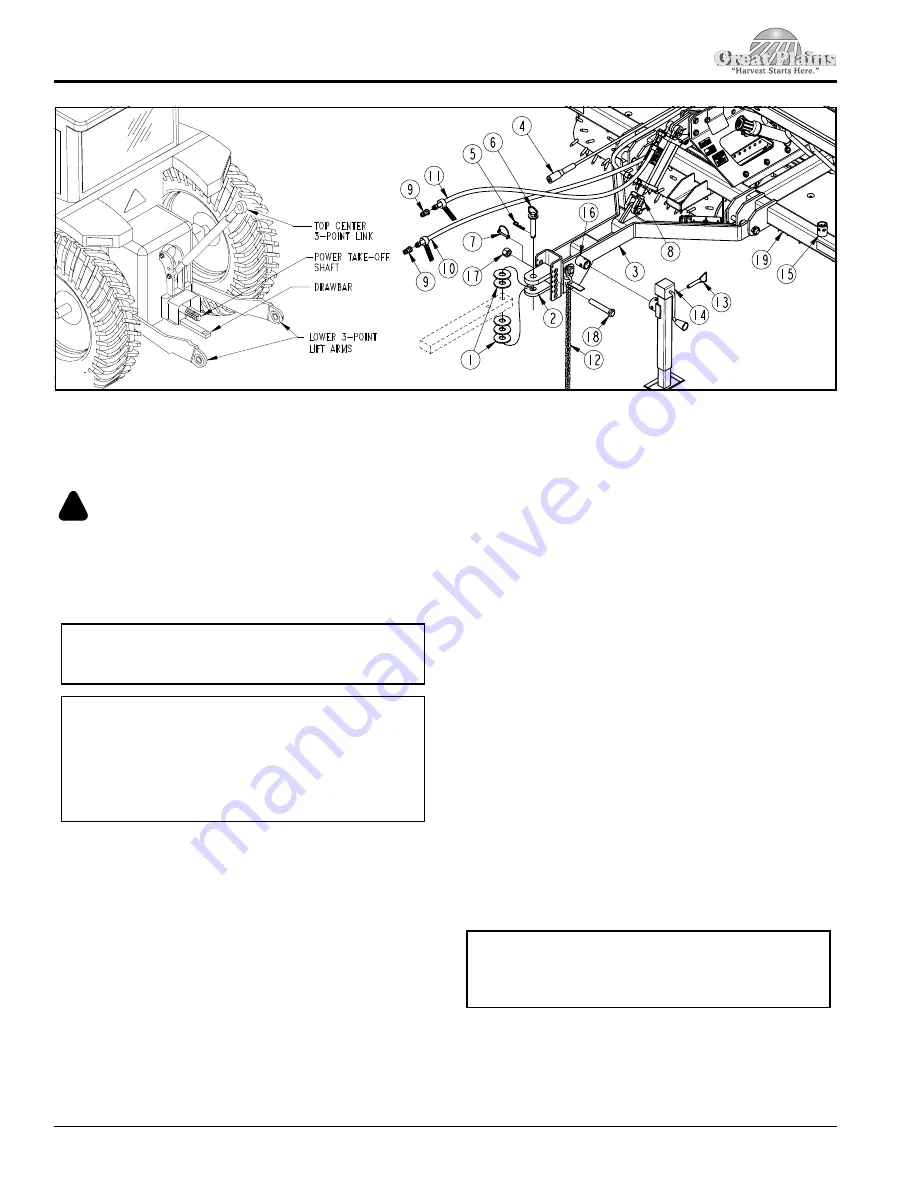
Refer to Figure 2-4:
WARNING
!
To avoid serious injury or death:
1.
Make certain park jack (#14) is properly attached to
jack mount (#16) and secured with detent pin (#13).
2.
Adjust park jack as follows:
•
If seeder is resting on the ground, adjust park
jack (#14) to support mainframe (#19) level. Do not
adjust park jack to align clevis (#2) with tractor
drawbar. Clevis height will be adjusted later in
step 7.
•
If seeder was unhooked raised off the ground, do
not adjust park jack (#14) to align clevis (#2) with
tractor drawbar. Clevis height will be adjusted later
in step 7.
3.
Store tractor’s upper center 3-point link in its storage
hook.
4.
Start tractor and raise 3-point lift arms fully up.
IMPORTANT:
Detent pin (#13) must be fully inserted
and secured before working on or around a seeder
that is not hooked to the tractor drawbar.
IMPORTANT:
(Drawbar to Clevis Height)
If clevis (#2) does not align properly with tractor
drawbar during hook-up, the clevis height must be
adjusted in hitch channel (#4). Do not adjust clevis
height with park jack (#14). Using park jack to adjust
clevis height can cause hydraulic lift cylinders to not
function properly in the field.
5.
Carefully back tractor within close proximity of
clevis (#2).
6.
Shut tractor down properly before dismounting. Refer
to
7.
Hold clevis (#2) level. If tractor drawbar is higher or
lower than clevis, adjust clevis in hitch channel (#4).
a. Remove nylock nut (#17) and bolt (#18).
b. Move clevis (#2) up or down until clevis (#2) is up
one hole above tractor drawbar height.
c. Attach clevis (#2) to clevis hitch channel (#4)
with existing 1"-8 x 6" GR5 bolt (#18) and nylock
nut (#17). Draw nylock nut up snug. Do not
tighten.
8.
Rotate clevis (#2) level and insert wire retaining
pin (#7) as follows:
•
If hydraulic lift cylinder (#8) is retracted as
shown, insert wire retaining pin (#7) in one of
the holes on the right side of clevis (#2).
•
If hydraulic lift cylinder (#8) is fully extended
insert wire retaining pin (#7) in one of the holes
on the left side of clevis (#2).
9.
Start tractor and continue to back tractor toward the
seeder until hole in tractor drawbar and holes in
seeder clevis hitch (#2) are aligned.
10. Shut tractor down properly before dismounting.
11. Attach seeder to tractor drawbar by inserting
customer supplied hitch pin (#6) through upper plate
of clevis (#2), two upper washers (#1), tractor
drawbar, as many lower washers (#1) as possible,
and lower plate of clevis (#2). Secure hitch pin with
customer supplied hitch pin keeper (#5).
NOTE:
Hitch pin (#6) and keeper (#5) are customer
supplied. The number of flat washers (#1) required
will depend on tractor drawbar thickness. Not using
flat washers can cause increased drawbar wear.
Tractor Hook-up to Pull-Type Seeder
Figure 2-4
37298
39056

