❏
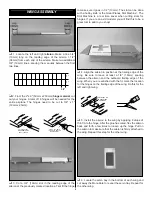
1. Locate the left and right
aileron.
Make a line 3/4"
(19mm) long on the leading edge of the aileron 1-1/2"
(38mm) from each end of the aileron. Make two additional
3/4" (19mm) lines, spacing them equally between the first
two lines.
❏
2. From the 2" x 9" (50mm x 230mm)
hinge material
, cut
out your hinges. A total of 16 hinges will be needed for the
entire airplane. The hinges need to be cut to 3/4" x 1"
(19mm x 25mm).
❏
3. Cut a 3/4" (19mm) slot in the leading edge of the
aileron at the previously marked locations. Trial fit the hinge
to make sure it goes in 1/2" (13mm). The slot can be done
with a hobby knife or the Great Planes Slot Machine
™
. The
Slot Machine is a real time saver when cutting slots for
hinges. If you are an avid modeler you will find this to be a
great tool to add to you shop!
❏
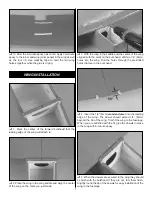
4. Align the aileron in position at the trailing edge of the
wing. Be sure to leave at least a 1/6" (1.6mm) spacing
between the aileron and the outboard trailing edge of the
wing. When you are satisfied with the fit, mark the location
for the hinges on the trailing edge of the wing. Do this for the
left and right wing.
❏
5. Install the aileron to the wing by applying 6 drops of
thin CA to the hinge. After the glue has cured, flex the aileron
back and forth a few times to loosen up the hinge. Pull on
the aileron to make sure that the aileron is firmly attached to
the wing. Repeat this step for the other wing.
❏
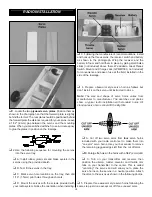
6. Locate the servo bay in the bottom of each wing and
cut away the MonoKote to reveal the servo tray. Repeat for
the other wing.
TEMPORARY PIN
TO KEEP HINGE
CENTERED
THIN
CA
AND #11 BLADE
WITH HOBBY KNIFE
CUT HINGE SLOT
DRILL A 3/32" HOLE
1/2" DEEP, IN CENTER
OF HINGE SLOT
1"
1"
3/4"
WING ASSEMBLY
5


