❏
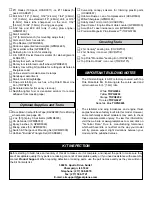
10. Prepare 1 oz. of 30-minute epoxy. The same as when
joining the bottom wing, thoroughly coat one side of the
joiners and all mating surfaces of one side of the center
panel and the adjoining outer panel with epoxy. Take the
strings back out of the ends of the joining panels. Slide the
panels together until they are about 3/4" [19mm] apart. Tie
the ends of the strings together. Slide the panels the rest of
the way together, simultaneously pulling the string from the
aileron servo opening. Tightly tape the panels together,
wiping away excess epoxy as it squeezes out.
❏
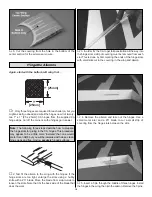
11. Pulling the string from both ends (from the servo
opening in the outer panel and from the other end of the
center panel), shift the string back and forth a few times to
make sure it does not get glued inside the wing. Do this a
few times as the epoxy continues to harden. Set the wing
aside until the epoxy fully hardens.
❏
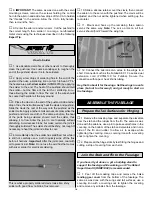
12. Remove the masking tape and join the other outer
panel to the other side of the center panel. Be sure not to
glue the string in the wing. After the epoxy hardens remove
the masking tape and tighten the covering.
Start with the bottom, right wing so yours looks like the
photos the first time through…
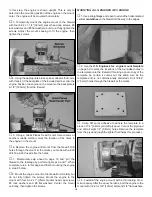
Refer to this photo while mounting the aileron servo.
❏
1. Test fit the aileron servo in the servo opening in the
bottom of the wing. If necessary, use a hobby knife to
enlarge the opening to fit the servo.
❏
2. Connect a 12" [300mm] servo extension wire to the
aileron servo. Slip a 1-1/2" [38mm] piece of heat shrink
tubing supplied with this kit over the connection, then
carefully shrink the tubing with a small flame (from a
soldering torch) or a heat gun. Tie the string in the servo
opening to the end of the servo wire. Pull the wire through
the wing and out of the hole in the middle. Place the servo
in the opening.
❏
3. Drill 1/16" [1.6mm] holes into the wing for mounting the
servo. Mount the servo using the screws that came with it.
❏
4. IMPORTANT! Remove the screws and the servo. Add
a few drops of thin CA to the holes to harden the “threads.”
Allow the CA to fully harden, then remount the servo.
❏
5. Make a one-arm servo arm by cutting off the unused
arms. Install the arm on the servo.
❏
6. Thread a 4-40 nut and a 4-40 clevis onto a 4-40 x 4-
1/2" [115mm] pushrod. Slip a silicone retainer over the
clevis. Connect the clevis to the middle hole of a nylon
control horn.
❏
7. Position the control horn on the aileron with the
pushrod in alignment with the servo arm. Make sure the
horn is on the hardwood plate built into the aileron. Push the
control horn into the aileron until the spikes on the bottom
lock into the wood. Using care not to drill all the way through
the aileron, drill four 3/32" [2.4mm] holes for mounting the
horn. Mount the control horn to the aileron with four #4 x 1/2"
[13mm] screws.
Hook Up the Ailerons
13


