41
❏
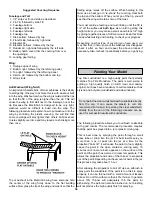
8. The ElectriCub kit contains a decal sheet including the
small emblems which would be difficult to reproduce
otherwise. These decals are the “peel-and-stick” type. Cut
around the individual decal emblems, peel off the protective
backing and apply them to your airplane.
❏
9. The large wing numbers and lightning bolts (for the side
of the fuse) are not provided in decal form; therefore, you
may cut these out of covering film or trim sheet material
using the outlines shown on the plan.
❏
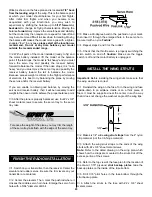
1. The ElectriCub comes with two 3-1/2" long strips of
Velcro
®
Brand Touch Fastener material, which have a sticky
backing. One of the strips has a fuzzy texture and the other
consists of hundreds of tiny plastic hooks. Cut each strip in
half to make pieces 1-3/4" long.
❏
2. Use a vacuum cleaner or a brush to remove all traces
of sanding dust from the front surface of the battery bench
back and the bottom of the F-2 opening.
❏
3. Apply a few drops of medium or thick CA to the front
surface of the battery bench back and the bottom of the
F-2 opening. Spread the CA out to a thin layer, using a stick
or your finger covered with plastic wrap. Allow the CA to
cure. This will give the Velcro a better surface to adhere to.
❏
4. Peel the protective backing from one of the hook strips
and press it firmly in place on the front surface of the battery
bench back. Install the second hook strip on the bottom of the
F-2 opening (on top of the 1/4" x 1/4" balsa cross braces).
❏
5. Peel the backing from one of the fuzzy strips and press
it firmly in place on the end of your motor battery.
❏
6. Remove the battery hatch and slide the motor battery
through the F-2 opening and into place against the hook
strip on the battery bench back. With the battery in position,
mark on the battery the location of where the battery is
resting on the hook strip in the F-2 opening.
❏
7. Remove the battery and apply the second fuzzy strip
to the battery where you made the marks.
❏
8. To use this system of securing the battery, turn the
fuselage upside-down, remove the hatch, insert the battery
until you feel it make contact with the battery bench, then
raise the front of the battery until the Velcro engages. To
remove the battery, do not try to pull it straight out.
Instead, push down on the front of the battery to separate
the front Velcro, then pull straight forward, separating the
rear Velcro.
❏
1. Reinstall the rudder and elevator control horns,
pushrods, clevises, receiver, receiver battery, servo tray
with servos, receiver switch and toggle switch.
❏
2. Route the receiver antenna out the side of the fuse just
under the TE of the wing. Anchor the antenna to the top of
the fin with a rubber band and T-pin.
Note: Do not shorten the antenna! Leave any excess
trailing behind the model.
Reinstall the Radio System
Install the Motor Battery


