14
❏
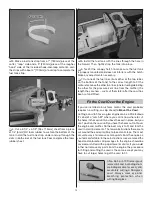
3. Make a fuel tank strap from a 7" [180mm] piece of the
softer, “loop” side and a 9" [230mm] piece of the rougher,
“hook” side of the included hook-and-loop material. Join
the strips with about 4" [100mm] of overlap to complete the
fuel tank strap.
❏
4. Cut a 2-1/4" x 4-1/2" [55 x 115mm] sheet from a piece
of 1/4" [6mm] RC foam rubber to cushion the bottom of the
tank. Install the fuel tank strap under and up through the
slots in both sides of the fuel tank fl oor and place the foam
rubber sheet.
❏
5. Install the fuel tank with the lines through the hole in
the fi rewall. Then, tightly strap the tank into place.
❏
6. Test-fi t the canopy hatch to make sure the fuel tank
is properly mounted and does not interfere with the hatch.
Make any adjustments necessary.
❏
7. Cut one of the fuel lines (from either of the two tubes
on the bottom of the tank) to the correct length to fi t the
carburetor. Leave the other two lines (one for fueling/defueling,
the other for the pressure/vent line from the muffl er) the
length they are now – we’ll cut them later after the cowl has
been cut and fi tted.
Fit the Cowl Over the Engine
If you’ve installed a brushless motor, the cowl probably
requires no cutting, so skip ahead to
Mount the Cowl
.
Cutting a cowl to fi t over a glow engine can be a little tedious.
It’s kind of a “catch 22” where you can’t know where to cut
the holes in the cowl until you have the cowl in place, but you
can’t position the cowl until you have the holes cut to fi t over
the engine and muffl er. So the best way is to fi t and trim the
cowl in small increments. The fewer obstructions there are to
cut around the easier it will be to take small steps. The most
accurate way is to remove as many parts from the engine as
you feel comfortable. In these instructions we’ve removed the
head and carburetor. All passages to the engine should be
covered or stuffed with a paper towel or similar. If you would
rather not remove any parts from the engine, the procedure
for fi tting and cutting the cowl is the same, except you may
have to cut larger holes to get the cowl to fi t.
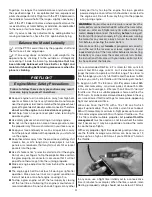
A No. 569 or 570 Dremel grout
removal bit and a sanding drum
are indispensable for easily and
accurately cutting a fi berglass
cowl. Always wear eye and
breathing protection when
cutting fi berglass.


